Opening the Collection Balance Report, click More.
1. Click Processes from the Menu Bar.
2. Click Collection.
3. Click Collection Balance Report.
Or, use the keyboard shortcut: [ALT] [p] [c] [r].
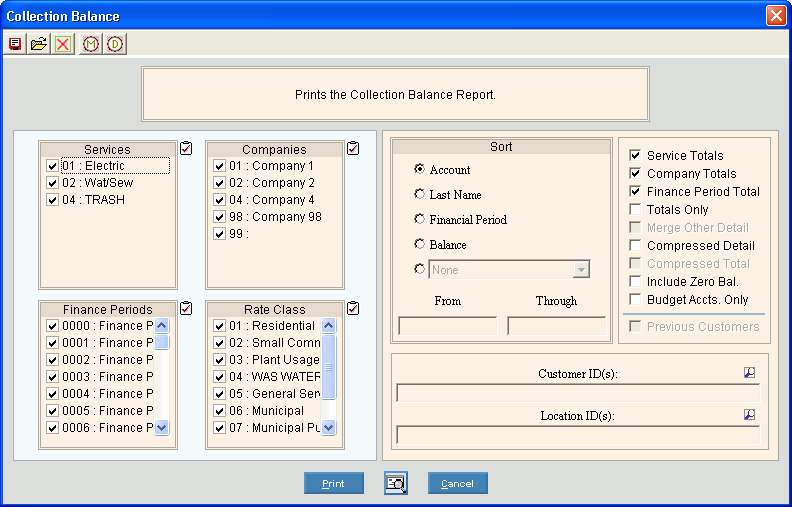
Collection Balance Report Window Example:

Choosing the selections at the prompt window, click More.
|
Collection Balance Report Prompt Options Tip: To see more information about a field, click the hyperlink for the field name. |
|
|
To select the Services to print, click to check the appropriate Services listed. Tip: To quickly select or de-select all Services listed, click the Check All |
|
|
To select the Companies to print, click to check the appropriate Companies listed. Tip: To quickly select or de-select all Companies listed, click the Check All |
|
|
To select the Finance Periods to print, click to check the appropriate Finance Periods listed. Tip: To quickly select or de-select all Finance Periods listed, click the Check All |
|
|
To select the Rate Classes to print, click to check the appropriate Rate Classes listed. Tip: To quickly select or de-select all Rate Classes listed, click the Check All |
|
|
Sort |
To choose a sort option, click to select the appropriate button. Sort Options:
|
|
Range Note: The Range fields are only active if you select Account as the Sort option. |
|
|
From |
To limit the report to a range of Accounts, enter the appropriate beginning Customer ID in the range. Tip: To include all Accounts, leave blank. |
|
Through |
To limit the report to a range of Accounts, enter the desired ending Customer ID in the range. Tip: To include all Accounts, leave blank. |
|
Service Totals |
To print totals for each Service Code at the end of the report, select this box. |
|
Company Totals |
To print totals for each Company at the end of the report, select this box. |
|
Finance Period Totals |
To print totals for each Finance Period at the end of the report, select this box. |
|
Totals Only |
To print totals only while excluding the detail, select this box. |
|
Merge Other Detail |
To print regular charges and other charges combined in one column, select this box. Note: This field is only available if extended aging information is set up. For more information, contact NDS Technical Support. |
|
Compressed Detail |
To print the report in a 132-column format, select this box. |
|
Compressed Total |
To include a Total column in the 132-column report format, select this box. Notes:
|
|
Include Zero Balance |
To include accounts with zero balances on the report, select this box. |
|
Budget Accts. Only |
To print budget accounts only, select this box. To print all accounts, de-select this box. |
|
Previous Customers |
To include both current and previous customer balances for a location, select this box. Tip: This field is only active if you select to print specific locations by entering Location IDs. |
|
Entry Options:
|
|
|
To print selected locations on the report, enter the Location IDs. (up to 12 characters) Tip: To build a list of locations:
|
|
|
|
To begin printing to the Windows® default printer, click Print, or press [ENTER]. Keyboard shortcut: [ALT + p] |
|
|
To print to the Print View window, click here. |
|
|
To escape from the print routine, click Cancel. Keyboard shortcut: [ALT + c] |
Report Sample(s), click More.