Adding Existing Liens to EDIFICE
Use these instructions to add existing liens that were manually created outside of the system to EDIFICE customers.
Note: If you have liens for more than 1 lien year, you must perform the process for each lien month and year individually.
A function key must be set up to add existing liens to the liens workfile. Please contact NDS Support at 1-800-649-7754 for assistance setting this up.
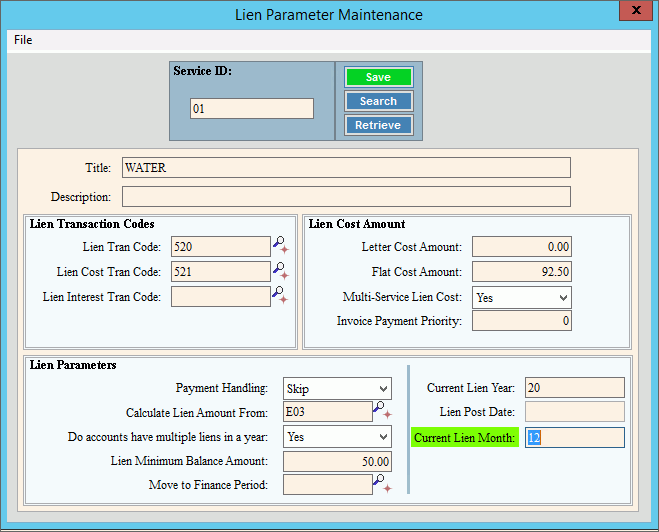
To add existing liens to the system set the lien month and year on the Lien Parameter to be the month and year of the liens to add. Set the Lien Parameters for each service for which you are processing liens.
Go to Processes --> Liens --> Lien Parameter Maintenance.
1. Retrieve the service for the liens.
2. Edit the line month and year to be the appropriate lien month and year.
3. Verify that the transaction
codes assigned for liens and lien costs are correct. Click Fast Maintenance ![]() to verify that the debit/credit GL accounts assigned to the transaction
codes are correct.
to verify that the debit/credit GL accounts assigned to the transaction
codes are correct.
4. Click Save to save your work.
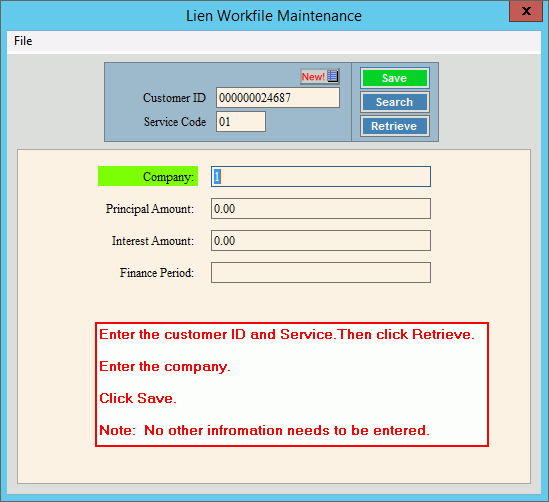
After the Lien Parameters are set, the customers need to be added to the Lien Workfile. This must be done for each account that has an existing lien that was manually created outside of the system.
Press F12 to open Liens Workfile Maintenance.
After the customers have been added to the workfile, use Lien Transaction entry to enter the transactions to apply the lien amounts. A transaction must be entered for the lien and a separate transaction detail line must be entered for the lien cost, if applicable.
Go to Processes --> Liens --> Transaction Entry.
![]()
1. At the Billing Run screen, enter LIENS for the billing run ID and click Retrieve. Enter the service from and to dates. Click Proceed.
2. At the Lien Transaction Entry screen do the following:
a. Enter the customer ID and press [Enter].
b. Enter the transaction code for the lien.
c. At the Charge field enter the amount of the lien fee or lien costs, if applicable.
d. At the Age field enter the lien month and year.
e. Press [Enter] to add the transaction.
3. Repeat the steps to add lien costs, if applicable
4. Then, click commit to move to sewer, if applicable.
After all transactions have been entered, run the lien transaction journal to proof your work and verify the lien amounts and lien costs amounts.
1. Go to Processes --> Lien --> Print Transaction Journal.
2. Uncheck the Print Customer Class totals box.
3. Click Account for the sort type.
4. Choose to print or view the journal on the screen.
After the line transactions have been proofed and approved, run the Post Lien Transactions routine to update the system with the lien information. The Post will move the lien amounts and lien costs to the lien balances and create GL journal entries.
Note: Generally, you will set the Post Lien Transactions to update the current GL period. However, if manual GL entries were made previously to account for the liens manually maintained, you will need to make reversing entries to keep the GL in balance.
Go to Processes --> Liens --> Post Transactions.
![]()
1. Select the services, companies and books to post.
2. Enter the appropriate GL period.
3. Click Proceed.
4. Verify that the post information is correct.
5. Then, click Ok and then choose the appropriate printer.
When the post has completed, if you need to add existing liens for another year, return to Lien Parameters Maintenance and change the lien month and year to the desired month and year. Then, for each month and lien year that is applicable repeat each of the steps above to enter the existing liens.