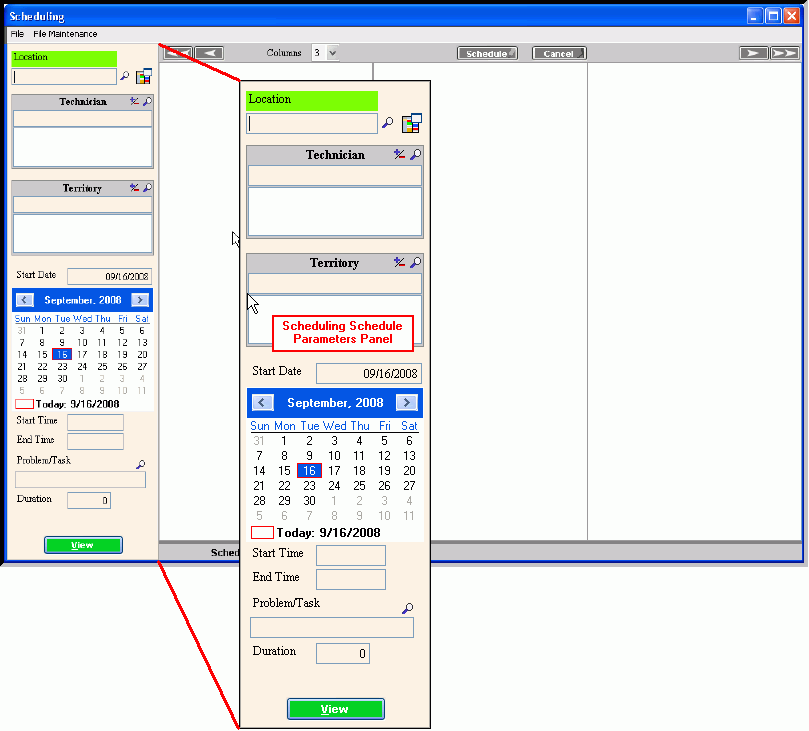
Scheduling Window - Side Panel Schedule Parameters Panel
Use the Scheduling Parameters Panel in Scheduling to limit the Appointment Book Area to the desired time slots. Using the Scheduling Parameters you can highlight the time slots mutually agreeable to customers, and the technicians. Based on the parameters you enter, the appointment book displays for the days and technicians specified. Times that are not available are grayed out for the dates and locations specified. The table following the window example describes the Scheduling Parameters Panel in the Scheduling Window Side Panel (the left pane in this example).
Scheduling Parameters Examples:
If a customer wants to make an appointment for a specific date between 9 am and noon, you can enter the scheduling parameters to display the qualified times. To do this enter the Start Date, and then enter a Start Time of 9:00 and an End Time of 12:00.
If a customer wants to make an appointment on a specific date from 3 -5 pm, you enter a Start Date, and maintain a Start Time of 15:00 and an End Time of 17:00.
1. To display the Scheduling Parameters Panel, open Scheduling.
2. To apply the parameters to the Appointment Book Area in the Scheduling Window:
a. Enter the Location ID and technicians, if applicable.
b. Change the remaining parameters, if applicable.
c. Click View ![]() .
.
Scheduling Window - Schedule Parameters Panel Example:

|
Scheduling Side Panel Schedule Parameters Area Prompts Tip: To see more information about a field, click the hyperlink for the field name. |
|
|
To identify the territory for the location, enter the Location ID. (up to 12 characters) Tips:
|
|
|
To limit the technician or technicians to include in the Appointment Book, enter the Technician Code and click Add/Delete Tips:
|
|
|
To enter another territory associated with the location, click Add/Delete Tips:
|
|
|
Entry Options:
|
|
|
Scheduling Calendar |
|
|
|
To select a date, click the desired date. Tips:
|
|
|
To display the month before the currently displayed month, click the Back Arrow. |
|
|
To display the month following the currently displayed month, click the Forward Arrow. |
|
Dimmed Dates |
Dates that are dimmed or "grayed out" indicate dates for the previous month or the next month. Example: In the pop-up example above, the following dates are dimmed:
Tip: To select a dimmed date and to display the associated month, click the desired date. |
|
To specify the beginning time the customer is available for an appointment, enter the Start Time, if applicable. (hh:mm, military time) Example: Enter 9:00 for 9:00 am Tips:
|
|
|
To specify the ending time the customer is available for an appointment, enter the ending time, if applicable. (hh:mm, military time) Example End Time: Enter 13:00 for 1:00 pm Tips:
|
|
|
To identify the problem or task the appointment is for and the time needed, enter the Problem/Task Code. (up to 3 characters) Tip: To search for the appropriate Problem/Task Code, click Search |
|
|
To limit the display of time slots in the Appointment Book, enter the minimum duration, if applicable. (3.0 numeric, in whole minutes) |
|
|
|
To update the Appointment Book with the schedule parameters entered, click View. |