Create Reversing Entries
Use the Create Reversing Entries routine to generate reversal journal entries for unposted adjustments made in the previous period. Any reversing entries specified with Journal Code RE during Enter Manual Transactions can be automatically reversed by this routine during the following Period. This routine creates reversing entries for all RE journal entries in the Reversing Entry Period (usually the prior Period).
For additional information, click More.
Tips:
You can only reverse RE transactions that have not yet been posted.
The reversing routine checks if entries for the Reversing Entry Period have already been reversed. It also checks if the entered periods have been closed.
The report is available in the following formats:
80-Column Format: Set during System Parameters at the Print tab.
132-Column Format: Set during System Parameters at the Print tab.
Enhanced View: Set during Print View at the View menu.
Example:
In November use the Enter Manual Transactions program to enter a reversal journal entry with Journal CodeRE. Credit Account Number #992500 and Debit Account #999900.
Manual Entry in November:
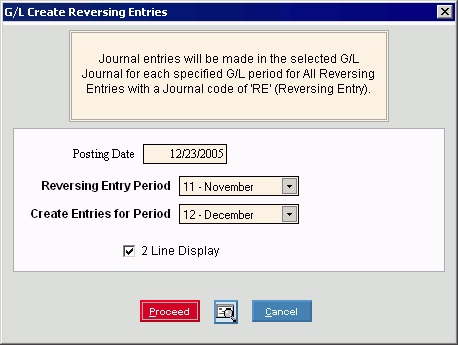
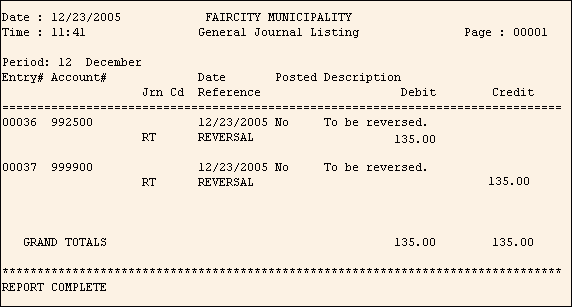
In December run Create Reversing Entries, entering November as the Reversing Entry Period and December as the Create Entries for Period. The program automatically creates the RT transactions to reverse the RE transactions. Now Account #992500 is debited and #999900 is credited.
Create Reversing Entries in December:
Directions:
To see directions for...
Opening the Create Reversing Entries routine, click More.
Basic Method (from the G/L Module):
Click Daily Work from the Menu Bar.
Click
Create Reversing Entries.
Tip: Or,
use the keyboard shortcut:
[ALT]
[a] [v].
Advanced Method (from another NDS Module):
Click General Ledger from the Menu Bar.
Click Daily Work.
Click
Create Reversing Entries.
Tip: Or,
use the keyboard shortcut: [ALT]
[g] [a] [v].
Note: To
activate the General
Ledger menu in another module, the G/L
Application Control must be set up for the module during installation.
Create Reversing Entries Window Example:
Choosing the selections at the prompt window, click More.
Create Reversing Entries Prompt Options Tip: To see more information about a field, click the hyperlink for the field name. | |
To accept the system date as the Posting Date, click [TAB]. Or, you can enter a different Posting Date. (mmddccyy - century and slashes optional) Note: If the Posting Date falls outside the Period Closing Date, you will a warning. | |
Reversing Entry Period |
To specify the period of the journal entries that are to be reversed, click the period in the drop-down list. Tip: This is usually the period prior to the Create Entries for Period. |
Create Entries for Period |
To specify the period for the journal entries that will reverse the adjustments in the Reversing Entry Period, click the period in the drop-down list. Tip: This is usually the period following the Reversing Entry Period. Note: If you specify a Period that is already closed, you will see the following message: You can either correct the Period. Or, if you are certain that you want to post to a closed Period, you can open the Period using Period Descriptions Maintenance. |
2 Line Display |
Specify if you want the report to print two lines for each credit and debit transaction. Options: |
To run the routine and begin printing to the Windows® default printer, click Proceed, or press [ENTER]. Keyboard shortcut: [ALT + p] | |
To run the routine and print to the Print View screen, click here. | |
To escape from the routine:
|
Report Sample(s), click More.