Opening the Management Reports, click More.
-
Basic Method (from the G/L Module):
-
Click Reporting from the Menu Bar.
-
Click Management Reports.
Tip: Or, use the keyboard shortcut: [ALT] [r] [r].
-
Advanced Method (from another NDS Module):
-
Click General Ledger from the Menu Bar.
-
Click Reporting.
-
Click Management Reports.
Tip: Or, use the keyboard shortcut: [ALT] [g] [r] [r].
Note: To activate the General Ledger menu in another module, the G/L Application Control must be set up for the module during installation.
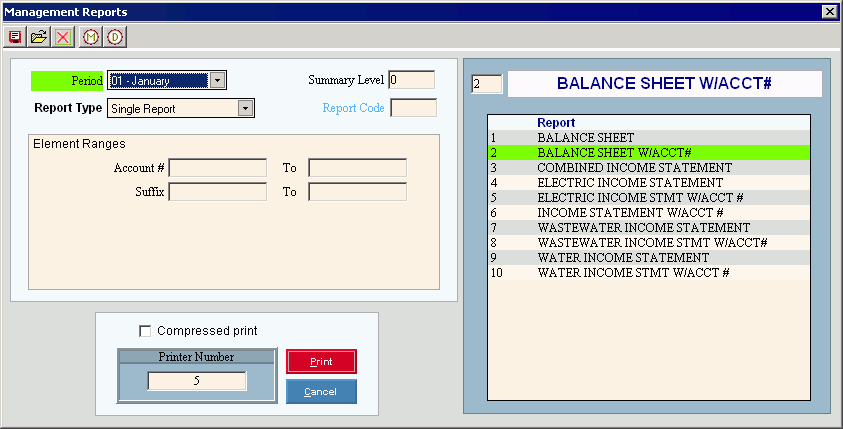
Management Reports Window Example:

Choosing the selections at the prompt window, click More.
|
Management Reports Prompt Options Tip: To see more information about a field, click the hyperlink for the field name. | |
|
To specify the Period for the report, click the Period in the drop-down list. (predefined) | |
|
To specify the Report Type, click one of the following options in the drop-down list:
Tips:
| |
|
Enter the Summary Level for the detail lines in the report, or enter 0 (zero) to use the level that was designed for the report. (2.0 numeric) Tip: You can construct financial statements so that totals and subtotals have a higher summary level than the regular detail lines. Therefore, you can print a summary version of a report, which excludes the detail lines. Example: Assume that the detail lines for a report are defined as Summary Level 1, the subtotals are Summary Level 2, and the Totals are Summary Level 3.
| |
|
To specify that you want to print reports defined with a specific Report Code, specify Use Report Code in the Report Type and then enter the Report Code here. (up to 6 characters) Tip: The Report Code groups reports together that you frequently print at the same time. | |
|
Element Ranges |
To limit the report to a range of Account Number Elements, enter the from and to values (inclusive). (format varies) Tip: The list of Elements varies among facilities. |
|
Compressed Print |
To compress the printed output for some printers, select the box. |
|
Report Number |
If you specified that you want to print a Single Report in the Report Type field...
Tip: Report Number is active only when you specify Single Report for the Report Type. |
|
Report List |
Displays the Report Number and Report Name of the Management Reports defined for your facility. Tip: This list varies among installations. |
|
Printer |
Displays the default printer number. For more information, see Printing Options. |
|
|
To generate the report, click Print or press [ENTER]. Keyboard shortcut: [ALT + p] |
|
|
To escape from the print routine, click Cancel. Keyboard shortcut: [ALT + c] |
Report Sample(s), click More.

