 Important:
XML W-2 Magnetic Filing
Use the XML W-2 Magnetic Filing routine to create the file of employee W-2s for electronic submission to the Social Security Administration.
 Important:
For reconciliation purposes, it is important that you print the W2 Mag File Report that is part of this routine. The totals on the W2 Magnetic File Report should match the W-2 totals accumulated during the Print W-2 Forms routine.
Only run this routine if you are submitting the W-2 Magnetic file electronically to the government.
If the XML W-2 Magnetic file is returned by the government because of errors, you must make the necessary corrections during W-2 Master FM, run the XML W-2 Magnetic Filing routine again and re-send the file. If you re-submit the file, you must check Resubmit and maintain the Wage File Identifier provided by the Social Security Administration. For more information, please contact NDS Technical Support.
The W-2 Magnetic file does not include employees with no earnings or withholdings to report.
Employers are required by law to maintain at least the previous four years W-2 Magnetic files. After sending your XML W-2 Magnetic file, it is important that you rename your file to include the year. Make sure to save copies of each applicable year on some type of removable media such as, a tape, diskette, or CD-ROM or save copies on a network drive that is backed up regularly.
XML W-2 Magnetic Filing is the fifth step in the W-2 Reporting process. For more information, see the W-2 Reporting Procedure.
Directions:
To see directions for...
Opening the XML W-2 Magnetic Filing routine, click More.
1. Click Utilities from the Menu Bar.
2. Click Year End.
3. Click W-2 Reporting.
4. Click
XML W-2 Magnetic Filing.
Tip: Or,
use the keyboard shortcut:
[ALT]
[t] [y] [w] [ARROW DOWN].
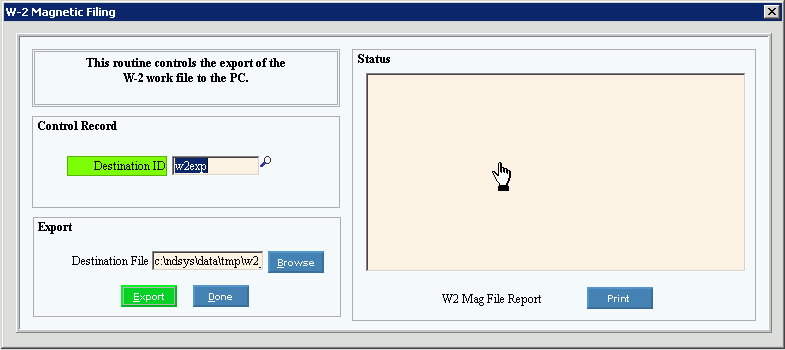
XML W-2 Magnetic Filing Window Example:

Choosing the selections at the prompt window, click More.
|
XML W2 Magnetic Filing Routine Prompt Options Tip: To see more information about a field, click the hyperlink for the field name. | |
|
Control Record | |
|
To specify the characteristics of the file and the destination of the generated W2 Magnetic file, enter the Destination ID defined during W2 Destination File Maintenance. (up to 20 characters) Note: To
search for a Destination ID, click Search | |
|
Export | |
|
To accept the Definition File Name associated with the Destination ID as the Destination File, press [TAB] or enter another Definition File Name. (up to 80 characters) Note: To search for
the appropriate file name, click Browse | |
|
|
To run the routine and generate the report, click Export, or press [ENTER]. Keyboard shortcut: [ALT + e] |
|
|
To close the window when the routine is finished, click Done. Keyboard shortcut: [ALT + d] |
|
Status |
Note: For directions for this field, see the table below. |
|
|
Note: For directions for this field, see the table below. |
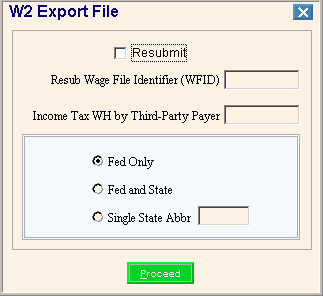
After you click, Export the following window displays:

|
XML W2 Magnetic Filing Routine Prompt Options Tip: To see more information about a field, click the hyperlink for the field name. | |
|
Resubmit |
To identify that the W2 Magnetic file is being resubmitted to the government, click to select the box. Notes:
|
|
Resub Wage File Identifier (WFID) |
If you are re-submitting the XML W2 Magnetic file and you checked Resubmit, you must maintain the Wage File Identifier that you received from the SSA when the previous W2 Magnetic file was returned unprocessed by the SSA. Note: This field is only active, if you selected Resubmit above. |
|
Income Tax WH by Third Party Payer |
If income tax was withheld for a third party payer, enter the amount. Otherwise, leave blank.(7.2 numeric) Tip: This amount is submitted with the Totals record. |
|
Fed |
To specify the information to include in the file, click a choice:
Notes:
|
|
Single State Abbr |
If you selected Single State Abbr, enter the 2-character postal service state abbreviation for the state information to include in the W2 Magnetic file. (2 characters) Note: This field is only active, if Single State Abbr is selected. |
|
|
To run the routine, click Proceed or press [ENTER]. Keyboard shortcut: [ALT + p] |
|
Status |
Displays information pertaining to the various phases of the XML W2 Magnetic Filing process to guide you.
|
|
W2 Mag File Report |
To list the W2 Magnetic File Report, click W2 Mag File Report. Notes:
|
|
|
To begin printing the W2 Magnetic Filing Status Report or the W2 Magnetic File Report to the Windows® default printer, click Print or press [ENTER]. Keyboard shortcut: [ALT + p] Tip: To toggle between the W2 Magnetic File Report and the W2 Magnetic Filing Status Report, click W2 Mag File Report. |
|
|
To close the XML W-2 Magnetic Filing routine when Complete displays and the routine is finished, click Done. Keyboard shortcut: [ALT + d] |
Report Sample(s), click More.
To see an example of the report, click XML W2 Magnetic Filing Report Sample.
To see an example of the report, click XML W2 Magnetic Filing Status Report Sample.