Opening W-2 Master File Maintenance, click More.
1. Click Utilities from the Menu Bar.
2. Click Year End.
3. Click W-2 Reporting.
4. Click W-2
Master.
Tip: Or, use the keyboard
shortcut: [ALT] [t]
[y] [w] [w].
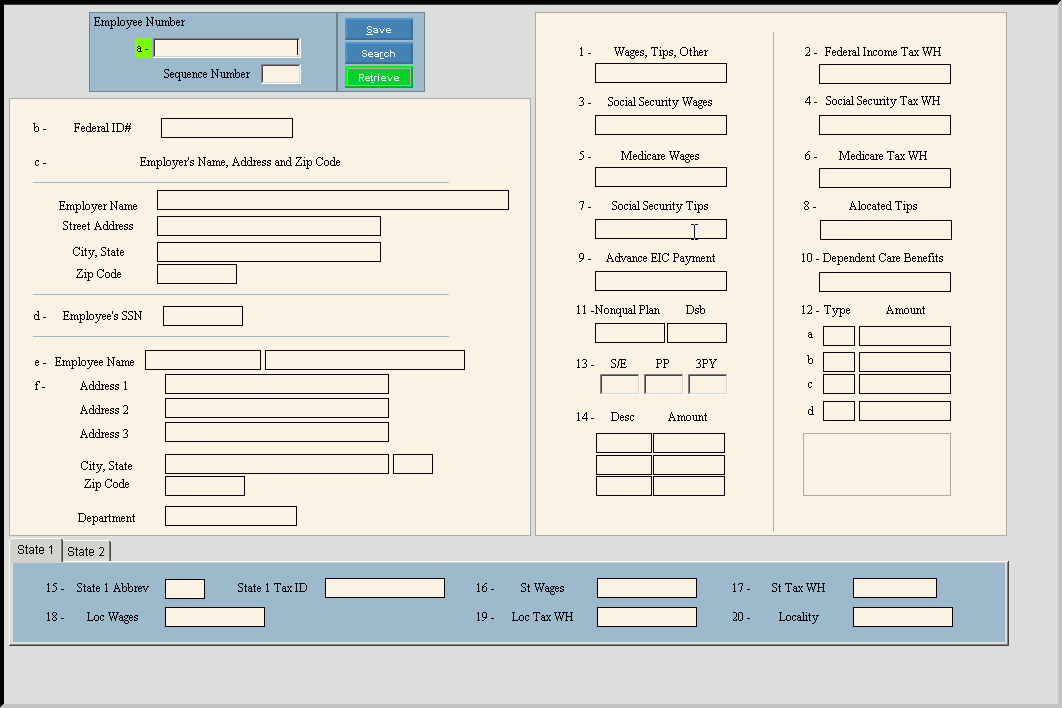
W-2 Master Maintenance Window Example:
Creating a new Employee W-2 Master Record, click More.
W-2 Master File Maintenance Prompts Tip: To see more information about a field, click the hyperlink for the field name. |
|
Enter the Employee Number for the employee W-2. (7.0 numeric) Tip:
If you are building a new Employee W-2 Master Record,
New |
|
Sequence Number |
Displays the first Sequence Number for the employee, if an employee has multiple W-2s. To change, enter the new Sequence Number for the appropriate W-2 for the employee. |
|
To update the new or changed information, click Save or press [ENTER]. Keyboard shortcut: [ALT + s] |
To avoid losing data, you must save new or changed records. |
|
|
To view all of the existing employee W-2 records, click Search. From the Search list you can select the record to change or delete. Keyboard shortcut: [ALT + r] |
|
To display an existing employee W-2 Record, enter the Employee Number and click Retrieve, or press [ENTER]. Keyboard shortcut: [ALT + t] |
Federal ID# |
Displays the submitter's Federal ID Number. (up to 11 characters, xx-xxxxxxx) |
Note: The following fields contain the information maintained during W2 Employer Master Maintenance and are display-only. |
|
Employer Name |
Displays the employer name. |
Street Address |
Displays the employer street address. |
City, State |
Displays the employer city name and state. |
Zip Code |
Displays the employer zip code. |
Note: The employee name and address is maintained during Employee Master Maintenance. |
|
Employee Name |
To accept the employee first name and middle initial in the first box, press [TAB] or enter another employee first name and middle initial. To accept the employee last name in the second box, press [TAB] or enter the employee last name. (up to 15 characters per box) |
Address 1, 2, 3 |
To accept the 3 lines for the employee mailing address, press [TAB] or enter the new mailing address lines. (up to 20 characters, per line) |
To accept the city name and state for the employee mailing address, press [TAB] or enter another city and state. |
|
To accept the zip code or the Zip+4 code for the employee mailing address, press [TAB] or enter another zip code. (up to 11 characters) |
|
To accept the department number for the employee, press [TAB] or enter another department number. (up to 8 characters) |
|
To accept the dollar amount for the employee's accumulated wages, tips and other compensation, press [TAB] or enter another amount. (7.2 numeric) |
|
To accept the accumulated dollar amount for the federal income tax withheld for the employee, press [TAB] or enter another amount. (7.2 numeric) |
|
To accept the accumulated dollar amount for the employee's social security wages, press [TAB] or enter another amount. (7.2 numeric) |
|
To accept the accumulated dollar amount withheld for social security taxes for the employee, press [TAB] or enter another amount. (7.2 numeric) |
|
To accept the dollar amount accumulated for the employee's Medicare wages, press [TAB] or enter another amount. (7.2 numeric) |
|
To accept the accumulated dollar amount withheld for the employee's Medicare tax, press [TAB] or enter another amount. (7.2 numeric) |
|
To accept the accumulated dollar amount for the employee's social security tips, press [TAB] or enter another amount, if applicable. (7.2 numeric) |
|
To accept the dollar amount allocated for employee tips, if you are a food and beverage establishment, press [TAB] or enter another amount or press [TAB] to skip. (7.2 numeric) |
|
Advance EIC Payment |
To accept the dollar amount paid to the employee as advance earned income credit, press [TAB] or enter another amount, if applicable. (7.2 numeric) |
Dependent Care Benefits |
To accept the dollar amount for dependent care benefits under a dependent care assistance program paid or incurred by the employer for the employee, press [TAB] or enter another amount. (7.2 numeric) |
Nonqual Plan Dsb |
Enter the amounts from box, 1, 3 or 5 that was earned in a prior year, if applicable. (7.2 numeric) |
Note: You can maintain up to four types and amounts for Box 12. |
|
Type |
Displays the IRS Type Code that pertains to the amount in box 12. Tip: The IRS Type Code is the Box 12 Type setting maintained during W2 Box Table Maintenance. |
Amount |
Enter the dollar amount that pertains to the code in box 12. (7.2 numeric) |
S/E |
Enter Yes if the employee is a statutory employee whose earnings are subject to social security and Medicare taxes but not subject to federal income tax withholding. Otherwise, enter No. |
PP |
Enter Yes if the employee actively participated in a retirement plan for part of the year. Otherwise, enter No. |
3PY |
To specify a Sick Pay Indicator, enter 1. Otherwise, please leave blank. (1.0 numeric) |
Note: You can maintain up to three types and amounts for box 14. |
|
Desc |
Displays the description associated with the amount in box 14. Tip: This description is maintained during W2 Box Table Maintenance. |
Amount |
Enter the amount associated with box 14. (7.2 numeric) |
|
|
|
To
display State 1 information, click State
1. |
State 1 Abbrev |
Displays the state abbreviation associated with the State Code assigned to the employee. |
State 1 Tax ID |
Enter the state tax identification number. (up to 11 characters) |
To accept the accumulated dollar amount for the employee's state wages, press [TAB] or enter another dollar amount. (7.2 Numeric) |
|
To accept the accumulated dollar amount withheld for the employee's state taxes, press [TAB] or enter another dollar amount. (7.2 numeric) |
|
Loc Wages |
To accept the accumulated dollar amount for the employee's local wages, if applicable, press [TAB] or enter another amount. (7.2 numeric) |
Loc Tax WH |
To accept the accumulated dollar amount withheld for the employee's local taxes, if applicable, press [TAB] or enter another dollar amount. (7.2 numeric) |
Locality |
To accept the name of the locality for local withholding tax, if applicable, press [TAB] or enter another locality name. (up to 7 characters) |
Editing an Employee W-2 Master Record, click More.
![]() CAUTION: To
avoid losing data, you must save new or changed records.
CAUTION: To
avoid losing data, you must save new or changed records.
1. To display the record
to be changed, enter the Employee Number and click Retrieve
![]() , or press
[ENTER].
, or press
[ENTER].
Keyboard shortcut: [ALT
+ t]
Tip: If you do not know the Employee Number, you can
click Search ![]() to see a list of Employee
W-2 Master Records.
to see a list of Employee
W-2 Master Records.
2. To position the pointer to the information that you want to change, press [TAB] or click the field using the mouse.
3. Enter the data changes.
4. To complete the edit
process, click Save ![]() , or press [ENTER].
, or press [ENTER].
Keyboard shortcut: [ALT
+ s]
Deleting an Employee W-2 Master Record, click More.
1. To display the record
to be deleted, enter the Employee Number and click Retrieve
![]() , or press
[ENTER].
, or press
[ENTER].
Keyboard shortcut: [ALT
+ t]
Tip: If you do not know the Employee Number, you can
click Search ![]() to see a list of Employee
W-2 Master Records.
to see a list of Employee
W-2 Master Records.
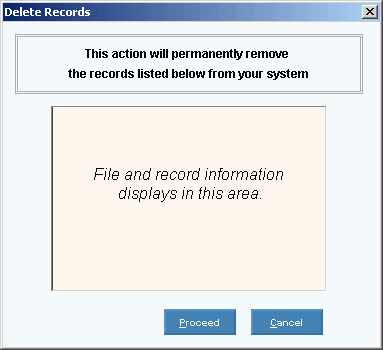
2. Click File
from the Menu Bar,
and next click Delete.
Keyboard shortcut: [ALT]
[f] [d]
3. At the Delete Records
prompt, click Proceed
to delete the record, or click Cancel
to escape from the delete routine.
Example:
Note: After you click Proceed,
you will see the following message on the Status
Bar.
![]()