Year-End Journal Listing Instructions
Use the Year-End Journal Listing to print year-end journal entry transactions for the closing Period, period 14. The closing transactions are generated by the Clear and Close Accounts routine and by Year-End Adjusting Entries Maintenance. You can select if you want to print posted or unposted transactions.
Tips:
This report is also known as the Journal Listing, Closing Report, Adjusting Journal, or Print Closing Journal.
The Clear and Close Accounts routine generates journal entry transactions with Journal Code G.
Year-End Adjustments Processing generates journal entry transactions with Journal Code YE.
For information about the sequence of running the Year-End steps, refer to the General Ledger Runbook.
You can re-run this report at any time.
Generate this report whenever you run the Clear and Close Accounts routine and whenever you perform Year-End Adjusting Entries Maintenance. Review the report for accuracy.
This listing provides the same information as the General Journal Listing, however the prompt options are different.
This listing is also similar to the General Journal Listing. However, this listing provides the option to specify if you want to print posted or unposted journal entries, whereas the General Journal Report always prints both posted and unposted entries.
For more information about running reports, see Print View.
For more information about the buttons on the toolbar, see the Reporting Toolbar.
To see an example of the report, click Year-End Journal Listing Sample.
Directions:
To open click Year
End from the Menu and
then click Year-End Journal Listing.
Tip: Or, use the keyboard
shortcut: [ALT] [y] [l].
From the Adjusting Journal Processing screen click Print Journal.
Year-End Journal Listing Window Examples:
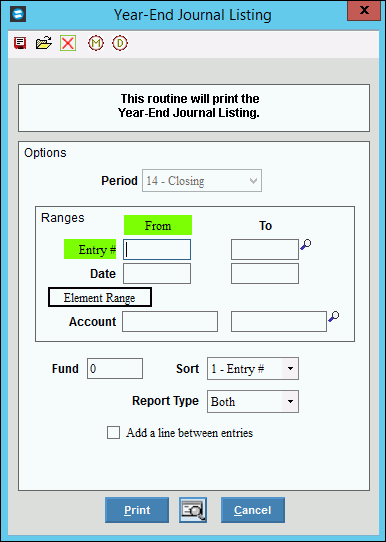
Year-End Journal Listing Prompt Options
|
|
Report Writer Prompts Tip: For more information, refer to the Report Writer - Overview. |
|
Report Writer Directions |
1. If you want to use
existing report settings, click Open
2. If you want to save
the current report settings, click Save
3. To generate the report:
Tip: For more information, refer to the Report Writer - Overview. |
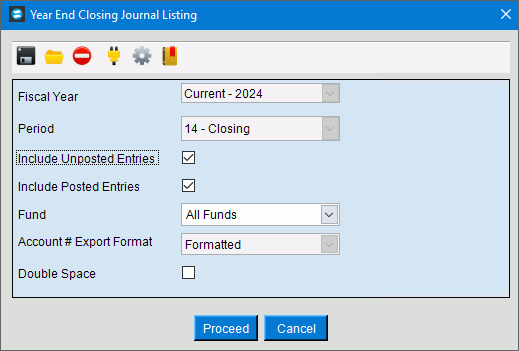
Year End Journal Listing Report Options Window: Tip: This appears after the Report Writer screen.
|
|
Fiscal Year |
Select the year to report. |
Displays 14 as the closing period. |
|
Fund |
To specify a single GL Fund to report, enter the Fund # here. To report all funds, select All Funds. |
Account # Export Format |
If you are exporting the report information, select if the GL Account numbers should be exported as a formatted number or unformatted number. |
Double Space |
To have the lines on the report double spaced, check the Double Space box. Or to list the entries single spaced, leave the box blank. |
Element Range Options Tip: This area displays a list of the Elements defined for the Account Number. The list of Elements varies according to the settings for each facility. You can select accounts to print on the report by entering ranges of Elements. |
|
Account Element Range |
To select ranges of account numbers by the account element, enter the From and To options to enter a starting and ending element range. Note: In the example above the element range is Fund, Location and Account Number. The list of elements varies according to the settings for your organization. You can select accounts to be reported by entering ranges of elements. |
|
To generate the report, click Proceed or press [ENTER]. Or to escape from the print routine,
click Cancel |
![]()


 .
.