History Analysis Report Instructions
Use the History Analysis Report to analyze customer usage and consumption by rate class, by transaction code, by billing rates or by customer consumption. This history summary report offers many options that allow you to organize the report information for your purposes. The information on the report comes from the History Summary table.
Tips:
Do not confuse the following reports, which all contain customer usage information:
History Analysis Report - Provides a historical summary analyzing usage by rate class, transaction code, billing rates, or by customer consumption for a specified time period. The Report information comes from the hist_sum table.
Billing Detail Analysis - Provides a historical detail analysis of customer usage by rate class, transaction code, billing rates, customer consumption or by billing detail. This report looks similar to the History Analysis Report but the report information comes from the ubdet table.
Customer History Report - Provides customer detail of all their transactions and includes the customer usage.
For more information about running reports, see Print View.
For more information about the buttons on the toolbar, see the Reporting Toolbar.
To see an example of the report, click History Analysis Report Sample.
To open:
1. Click Analysis from the menu.
2. Click Reports.
3. Click History
Report.
Tip: Or, use the keyboard
shortcut: [ALT] [s] [r] [h].
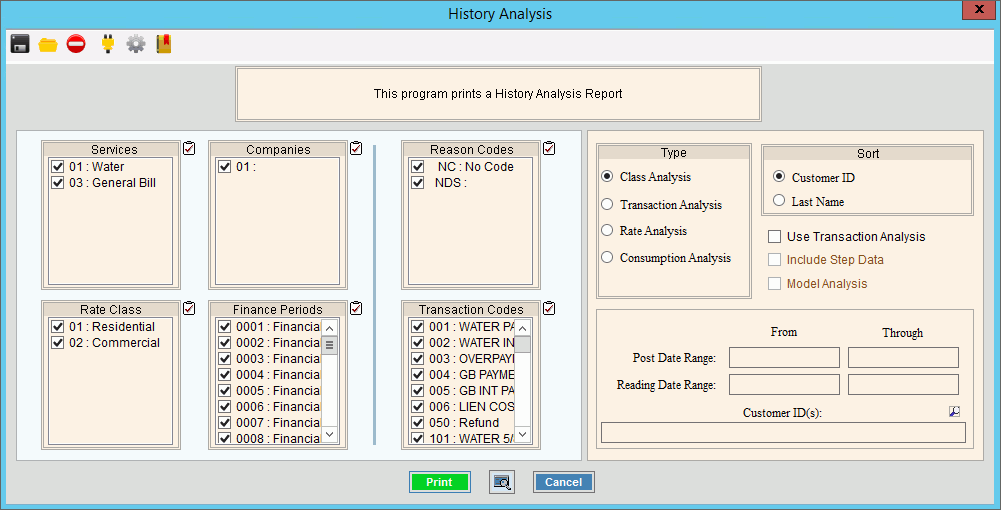
History Analysis Report Window Example:

History Analysis Report Prompt Options
|
|
To select the Services to report, click to check the appropriate Services listed. Tip:
To quickly select or de-select
all Services listed,
click Check All |
|
To select the Companies to report, click to check the appropriate Companies listed. Tip:
To quickly select or de-select all
Companies listed, click Check
All |
|
To select the Reason Codes to report, click to check the appropriate Reason Codes listed. Tip:
To quickly select or de-select all
Reason Codes listed, click Check
All |
|
To select the Rate Classes to report, click to check the appropriate Rate Classes listed. Tip:
To quickly select or de-select all
Rate Classes listed, click Check
All |
|
To select the Finance Periods to report, click to check the appropriate Finance Periods listed. Tip:
To quickly select or de-select all
Finance Periods listed, click Check
All |
|
To select the Transaction Codes to report, click to check the appropriate Transaction Codes listed. Tip:
To quickly select or de-select all
Transaction Codes listed, click Check
All |
|
Type |
To choose an Analysis Type, click to select the appropriate button. Analysis Types:
|
Sort |
To specify the method for sorting the report information, click the appropriate button. Sort Choices: |
Use Transaction Analysis |
To run the report using the Transaction Code Analysis and Service Settings, select this box. To run the report using the system level setting, leave this box unchecked. |
Include Step Data |
To include Rate Step Data in the analysis, select this box. To omit Rate Step Data in the analysis, de-select this box. Tip: This field is only available when you select Rate Analysis as the Type. |
Model Analysis |
To include a Rate Model analysis, select this box. To omit a Rate Model analysis, de-select this box. Tip: This field is only available when you select Rate Analysis as the Type. |
Post Date Range From |
To limit the report to a range of Posting Dates, enter the appropriate beginning Posting Date in the range. Tip: To include all Posting Dates, leave blank. |
Through |
To limit the report to a range of Posting Dates, enter the appropriate ending Posting Date in the range. Tip: To include all Posting Dates, leave blank. |
Reading Date Range From |
To limit the report to a range of Reading Dates, enter the appropriate beginning Reading Date in the range. Tips: To include all Reading Dates, leave blank. |
Through |
To limit the report to a range of Reading Dates, enter the appropriate ending Reading Dates in the range. Tips: To include all Reading Dates, leave blank. |
Entry Options:
|
|
|
To begin printing to the Windows® default printer, click Print, or press [ENTER]. Keyboard shortcut: [ALT + p] Or, to print to the Print
View window, click Print
View Or, to escape from the print routine,
click Cancel Keyboard shortcut: [ALT + c] |