Create Customer Location Step 7 Window
Use the Create Customer Location Step 7 Window to enter the Billing ID, Contact information and Responsibility Code for the location.
Notes:
For each service delivered to the location, enter the Billing ID, Contact and Responsibility Code.
If your company bills multiple services, enter a Billing ID for each service delivered to the location as there can be different parties responsible for payment. For example, if you bill both water and sewer and you have apartment buildings having only 1 sewer pipe leaving the building and multiple water meters for water service, you can bill services separately. In this case you can set up to bill the owner for the sewer service and bill the individual tenants separately for their water consumption.
For general information about using wizards, see the Wizard - Introduction.
To display the Create Customer Location Step 7 window:
1. From the Inquiry, click Tools and then, click Wizards.
2. In the Create section, click Customer.
3. To navigate
to the step that you want to maintain click Next
![]() or click Back
or click Back ![]() until
the data that you want to maintain displays in the Data Entry Panel.
until
the data that you want to maintain displays in the Data Entry Panel.
Create Customer Location Step 7 Window Example:

Data Entry Panel - Create Customer Location Step 7 Prompts
|
|
|
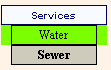
The selected service is highlighted. To select another service, click to highlight the desired service. |
Billing ID determines who is responsible for paying the bill. Entry Options:
Note: If you do not enter a Billing ID, the Owner ID will be assigned as the Billing ID. |
|
To determine who to contact regarding the service at the location, click a choice in the drop-down list. Tips:
|
|
To determine if the owner or tenant is financially responsible for the account, click a choice in the drop-down list. Tips:
|
|
|
To complete the entries and continue to the add service connection steps, click Next. Keyboard shortcut: [ALT + n] For directions to Create Customer Service Connection Step 1 Window, click here. |
|
To return to the previous window for re-entry, click Back. Keyboard shortcut: [ALT + b] For directions to the previous window, click here. |
|
To complete the customer location entries, click Finish or press [Enter]. Keyboard shortcut: [ALT + s] |
|
|