Enhanced Inquiry - BUSA Reporting View
The EDIFICE BUSA Reporting view is a powerful reporting tool that allows you to create custom reports for quickly generating information. Building a report is flexible and offers many features that allow you to hone in on the information that you want. You can report on any EDIFICE table and field and tables can easily be joined so that customer, location and device infrastructure can be reported. Data can be filtered, sorted and organized to suit your purposes. There are also aggregate functions such as count, sum and average. Advanced functions include the ability to create substrings of data fields and concatenate fields.
Reports and their settings can be saved. Saved reports can be viewed from the BUSA Reporting view and the Executive Reporting view, where they can be scheduled to run at a certain time or on a regular basis. Customer letters and email blasts can be generated using report data. In addition, report data can be printed and exported to Microsoft Excel, Microsoft Word or saved as a PDF.
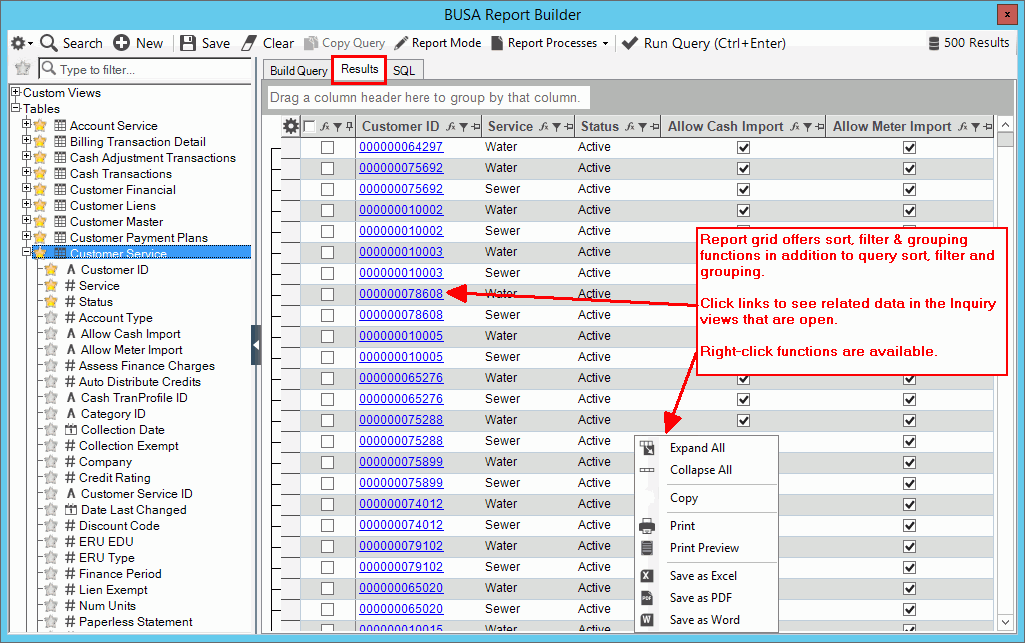
Certain information in the reports is interactive. Clicking a link in the report will display the related data for the customer, account, location or device in the Enhanced Inquiry views that are open. Additionally, information in user definable fields in reports can be updated.
Use these instructions to:
Build BUSA Reports
Run BUSA Reports
Print and export report data
Generate customer letters from BUSA reports
Send emails from BUSA reports
Note: The BUSA Reporting is an add-on feature in the EDIFICE Inquiry. To activate this feature, please contact NDS Support at 1-800-649-7754.
From the EDIFICE Inquiry, click Tools and then click BUSA Reporting View.
EDIFICE Inquiry - BUSA Reporting View Example:
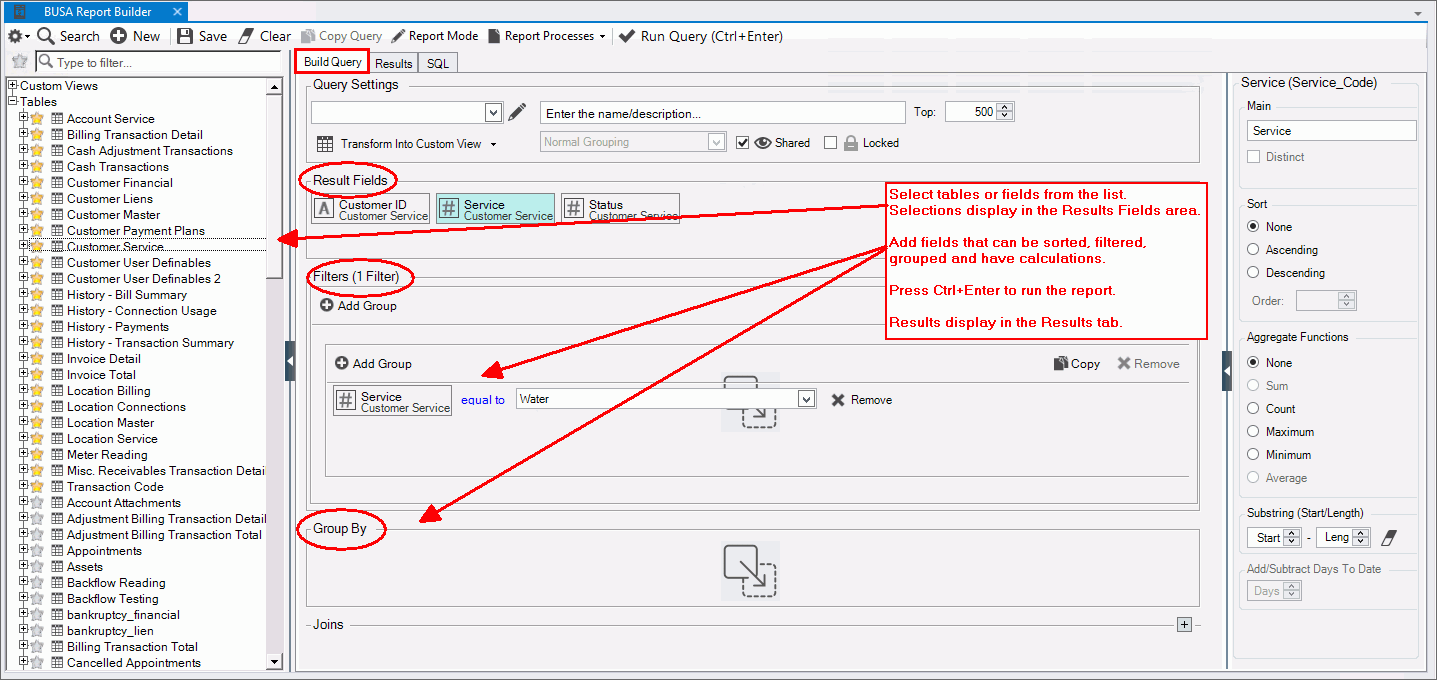
EDIFICE Inquiry - BUSA Report View Build a Report Prompts
You can choose any EDIFICE data to include on the report. Joins will automatically be detected when fields from new tables are added. You can arrange the fields in the desired order, add filters to limit information on the report, as well as, group and sort information. To create a report from an existing
report, click Copy |
|
Enter General Query Settings
|
|
Choose a Category |
Select an optional category under which to group a report. The category displays in the BUSA Reporting search and in the Executive Reporting screen. To create or edit a category, click
Edit
To create a category, click New. Enter the title and click Save. To edit a category, click Search. Select the title from the list, edit it and click Save. |
Description |
Enter the report title, which also serves as a description. Required |
Top |
Top is the maximum number of items to return for the report and defaults to 500, but this can be changed. To remove the limit, enter 0. Example: To report the topi 10 customer balances or usage, enter 10 here. |
Other Settings |
Other options: Transform query into a table view
Grouping
- Choices are: Normal
grouping shows all fields. Grouping/Aggregates
Only shows only aggregate fields and the fields in the
group by area. Shared - to allow the query to be viewed and shared with other users, check this box. Note: Only shared reports are available in Executive Reporting. Locked - To only allow reporting and to prevent editing of the report, check this box. |
Select Report InformationCheck any EDIFICE data from the Table/Field List. Only tables with data in them display in the list (or, you can right-click and select Show All Tables). Many tables and fields have friendly descriptions rather than the database table name. Commonly
used tables and fields are listed as favorites as indicated by
yellow star There are other right-click options for managing the list. There is also an option for finding other reports that use the selected table.
|
|
Select Tables and Fields |
To start a report, double-click the desired table in the list. This adds the table's fields to the Result Fields area. Or, to add fields to the report, double-click or drag the field name to the Result Fields area. To remove a field from the query, drag the field out of the Result Fields area. The icon next to each field identifies its data type, which can be alpha, numeric, date/time or a function/expression. There are some built-in fields such as formatted customer names and phone numbers. If you add other tables or fields from other tables to the report, join relationships will automatically be added and, if certain fields such as customer IDs are already in the report, they are skipped. Tip: To search for tables or fields, enter the name in the Table/Field Search box. |
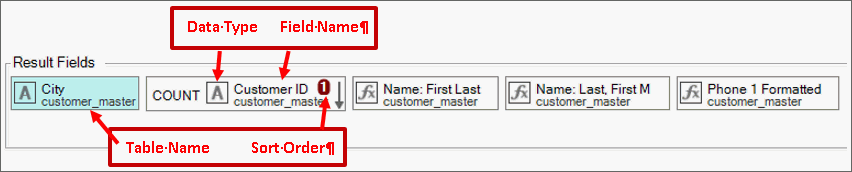
Filter and Organize Report InformationResult Fields Panel The Result Fields panel lists the fields that were selected for the report. Each field shows its name, table name, data type icon, aggregate function and sort information. The order in which the fields are listed is the order that they will appear in the report. To re-arrange this order, drag the fields to the desired position. These fields can be used to filter and group the data as well. Tip: Filtering, grouping and sorting can also be done from the grid once the report is run.
|
|
|
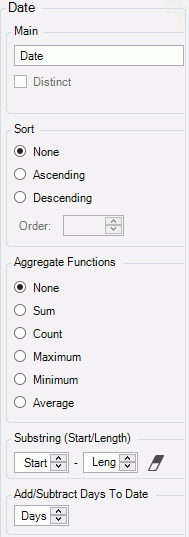
Use field options to create simple calculations, assign sort information and to create substrings to extract information from a portion of a field. Notes:
Report Sort You can choose multiple fields by which the report will be sorted. An arrow indicating ascending or descending and a number indicating its order relative to other sorted fields will display as seen in this example. To assign the sort order, press [Shift + Click] on the desired field or, click a choice here. Press [Shift + Click] to toggle between ascending and descending order.
Aggregate To perform a calculation on a field, select an aggregate choice. Use maximum to compare values to find the highest ones and use minimum to find the lowest values.
Substring To extract information from a portion
of a field, select the start position and end position within
the field. Substrings can be filtered and grouped. |
FiltersUse filters to limit the information to report. Multiple filters can be added. Filters can also be used to compare 1 field to another field. Multiple Filters Example with AND as the condition:
To create a filter: 1. Drag the field to be filtered to the Filters area. 2.
To set the operator, click the blue text between the field
and the value to see the choices. Then, select the desired
choice. Operator choices change based on the type of field
that is being filtered.
3. Enter a value or select choices from the drop-down list to compare with the filter field. How the value is compared is determined by the operator. Tip: Use % (percent) as an inner wild card for the value. 4. If multiple fields are being filtered, choose And or Or to specify whether information is included or excluded. This will construct AND or Or conditions. 5. To compare a filter field with another field, drag the desired field to the comparison value field. Tips; After
setting a result field to sum or count, it can then be dragged
to the Filter area to filter on the aggregate. To copy a
filter, click Copy |
|
Grouping Use this area to organize the report. Note: If this area is not visible, use the scroll bar to move to this area.
To organize information by a specific fields such as customer ID, drag the fields to the grouping area. When using agregate functions such as sum, count, etc., if other non-aggregate result fields are present, than they must be grouped by a field here. To remove a group, click to highlight the group and then, press [Delete]. |
|
Run Query
|
To
run the report, press [Ctrl +
Enter] or, click Run Query.
The report displays in the Results tab |
Advanced Functions |
|
Joining Tables |
Join allows data to be gathered from more than 1 table using a common field between the tables. The Join area is hidden as join relationships are automatically added as an Inner Join (vs Left/Right joins). The first result field/table added to the query is considered the main from table. Use the drop-down list to change this. You may need to change the join if you want to see the tenant associated with a location, for example. Location has two customer joins: Owner and Tenant and by default owner is selected. To change this to tenant, click the Owner ID field and then, select tenant. Or, drag the Tenant ID field from the Table/Field list or Result Fields area to the Join area and remove the Owner ID join. The join condition can be changed by clicking equal to and selecting another condition operator. To complete the joins changes and regenerate using the current Result Fields, click Reset Joins. |
Custom Field |
To write a custom expression as its own field in the table, right-click a table in the list and select Add Custom Field. Or, to edit a custom field, select Edit Custom Field. Fields should be properly escaped with the table name. Once created they will display in the Table/Field list. They are stored in the database table query_fields. |
Reports can be run as you are creating them. In addition, saved reports can be run here, and if they are shared reports they can be run from the Executive Reporting view where they show in the Reports list.
Viewing Reports Prompts
|
|
Running a Saved ReportTo run a saved report from the Build BUSA Report view: 1.
Click Search 2. Change filters, if needed. 3. Press [Ctrl + Enter] to run the report. The Results tab opens with the report data displaying in the grid.
Notes:
Build BUSA Report View Report Example:
|
|
Organize Report GridThe query
settings and filters display in the Build Query tab. You
can change the filter conditions, as well as, add filters, sorts
and groupings to the data after the report is generated. You
can use the grid setting Some fields have links to additional information in a related view. For example, customer IDs, location IDs, device IDs, invoice numbers, connection IDs and work order IDs generally have links. Click a link to load the associated account or device to the Enhanced Inquiry views that are open. Tip: To check and uncheck a row or rows, highlight the desired rows and press [Space bar]. |
|
Sort List |
To change or add a new sort to the grid, click the desired column heading. To sort in descending order, click the column heading a second time. Tip: To remove a sort on a column, press [Shift + click]. |
Filters |
To
limit the data in the grid to those that meet certain criteria,
click Filter
Click to check the desired box or boxes and then, click OK. Notes:
|
Printing & Exporting FunctionsThe report grid offers right-click options for printing, exporting and saving the report information. These functions can be handy for further manipulating or formatting the data or sending copies to coworkers.
|
|
|
Grid Printing & Exporting right-click options:
|
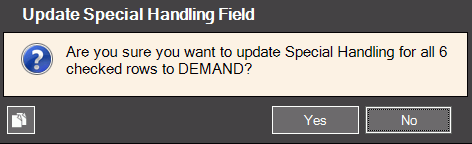
Update User Definable Fields |
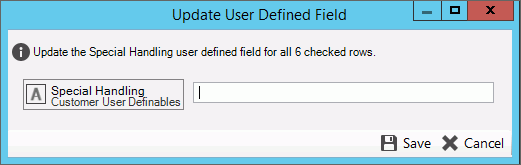
You can change information in user definable fields in the report. For example, if you are maintaining statuses in a user definable field you can change the status. To update a user definable field: 1. Check the box in the rows to be updated. 2. Right-click the column
heading for the user definable field and select Update
Field 3. The following screen displays:
4. Enter the new value for the field. 5. Click Save to complete the entry. 6. At the save prompt, click Yes to continue.
7. The updated value displays in the selected rows. |
You can create customer letters using the data from a BUSA report. In order to create customer letters, the report must include a customer ID and as an option you can include a location ID for tracking purposes.
Customer letters are recorded in the Documents view when they are printed. Viewing a customer letter will not create a letter in the Documents view.
Note: The customer letter requires a job with function type xmlCustomerLetter and a job file set up to your organization's specifications. Please note that the xmlCustomerLetter used here is not the same as the individual xmlCustomerLetter although it has similar data fields.
To create customer letters:
1. From the BUSA Reporting view, run the BUSA report to generate data for the letters.
2. Check the box for each row in the report to receive a letter.
3. Click Report
Processes --> Customer Letters --> Print  .
.
4. If there are multiple letter jobs select the print job for the letter you are trying to print.
5. The letters print. After they are printed, they can be viewed from the Documents view.
The email function in the BUSA Reporting view allows you to send email blasts to a group of selected email addresses. Just like with the other EDIFICE email options you will build an email configuration and a default email template to activate email.
There are only a few data fields that can be inserted when the detault tempate is being built. However, when you send emails from a BUSA report you can add any field from the report to the email template. The BUSA report from which emails are being sent needs to include the customer ID field and an email address that can be either the customer web email field or another email address field. This allows you to send emails to third parties such as lawyers, banks or custodians. If you want the location recorded in the email history on the Timeline view, then you need to include the location ID as well.
Notes:
For an overview on sending emails, see Enhanced Inquiry - Email.
To set up for sending emails:
Build
email
configurations.
Note: For BUSA email
blasts, NDS recommends creating an Email configuration using smtp2go
as the host. Using smtp2go can help prevent emails from being
spam blocked or blacklisted.
Build default BUSA templates.
Email history for a customer can be seen in the Timeline view. From the view you can double-click the email entry to see details about the email.
To send BUSA emails:
1. Open the BUSA Reporting view and run the desired report.
2. Check the box for each row
in the grid for which to send emails. Each selected row must have
a valid email address.
Note: If you want to use
an email address that is in another field such as a user definable field,
the field must be moved to the left most column in the grid and the column
name must be Email (case sensitive). Otherwise, the customer_web.email
address is used.
3. Click Report
Processes --> Send Emails. The BUSA template editor opens.
Note: Messages will alert
you if an email address has already received an email within the last
week or, if there are over 100 emails being sent in this email process.
These messages do not prevent you from continuing.
BUSA Send Emails window example:

BUSA Send Email Prompts |
|
Template |
Choose an email template from the list. Or, click New to create a new template. Multiple templates can be maintained. If you are creating a new template follow the Create Email Template instructions. |
To |
The email addresses for the rows selected display. You can remove any Send To addresses as needed. |
Subject |
If a subject was entered, you can edit it. If there is no text in the subject line, enter one or leave it blank. |
Body of Email |
To build the body of the email: Note:
The HTML code can be edited directly in the editor by clicking
HTML
1. The text in the body of the email can be edited and added to as well. To add text begin typing or paste text that was copied. Use the Formatting toolbar shown below to format the email to suit your needs. Send Email Toolbar
2. The list on the right displays the data fields that you can include in the email. When emails are generated, the inserted fields will fill with the report data. To insert a field in your email, double-click the name in the list. The field is added at the cursor, but can be moved. 3. To insert an image,
click Picture 4. To insert a hyperlink,
click Hyperlink 5. To add an attachment
to include with the email, click Add
Attachment
|
|
To save the email for use again, click Save. |
|
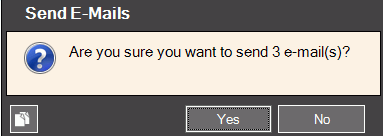
To send the email, click Send Email. The following prompt displays:
After confirming, click Yes to continue or to cancel, click No. When the send completes, the message Success! displays. Click OK to close the prompt. |
 . Or, to start
a fresh report, click
. Or, to start
a fresh report, click 
 .
The following screen displays:
.
The following screen displays:
 . To add a table
as a favorite, click
. To add a table
as a favorite, click 


 . To remove a filter,
press
. To remove a filter,
press  .
.


 . From the search
list, click the desired name.
. From the search
list, click the desired name. .
.
 to remove or add any columns that display in the grid. Column
order can be changed by dragging the column header to the desired
location.
to remove or add any columns that display in the grid. Column
order can be changed by dragging the column header to the desired
location. next to the desired
column heading. The available filter choices display. Here
is an example of street name filters.
next to the desired
column heading. The available filter choices display. Here
is an example of street name filters.
 .
.


 and then click
  . Enter the hyperlink
text to display in the document and enter the URL for the link.
Then, click
. Enter the hyperlink
text to display in the document and enter the URL for the link.
Then, click  .
From the Select a File to Attach screen, browse to find
the desired attachment. Then, click
.
From the Select a File to Attach screen, browse to find
the desired attachment. Then, click  .
.