EDIFICE Inquiry - Email
Email provides an easy and convenient way to electronically send EDIFICE
communications to customers. There are several places within EDIFICE
that have email capability. You can use email to send customer payment
plans, read history, BUSA report information and general letters as well
as email copies of statements or other notices for customers. Emails
are easily customized using the Template Builder and setting up the email
configuration is flexible allowing for multiple configurations as needed.
Multiple templates for each type of template can be built. You
can see the history of the emails sent to the customer and their contents
from the Timeline view.
Note: To activate email,
the Email configuration must be set up as well as templates for each type
of email that you want to send. For directions, see Setting Up in
Email below.
Places Where Email can be used in EDIFICE
Email
is available in the following places within EDIFICE. If
you do not see Email functions within a particular screen, check
to see if the required type of email template is set up for that
screen. |
EDIFICE
Inquiry

|
Email
next to Customer ID
is available for sending an account letter type of email to a
customer. For example, you can use this type of email to
send a new customer welcome letter or a missed payment reminder.
You can set up multiple email templates
for the customer email. To choose a template, click the
email icon and then select the template from the list.
Customer email is activated when an Account letter type of template
is set up, then the letter icon displays in green
to signify email is active. If the email icon is gray  , then the customer email is not active. If
no email icon displays next to the customer ID, then email needs
to be activated. , then the customer email is not active. If
no email icon displays next to the customer ID, then email needs
to be activated. |
BUSA
Reporting View
|
Use
email blasts for sending report data to a group of selected customers.
Tip:
Email in the BUSA Reporting view is activated when a default
BUSA email type of template is set up. |
Documents
View

|
Email
is available for sending documents stored in this view. For
example, use the email function to send a customer a copy of their
statement.
Tip:
Email in the Documents view is activated when a default
customer document type of template is set up. |
Payments
View

|
Email
is available for sending payment plan information and letters
about missed payments for a payment plan. Email can also
be used for sending payment history to a customer.
Tip:
Email in the Payments view is activated when a Customer
Payment Plan type of template is set up. |
Read
History View
|
Email
is available for sending read history information to customers.
There are 3 options for including read history. Chart
images can also be included.
Reading
Table - all currently visible rows, sorted descending by date last
10 of the most recent readings Current
year readings
Tip:
Email in the Read History view is activated when a read
history report type of template is set up. |
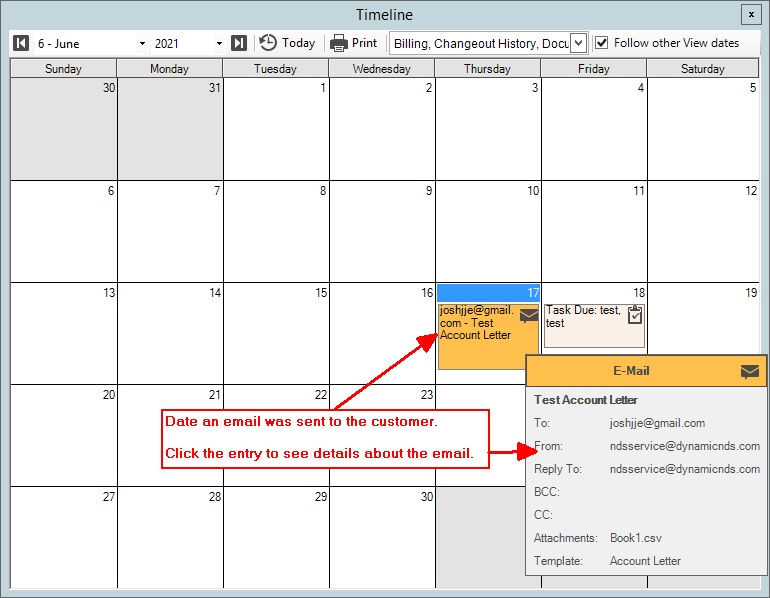
Timeline
View |
Emails
that are sent are recorded on the date sent in the customer's
Timeline for an audit trail. You can click the email icon
to view email detail. |
Setting up EDIFICE Email
You will need to set up email configurations and email templates
in order to send customers emails from EDIFICE. After the steps
below are done, email is ready to use.
Note: To build the email
configurations requires your SMTP email server information, which can
be provided by your IT staff or by Northern Data Systems. For more
information, please contact NDS Support at 800-649-7754.
1. Build Email
Configurations.
2. Build Email
Templates.
Sending EDIFICE Email
Sending emails to customers is easy.
These are the general steps.
Tip:
Emails that were sent to customers can be seen on the customers'
Timeline View.
1. To send an email, from any
of the following views:
a. From the EDIFICE Inquiry,
click Email
next to the customer ID.
b. From the BUSA
Reporting view - see Using
BUSA Reporting Email for instructions.
c. From the Documents
view - click Email on the line that contains
the document that you want to send to the customer.
Note: The document is first
created and then the Send Email screen opens.
d. From the Payments
view - click Email Payment Plan .
e. From the Read
History view - click Email Report
.
2. The Send Email editor opens
with the customer data filled in the fields. Send Email has similar
formatting functions as the Template Editor.
Note: The email template
will display different text and data depending on the type of template
being used. Because templates can be customized to suit your purposes,
your template may look different than the example below.
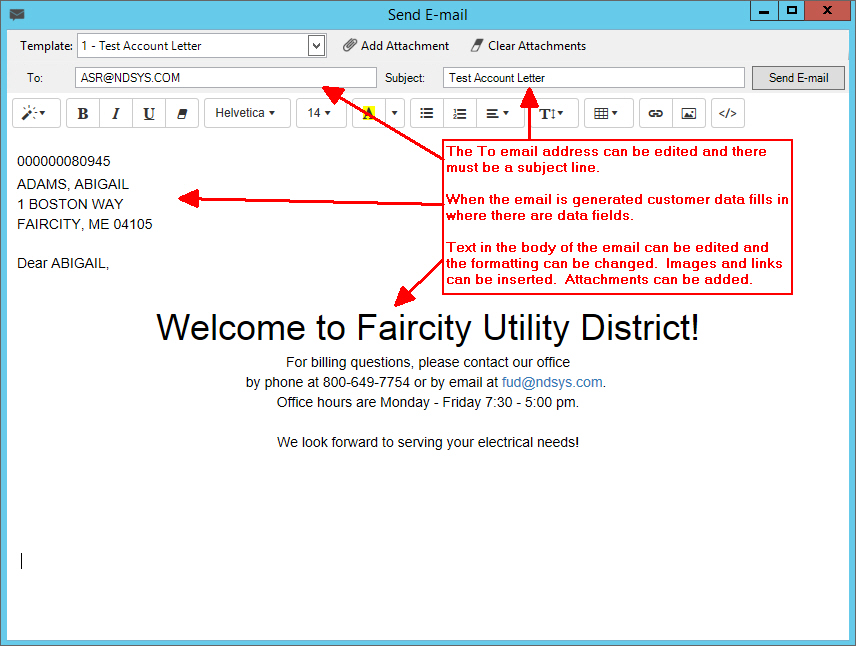
Send
Email (Account Letter Type of Template) Window Example:
Send Email Prompts |
Template |
Displays
for your reference the type of email template used for the email. |
To |
If
the customer has an email address associated with their account,
it fills in the Send To address. Otherwise, you can enter
an address in the To field. You can add multiple addresses
in the Send To field by entering a semi-colon
(;) between the addresses. And, you
can remove Send To addresses as needed. |
Subject |
If
a subject was entered, you can edit it, if needed. If there
is no text in the subject line, enter one now.
Required |
Body of Email |
To
build the body of the email:
Note:
The HTML code can be edited directly in the editor by clicking
HTML  . .
1. The text in the body
of the email can be edited and added to as well. To add
text begin typing or paste text that was copied. Formatting
toolbar shown below offers tools for formatting the email to suit
your needs.
Send Email Toolbar

2. Customer data displays
where data fields were inserted.
Note: If you
are creating BUSA emails, you can add fields of report data to
be included in the emails.
3. To insert an image,
click Picture  and then click Browse to select the desired
image. The image is inserted at the cursor, but can be moved
as needed. and then click Browse to select the desired
image. The image is inserted at the cursor, but can be moved
as needed.
4. To insert a hyperlink,
click Hyperlink  . Enter the hyperlink
text to display in the document and enter the URL for the link.
Then, click Insert Link. . Enter the hyperlink
text to display in the document and enter the URL for the link.
Then, click Insert Link.
5. To add an attachment
to include with the email, click Add
Attachment  .
From the Select a File to Attach screen, browse to find
the desired attachment. Then, click Open. .
From the Select a File to Attach screen, browse to find
the desired attachment. Then, click Open.
Tip: After an attachment
is added, the number of attachments displays with the Add Attachment
button  . .
|

|
To
send the email, click Send Email.
The following prompt displays:

If the displayed email address is accurate,
click Yes to continue
or to cancel, click No.
When the send completes, the message Success!
displays. Click OK
to close the prompt. |
Viewing Email History
Use the Timeline view
to see email history for a customer. From the view you can double-click
the email in the Timeline to see details about the email.