Cash Receipts Edit Journal Instructions
Use the Cash Receipts Edit Journal to print selected cash transactions in the cash receipts transaction file to proof your entries. Typically you will print the cash receipts edit journal for a specific clerk or specific services. The journal has several report options that allow you to specify the information to include.
Notes:
The Cash Receipts Edit journal and the Cash Receipts Print journal are two separate programs. Use the Cash Receipts Edit Journal to print selected cash transactions and use the Cash Receipts Print journal to print ALL cash transactions in the Cash Receipts Transaction file.
If it is necessary to correct a cash transaction, perform the steps to make the necessary corrections, then reprint the Cash Receipts Edit Journal to verify the correction.
A copy of the journal is saved to report history for a complete audit trail.
To see an example of the report, click Cash Receipts Edit Journal Sample.
To open:
1. Click Daily Work from the Menu.
2. Click Cash Receipts
3. Click Edit
Journal.
Or from Cash
Explorer click Journal and
then click Cash.
Or, use the keyboard
shortcut: [ALT] [y] [c] [d].
Cash Receipts Edit Journal Example:
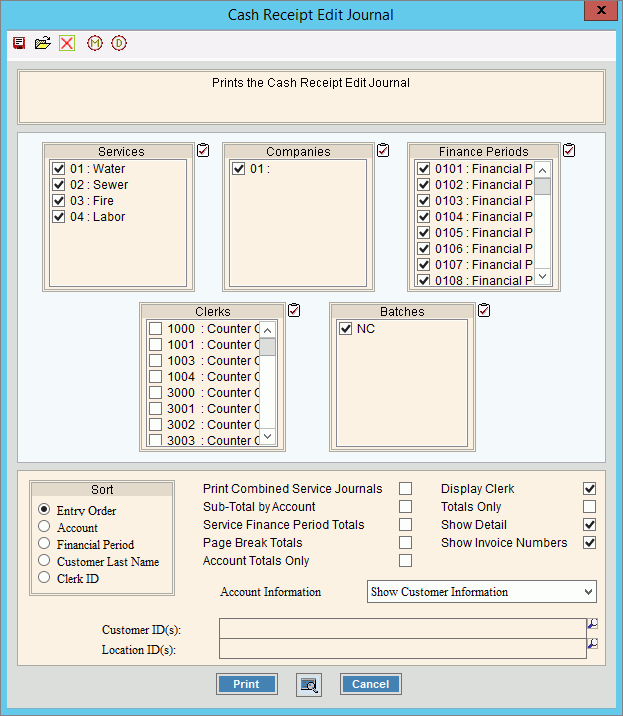
Cash Receipts Edit Journal Prompt Options
Tip:
To quickly select or de-select all
items listed, click Check All
|
|
To select the services to print, click to check the appropriate services listed. |
|
To select the companies to print, click to check the appropriate companies listed. |
|
To select the finance periods to print, click to check the appropriate finance periods listed. |
|
To select the clerks to print, click to check the appropriate clerk IDs listed. |
|
To select the batches to print, click to check the appropriate batches listed. |
|
Sort |
To choose a sort option, click to select the appropriate button. Sort Options:
|
Print Combined Service Journals |
To group and list together all payments for all services for each customer on the journal, select this box. |
Sub-Total by Account |
To print the subtotals for each customer, check this box. Or, to omit subtotals leave this unchecked. Tips: If you are using the credit cards payments feature, this option will provide a breakdown of credit card and other types of payments. This option will make the report longer because of all the detail. |
Service Finance Period Totals |
To print the subtotals for each finance period, check this box. Or, to omit printing subtotals for each finance period, leave this box unchecked. |
Page Break Totals |
To print the subtotals at the end of each page, check this box. Or, to omit printing subtotals at the end of each page, leave this box unchecked. |
Account Totals Only |
To print a single line with only the total payment for the customer or location, check this box. If Account Totals Only option is selected, each line will include the total payment for each customer, the customer name, location address, customer current balance, amount paid and the difference between the amounts. This option will not provide the detail if the payment is made up of a combination of cash and checks. Or, list transactions in the regular format, leave this unchecked. |
Display Clerk |
To print the clerk ID in place of the user ID, select this box. Or, to omit printing the clerk ID, leave this box unchecked. |
Totals Only |
To omit the receipt details and only print the journal totals, click to check Totals Only. The report will provide totals by transaction codes and finance periods as well as a total for each type of payment. To include receipt details, leave this box unchecked. |
Show Detail |
To include a second line for the location ID and location address, check this box. Or, to omit this information, leave this unchecked. Note: Show Detail only pertains to location aware customers. |
Show Invoice Numbers |
To include the invoice number associated with the payment, check this box. Or, to omit the invoice numbers leave this unchecked. |
Print GL Report |
To include the G/L revenue report posting summary with the GL accounts and the totals to post to those accounts, click to check this option. Or to omit this report leave this unchecked. |
Account Information |
Select an option:
Note: This generally pertains to open item accounts. |
Entry Options:
|
|
Locations ID(s) |
Entry Options:
|
|
To begin printing, click Print, or press [ENTER]. Keyboard shortcut: [ALT + p] Or,
to print to the Print
View screen, click Print
View To escape from the print routine, click
Cancel Keyboard shortcut: [ALT + c] |
![]()