Opening Payment Clerk Table Maintenance, click More.
1. Click Daily Work from the Menu Bar.
2. Click File Maintenance.
3. Click Table Maintenance.
4. Click Payment Tables.
5. Click Payment Clerk Table.
Tip: Or, use the keyboard shortcut: [ALT] [y] [m] [t] [p] [k]
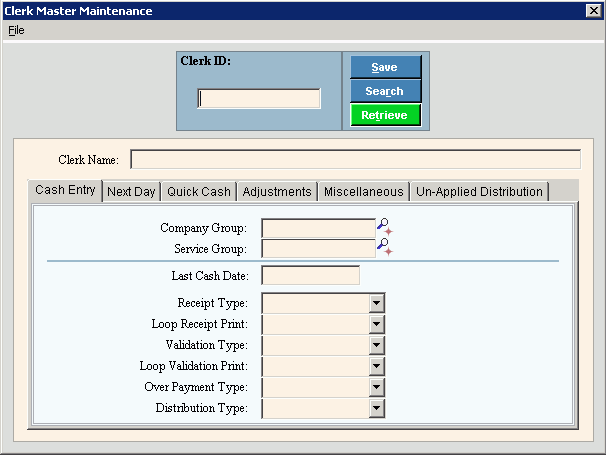
Payment Clerk Table Maintenance Window Example:

Creating a new Payment Clerk Table, click More.
-
Enter the new Clerk ID and click Retrieve
 , or press [ENTER].
Keyboard shortcut: [ALT + t] -
Or, enter the new Clerk ID and click File from the Menu Bar; next click New.
Keyboard shortcut: [ALT] [f] [n]
Tip: To indicate that you are building a new Clerk, New ![]() displays near the Clerk ID. Default entries display and the first field is highlighted to let you know you can begin entering information.
displays near the Clerk ID. Default entries display and the first field is highlighted to let you know you can begin entering information.
|
Payment Clerk Table Maintenance Prompts Tip: To see more information about a field, click the hyperlink for the field name. |
|
|
Enter a unique number to identify the clerk who will be entering the Cash Receipts. (2.0 numeric) Required |
|
|
|
To update the new or changed information, click Save or press [ENTER]. Keyboard shortcut: [ALT + s] |
|
To avoid losing data, you must save new or changed records. |
|
|
|
To view all of the existing clerk masters, click Search. From the Search list you can select the record to change or delete. Keyboard shortcut: [ALT + r] |
|
|
To display an existing clerk master, enter the Clerk ID and click Retrieve, or press [ENTER]. Keyboard shortcut: [ALT + t] |
|
Enter the name of the clerk who is assigned to the Clerk ID. (up to 20 characters) Required |
|
|
Cash Receipts To set the clerk options for Cash Entry, click Cash Entry and then, enter the following fields. To set the options for the other types of payment entry, click the desired tab and then enter the fields. |
|
|
To limit the clerk to entering cash receipts for customers associated with a specific Company Group enter the defined Company Group ID, if applicable. (up to 5 characters) Note: Generally, NDS recommends leaving the Company Group blank to allow the clerk to enter cash receipts for all customers. |
|
|
To limit the clerk to entering receipts for customers who are assigned to a specific service, click a choice in the drop-down list. Note: Generally, NDS recommends setting the Primary Service Code to ALL in order for the clerk to be able to enter payments for all services. |
|
|
Enter the last date that cash receipts were entered by the clerk. (mmddccyy) Required |
|
|
To set up receipt printing for the clerk, click a choice in the drop-down list. Note: The Receipt Type works together with the Print a Cash Receipt? option in the Payment Receipt Table to determine if receipt printing is allowed for the clerk. |
|
|
Loop Receipt Print |
The Loop Receipt Print setting determines if a receipt reprinting prompt Do you wish to print another receipt?, displays each time a receipt is printed. To display the Reprint Receipt prompt for the purpose of reprinting a receipt after it has been printed, click to select Yes. Or, to omit receipt re-printing, select No. |
|
To specify the type of check validation, select an option:
|
|
|
Loop Validation Print |
The Loop Validation Print setting determines if a Validate Receipt prompt Do you wish to validate again?, displays each time a receipt is printed. To display the Validate Again prompt for the purpose of validating a receipt if it is re-printed, click to select Yes. Or, to omit the Loop Validation Printing prompt, click No. |
|
To specify how over payments are handled for the clerk, select an option:
|
|
|
Distribution Type |
To specify the type of auto-distribution of cash payments for routines using auto-distribution, select an option:
|
Editing an existing Payment Clerk Table, click More.
![]() CAUTION: To avoid losing data, you must save new or changed records.
CAUTION: To avoid losing data, you must save new or changed records.
1. To display the record to be changed, enter the Clerk ID and click Retrieve ![]() , or press [ENTER] if the button is in focus.
, or press [ENTER] if the button is in focus.
Keyboard shortcut: [ALT + t]
Tip: If you do not know the Clerk ID, you can click Search ![]() to see a list of clerk masters.
to see a list of clerk masters.
2. To position the pointer to the information that you want to change, press [TAB] or click the field using the mouse.
3. Enter the data changes.
4. To complete the edit process, click Save ![]() , or press [ENTER] if the button is in focus.
, or press [ENTER] if the button is in focus.
Keyboard shortcut: [ALT + s]
Deleting an existing Payment Clerk Table, click More.
1. To display the record to be deleted, enter the Clerk ID and click Retrieve ![]() , or press [ENTER] if the button is in focus.
, or press [ENTER] if the button is in focus.
Keyboard shortcut: [ALT + t]
Tip: If you do not know the Clerk ID, you can click Search ![]() to see a list of clerk masters.
to see a list of clerk masters.
2. Click File from the Menu Bar, and next click Delete.
Keyboard shortcut: [ALT] [f] [d]
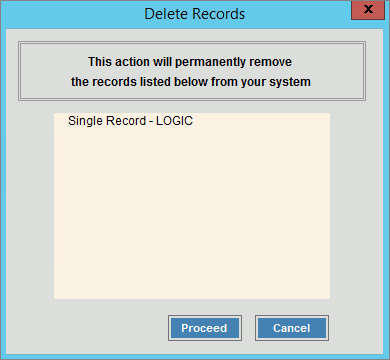
3. At the Delete Records prompt, click Proceed to delete the record, or click Cancel to escape from the delete routine.
Example:

Note: After you click Proceed, you will see the following message on the Status Bar.
![]()
