Quick Cash
Use Quick Cash to quickly enter account payments and when used with EDIFICE's auto distribution feature, it becomes an efficient cash entry tool. The account's total balance fills in (which can be edited), and then the payment auto distributes in the same way as Cash Receipt Entry does. If needed the clerk ID, cash date and batch number can be changed between separate payments without closing the window. You can also process cash receipts in batches. To learn more, see cash receipts batch processing.
You can use Quick Cash to pay the balances for multiple accounts at the same time. For example, Quick Cash is a handy way to enter payments from a landlord who wants to pay for services delivered to several individual locations using one check.
Payments entered through Quick Cash are grouped together in the same journal as the standard Cash Receipts Entry transactions. Using Quick Cash will not interfere with individuals entering payments in Cash Receipts Entry. Regardless of where they are entered, all payments can be separated by clerk ID and batch, if applicable, in both the journal and Cash Receipts Post routine.
Notes:
Payments can be entered by customer or by location. This depends on how your cash receipts are set up. For more information, please contact NDS Support at 800-649-7754.
To generate the quick cash transactions, Quick Cash uses a payment Transaction Code maintained during the Cash Transaction Profile, Service Settings Maintenance, Company Settings Maintenance or during the customer Service information.
Quick Cash generates customer discounts when applicable.
After entering the quick cash transactions, print the Cash Receipts Edit Journal to proof and approve your entries.
Quick cash transactions do not update the customer's balances until you perform Cash Receipts Post.
To open:
From the Inquiry go to Tools -->
Cash Explorer --> Quick Cash.
Tip: Or, use the keyboard
shortcut: [ALT] [y] [c] [ARROW]
[ENTER].
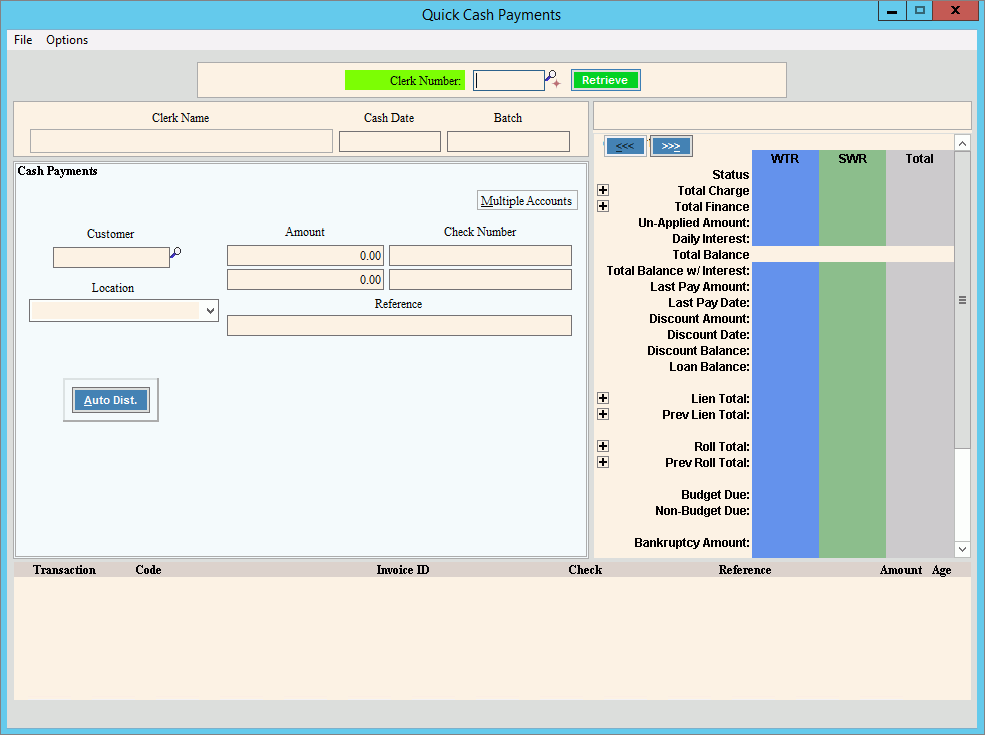
Quick Cash Window Example:
Quick Cash Entry Prompts
|
|
Clerk & Batch Information |
|
Enter a
clerk ID to identify the clerk entering quick cash and then, click
Retrieve Notes:
|
|
Defaults to today's date as the cash date for this batch, but it can be changed to another date. Note: The system updates the clerk's last cash date with the cash date. |
|
Enter the batch to associate with the payments, if desired. (up to 10 characters) Notes:
|
|
|
|
You can enter payments by customer or location depending on how your Cash Receipts is set up. You can also enter payments for multiple accounts with 1 single payment.
|
Entering the Payment Details Enter the details of the quick cash payments. |
|
The amount displays the customer's entire outstanding service balance, but can be edited. (-7.2 numeric) Keyboard shortcut: [ALT + t] Note: There are two amount fields that you can use if the customer has two methods of paying. For example, if they pay by cash and check you can enter the check amount in the first Amount field and the cash portion of the payment in the second Amount field. |
|
Enter the check number if the customer is paying by check. (up to 20 characters) |
|
|
To quickly generate payment transactions to pay the balances for each of the customer's services if you do not need to enter other payment details, simply enter the customer ID and click Auto Dist. or press [ENTER]. Then, proceed to the Commit Step. Or, to manually enter the payment details, omit Auto Distribution and enter the fields. |
Detailed Cash/Check/Credit Card Distribution |
If this is a credit card payment, check this box to enable credit card processing. Note: This option only displays if credit card processing is active. |
Principal Only Payment |
If this payment is on the account's principal balance, check this box. Otherwise, leave blank. |
Disable Receipt Printing |
To disable receipt printing, check this box. Otherwise, leave this box blank. |
Enter the amount paid by cash, if applicable. (-7.2 numeric) |
|
Check Number |
CASH displays to indicate that this is a cash payment. Enter a check number if this is a check. (up to 20 characters) |
Enter a payment reference associated with the quick cash payment transaction, if desired. (up to 20 characters) |
|
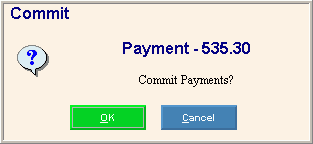
Commit Step Use the Commit Step to complete entry and to commit the quick cash payment transactions.
Commit Transactions Window Example:
|
|
|
To commit the approved quick payment transactions, click OK. Keyboard shortcut: [Alt +o] Or, to cancel the transactions if they
are incorrect, click Cancel
Tip: After clicking OK:
|
Multiple
Accounts To enter quick cash payments for multiple accounts at the same time, click Multiple Accounts. Keyboard shortcut: [ALT + m] After clicking Multiple Accounts or if you have entered a proof total for the cash batch that you are using, the following fields displays. If you have entered a proof total for the cash batch and the Application Options Force Cash Batch Proof Totals is set to yes, then the total payment fills in with the batch proof total. As you enter payments the un-applied balance is reduced by the payment amount. When the un-applied balance is 0, you know that the payments are reconciled and that you have entered them correctly.
|
|
Total Payment |
Enter the total dollar amount to be applied to the customer accounts. Then use the quick cash steps entering payment steps to enter the payment for each customer. As you enter each payment the un-applied balance is reduced by the payment amount. When the balance is 0, you know the payments are entered correctly. Repeat the steps of entering the payments until the un-applied balance is reduced to zoer and all payments for the multiple accounts are entered. |
Applied Amount |
Displays the dollar amount applied to the customer accounts so far. The Applied Amount is added to each time a quick cash transaction is committed. |
Un-Applied Balance |
Displays the total dollar balance that has not been applied to a customer accounts so far. The un-applied Balance is reduced each time a quick cash transaction is committed. |
Transactions List Generated payments display in this area. Proof before clicking commit.
|
|
List Panel Fields |
|
Editing a Cash Transaction |
Editing Quick Cash Payment TransactionsYou cannot edit quick cash payment transactions after you click Auto Dist and commit the payment. If you need to edit a quick cash payment transaction, use Cash Receipts Entry. Editing Posted Quick Cash PaymentsTo correct an incorrectly posted quick cash payment, you can enter a reversing payment during Cash Receipts Entry, then perform the Cash Receipts Post and next enter the correct payment. For more information, see Cash Receipts Entry - Entering Special Payments - Payment Reversal. |
Deleting a Cash Transaction |
Deleting Quick Cash TransactionsUse these steps to delete quick cash transactions. To delete posted quick cash transactions, see below. 1. Open Cash Receipts Entry and retrieve the appropriate customer. 2. From the Transaction Detail List, click to highlight the cash transaction detail line to delete. 3. To delete the highlighted
cash transaction, click Delete
Deleting Posted Quick Cash PaymentsTo delete a posted quick cash payment you can enter a reversing payment during Cash Receipts Entry, then perform the Cash Receipts Post and next enter the correct payment. For more information, see Cash Receipts Entry - Entering Special Payments - Payment Reversal. |
![]()