![]() CAUTION
CAUTION
Changes to the Application Options should only be made with the assistance of NDS Support.
After making changes to Application Options,
you must completely exit
from the EDIFICE application before the changes will take affect.
Application Options
Use Application Options to customize certain options for EDIFICE to suit the specific needs of your utility.
Changes to the Application Options should only be made with the assistance of NDS Support. After making changes to Application Options,
you must completely exit
from the EDIFICE application before the changes will take affect. |
To see directions for...
Opening Application Options, click More.
1. Click Daily Work from the menu.
2. Click File Maintenance.
3. Click Applications
Options.
Or, use the keyboard
shortcut: [ALT] [y]
[m] [a] [p] [p].
Creating the new Application Options, see each Tab listed below.
Editing the existing Application Options, click More.
![]() CAUTION:
To avoid losing data, you must save new or changed records.
CAUTION:
To avoid losing data, you must save new or changed records.
1. Position the pointer to the information that you want to change.
2. Enter the data changes.
3. To complete the edit
process, click Save ![]() , or press [ENTER].
, or press [ENTER].
Keyboard shortcut: [ALT
+ s]
Deleting the existing Application Options, click More.
Note: The Delete Command is not available during Application Options Maintenance.
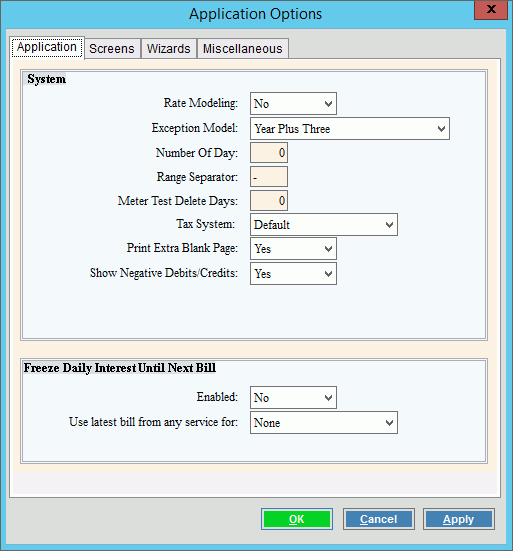
Use the Application Tab to set options for Utility Billing including billing exception models.
To see directions for the Application Tab, click More.
Application Options Wizards Tab Window Example:

Application Tab Prompts |
|
|
To open the Application Tab, click Application. |
Rate Modeling |
Note: The Rate Modeling option is not used for the Rate Modeling programs. |
To specify the historical time period for billing exception comparisons, select a choice in the drop-down list. Entry Options:
Note: The exception model setting only pertains to the Billing Exception Report. |
|
Number of Day |
To specify the number of days to look back in history for customer bills with the same transaction code, enter the number days. (3.0 numeric) Notes:
|
To specify the report range separator to use when entering a range of customers or locations during certain reports, enter the range separator value. (1 character) Notes:
|
|
Meter Test Delete Days |
Enter the
number of days that you are allowed
to delete a meter test
result. |
Tax System |
To specify the tax method to assess, click a choice.
|
Print Extra Blank Page |
To specify whether or not to include a blank page at the end of reports, click a choice.
|
Show Negative Debits / Credits |
To indicate how to display negative debits and negative credits, click a choice. If set to No the display of negative debits and credits is unchanged. If set to Yes to show negative debits and credits, the cash and billing post reports and the transaction statistics screen will display negative credits as debits and negative debits as credits. |
Open Item Daily Interest Tip: For more information on open item interest, see Customer Daily Interest. |
|
Enabled |
To enable daily interest to be frozen until the next bill, click Yes in the drop-down list. To continue calculating daily interest, click No. |
Use Latest Bill from any Service for |
To specify a service, click a choice in the drop-down list. This setting works with Enabled above. If freeze daily interest until next bill is enabled and an individual service or all services are selected here, then when calculating interest for an invoice with a service that matches this setting the latest billing/due date for all services will be used. If the calculation date is <= the last due date and >= the last billing date, interest will only be calculated up to the last billing date, effectively freezing interest during the period until it passes the last due date. |
Calculate OI Interest from Due Date |
If the payment is made after the due date plus the number of grace days maintained on the Open Item Daily Interest Maintenance:
|
|
To
apply the changes made to the Wizards options, click Apply. |
|
To
save changes and close the window, click OK. To exit without changing the Wizards
options, click Cancel |
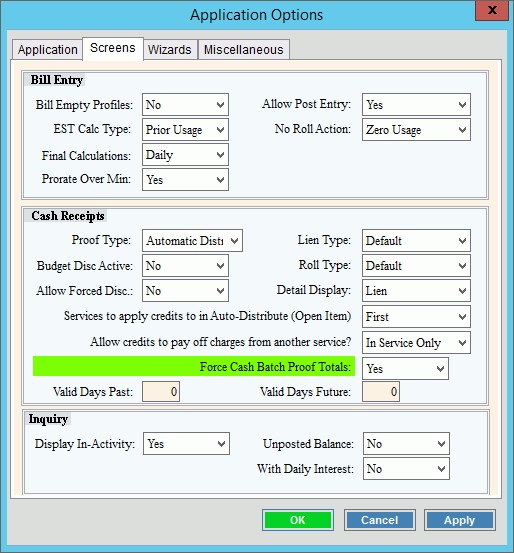
Use the Screens Tab to specify certain options for Bill Entry, Cash Receipts and the Customer Inquiry.
To see directions for the Screens Tab, click More.
Application Options Screens Tab Window Example:

Screens Tab Prompts
|
|
|
To open the Screens Tab, click Screens. |
Bill Entry |
|
Bill Empty Profiles |
To bill empty customer Transaction Profiles during Bill Entry, click Yes in the drop-down list. To prevent empty Transaction Profiles from being billed during Bill Entry, click No in the drop-down list. |
EST Calc Type |
To determine the type of estimated calculations and to determine the history to use when estimating the charges, click a choice in the drop-down list. Entry Options:
|
Final Calculations |
To determine how final bills are calculated, click a choice in the drop-down list. Entry Options:
|
Prorate Over Min |
To prorate over the minimum, click Yes. To prevent prorating over the minimum, click No. |
Allow Post Entry |
To prevent billing transactions from being entered while the Billing Post is in progress, click No. To allow billing transactions to be entered while the Billing Post is in progress, click Yes.
|
No Roll Action |
To activate the No Roll Action, click Yes in the drop-down list. To de-activate the No Roll Action, click No in the drop-down list. |
Cash Receipts |
|
Proof Type |
To set the Proof Type to use during Cash Receipts Entry, click a choice in the drop-down list. Entry Options:
|
Budget Disc Active |
To activate the Budget Discount feature, click Yes in the drop-down list. To prevent Budget Discounts, click No in the drop-down list. |
Allowed Forced Disc |
To allow a customer discount to be entered if they are not eligible to receive one, click Yes in the drop-down list. To prevent a customer from receiving a discount if they are not eligible to receive one, click No in the drop-down list. |
Lien Type |
To determine the method for paying Liens, click a choice in the drop-down list. Entry Options:
|
Roll Type |
To determine the method for paying the open roll detail, click a choice in the drop-down list. Entry Options:
|
Detail Display |
To specify whether to display Lien detail or Roll detail during Cash Receipts Entry, click a choice in the drop-down list. Entry Options:
|
Services to apply credit to in Auto-Distribute (Open Item) |
For open item systems, set this option to specify which services a credit will be applied to:
|
Allow credits to pay off charges from another service? |
To specify if credits from 1 service will pay off charges from another service, select:
|
Force Cash Batch Proof Totals |
If you want to use proof totals for reconciling payments when using cash batches, click Yes. Or to omit proofing the total dollar amount of payments entered for the batch, leave this set to No. When this option is set to yes and a proof total is entered for a batch a Proof Total area shows in Quick Cash Entry. The total dollar amount of payments entered for the batch must equal the batch proof total. |
Valid Days Past Valid Days Future |
These 2 settings work as a date check in Quick Cash Entry and Cash Receipts Entry to ensure that you don't enter an erroneous cash date. To activate the date check, enter the number of days past today's date that the date is still valid. To activate the date check, enter the number of days in the future from today's date the date is still valid. Note: Both values default to 0, so that the date check is not activated until values are added. You can enter values in 1 or both fields. If there are values in 1 or both fields and a cash date is entered that is outside the number of days past or in the future when compared to today's date, the following message displays to alert you:
|
Focus Location Field |
To activate the location field rather than the customer field for Quick Cash Entry and Cash Receipts Entry, set this field to Yes. When set to yes, you can enter a location rather than a customer for which to make a payment. |
Inquiry |
|
Display In-Activity |
To display inactive services, click Yes in the drop-down list. To omit displaying inactive services, click No in the drop-down list. Tip: Generally, this option is set to No. |
Unposted Balance |
Note: This field is reserved for future use. Please leave blank. |
With Daily Interest |
Note: This field is reserved for future use. Please leave blank. |
|
To
apply the changes to the Screens window, click Apply. |
|
To
save changes and close this window, click OK. To exit without changing the Screens
options, click Cancel |
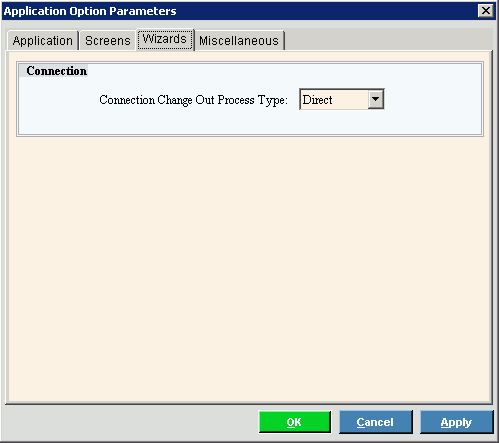
Use the Wizards Tab to set certain Wizards options.
To see directions for the Wizards Tab, click More.
Application Options Wizards Tab Window Example:

Wizards Tab Prompts |
|
|
To open the Wizards Tab, click Wizards. |
Connection Change Out Process Type |
To specify when the Connection Change Out updates the connection, click a choice in the drop-down list. Entry Options:
Note: This setting determines if the Change Out History Report is active. To activate the report on the Reports menu, set to the option to Delayed. |
|
To
apply the changes made to the Wizards options, click Apply. |
|
To
save changes and close the window, click OK. To
exit without changing the Wizards options, click Cancel
|
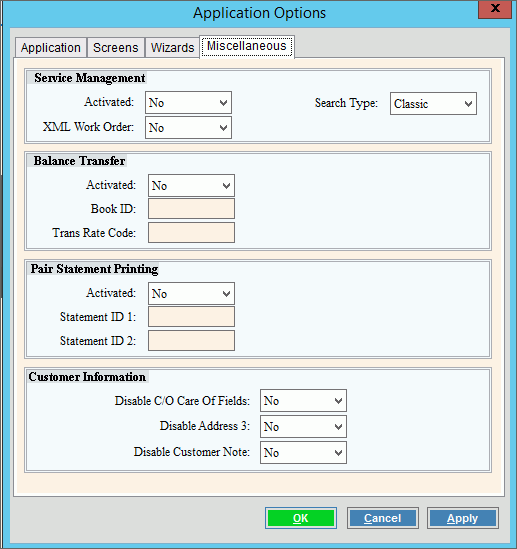
Use the Miscellaneous Tab to specify certain options for the Service Management programs, customer care of fields and for the Customer Balance Transfer Wizard feature.
To see directions for the Miscellaneous Tab, click More.
Application Options Miscellaneous Tab Window Example:

Miscellaneous Tab Prompts |
|
|
To open the Miscellaneous Tab, click Miscellaneous. |
Service Management |
|
Activated |
To activate the Service Management menu, click Yes in the drop-down list. To turn off the Service Management menu, click No in the drop-down list. |
XML Work Order |
To enable the XML format for service call work orders, click Yes in the drop-down list. To disable the XML format for the service call work orders, click No in the drop-down list. |
Balance Transfer Note: The options below pertain to activating the Customer Balance Transfer Wizard. |
|
Activated |
To activate the Balance Transfer Wizard, click Yes. Otherwise, click No. |
Enter the defined Billing Run Code ID associated with balance transfer transactions. Notes:
|
|
Enter the Transaction Code Rate Code to be assigned to balance transfer transactions. Tip: To make it easy to identify the transfer transactions, you may find it handy to use a Rate Code of BalX. |
|
Pair Statement Printing
|
|
Activated |
To allow statements to be printed twice once to statement ID 1 and once to statement ID 2, click Yes in the drop-down list. |
Statement ID 1 & 2 |
If activated is set to Yes, then enter the statement ID 1 and statement ID 2. Note: This field is not active if activated is not set to yes. |
Customer Information These options allow certain customer information to be disabled. |
|
Disable C/O Care of Fields |
To disable the care of fields in the Create/Edit Customer wizards and the Customer view, set this to Yes. To enable the customer care of fields, set this to No. |
Display Address 3 |
To disable the customer address line 3 in the Create/Edit Customer wizards and the Customer view, set this to Yes. To enable the customer address line 3 field, set this to No. |
Disable Customer Note |
To disable the customer note field that can be maintained in the Customer Note wizard and the Customer view, set this to Yes. To enable the customer notes, set this to No. |
|
To
apply the changes made to the Miscellaneous options, click
Apply. |
|
To
save changes and close the window, click OK. Or, to exit without changing the
options, click Cancel |