Enhanced Inquiry - Customer View
Use the Customer View to view and manage demographic information for customers. This includes customer name and mailing address, contact information, customer user-definable fields, notes, messages, ACH information and online access information.
Note: Owner
![]() and Tenant
and Tenant ![]() icons display on the Inquiry banner to indicate
if the customer has an owner and a tenant. If you are viewing owner
information, you can click Tenant to quickly load the customer information
for the tenant in the view. And, click Owner to switch to viewing
the owner information.
icons display on the Inquiry banner to indicate
if the customer has an owner and a tenant. If you are viewing owner
information, you can click Tenant to quickly load the customer information
for the tenant in the view. And, click Owner to switch to viewing
the owner information.
From the EDIFICE Inquiry, click View and then click Customer.
EDIFICE Inquiry - Customer View Example:
EDIFICE Inquiry - Customer View Prompts Note:
Each section of the view can be expanded or collapsed to
suit your needs. To collapse a section, click Collapse
|
|
Customer Tools There are several tools you can use for maintaining customer information.
|
|
Tools |
Customer Tools explanation:
|
Customer Information This area shows the customer name and address. This information can be edited.
|
|
Customer Information |
For details on maintaining this information, see Create Customer Wizard.
|
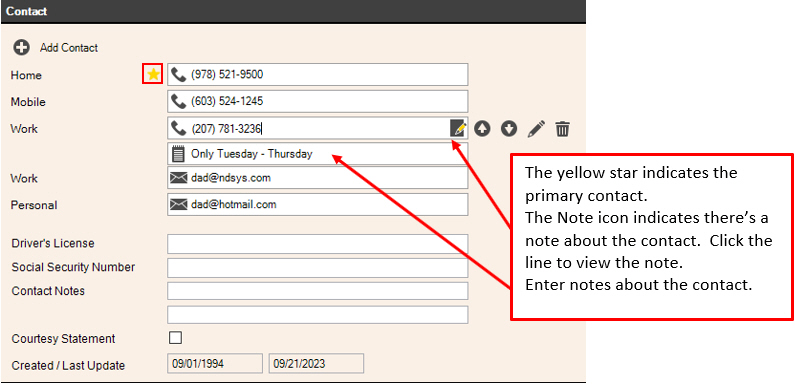
Contact Information When you create a customer using the Add New / Create Customer wizard, you can enter up to three customer phone number and an email address that will show in this area and you can maintain unlimited additional contacts here. Contacts can either be for the customer or the location associated with the customer. Notes can be included. The topmost contact is considered the primary or preferred contact and is noted with a yellow star, but you can assign a different contact as the primary contact if you want. Each contact is assigned a contact type. A type can be phone, email or other and is visually identified with an icon. You can also maintain a description for each type to suit your purposes. There are contact reports available in Executive Reporting.
|
|
Contact Information |
Unlimited contact information for the customer and the location can be added and edited here. It's important to note that a location contact is only associated with the location. To add additional contacts to an account:
Additional fields in the contact area:
|
Customer User Definable Information In this area you can view and maintain information specific to your organization. Because these fields are custom to your organization, the fields in the documentation may not match the fields on your screen. Alpha user definable fields will have drop-down lists from which you can choose an entry or you can enter an entry that is not listed. Adding an entry will make it available for the next time.
|
|
Customer Notes Use the customer notes section to add extended notes about the customer. These notes only display in this area. For more information, see Customer Notes.
|
|
Notes Tools |
The following tools are available:
|
Customer Messages This area shows messages attached to the account. Up to 3 user-defined message codes can be assigned to the account. The messages will display in certain places and can be included on several types of statements and notices for the customer. To select a defined message, click a choice in the drop-down list.
|
|
Customer ACH and Online Access Information Use this area to view customer ACH and online access information.
|
|
ACH Setup |
Use this area to view and maintain the ACH information for customers who wish to make automatic ACH payments for their utility bills. |
Online Access |
Use this area to view the online access information for the customer. This information is maintained using the Customer Web Information wizard.
|
Sale
|
Use Sale to generate prorate information if the property is being sold. This will calculate quarterly and daily charges along with the current balance forward and a prorated amount that is due. To start, click Sale and the following information displays. Note: This only displays if the feature is active.
1. Enter the current billing cycle from and through dates. 2. Enter the annual and quarterly utility charge. 3. Enter a date for the date of sale. 4. Click Print.
|
 . To expand a collapsed section,
click
. To expand a collapsed section,
click  .
.


 - To generate prorate information if the property is being
sold.
- To generate prorate information if the property is being
sold. 

 - To edit the customer's
online access information, click
- To edit the customer's
online access information, click  - To remove the customer for this account, click
 .
.
 . For directions, see
  displays to alert you if a note
is entered.
displays to alert you if a note
is entered.


 - To expand the
notes window for easier viewing click
- To expand the
notes window for easier viewing click  - Easily copy a
large block of text to another location by highlighting the
desired text and then clicking
- Easily copy a
large block of text to another location by highlighting the
desired text and then clicking  - Easily paste a block of text from another
source to the notes by clicking
- Easily paste a block of text from another
source to the notes by clicking  - Re-displays the notes from the last time they were saved
and clears all changes made since last save.
- Re-displays the notes from the last time they were saved
and clears all changes made since last save. -
Removes all notes currently displayed. After clicking
Clear, the following prompt displays:
-
Removes all notes currently displayed. After clicking
Clear, the following prompt displays: