Cash Receipts Entry
Use Cash Receipts Entry to enter cash payments and cash adjustments from customers. You can enter payments for liens, budget payments and enter cash receipts for security deposits from customers. Discounts and deposit interest can calculate, if applicable. In addition, an auto distribution feature is available to automatically generate cash receipt transactions. If the auto distribution feature is activated, the total proof amount fills in by using the customer's total balance, and then distributes a payment to each balance for the customer.
Notes:
After entering the customer cash receipts transactions, confirm your entries by generating the Cash Receipts Edit Journal.
Cash receipts transactions do not update the customer's balances until you perform Cash Receipts Post.
For information about the timing and sequence of cash receipts tasks, see Cash Receipts Process.
For directions to reverse a payment that was returned for insufficient funds, see reverse selected payment in the Payment view.
To begin:
1. Click Cash
Receipts Entry ![]() on the Tool
bar.
on the Tool
bar.
2. Or, use the keyboard shortcut: [Ctrl + r].
3. Or, click Tools and then click Cash Explorer. From the Cash Explorer click a line to edit and then click Edit.
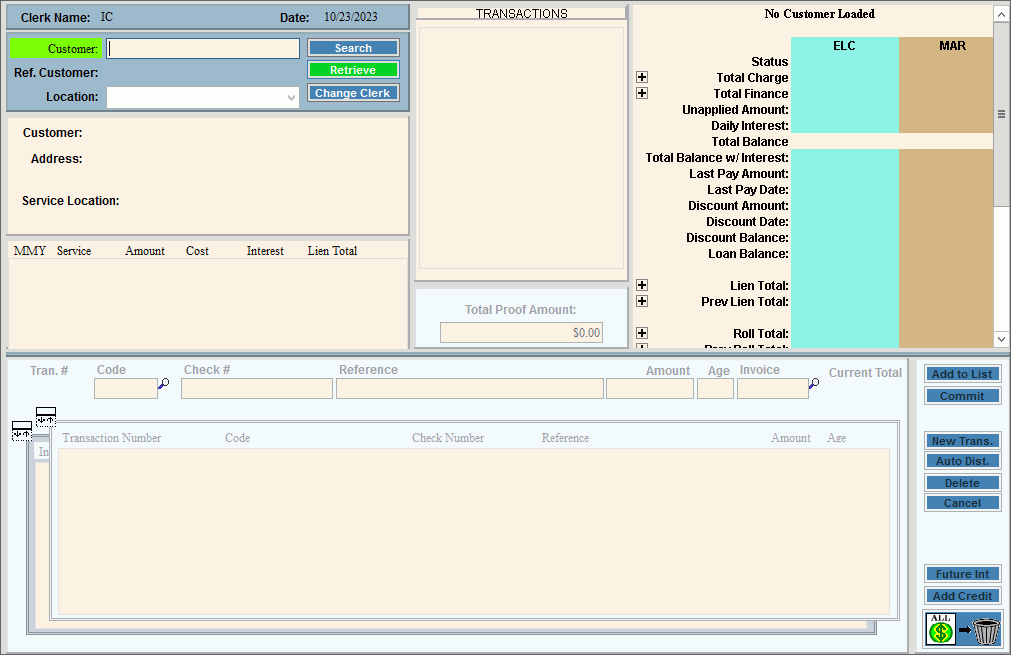
Cash Receipts Entry Prompts
|
|
Enter the cash receipts run information which includes the clerk entering the payments and the cash date. |
|
Payment Entry Summary |
Note: For information on entering a lien payment for a customer, see Cash Receipts Entry - Entering A Lien Payment. To create a new cash receipts transaction: 1. From the Customer Entry Area, enter a customer ID. 2. Accept the displayed total proof amount or enter a total proof amount. 3. Accept the displayed transaction code or enter another transaction code, if applicable. 4. If the payment is made by check, enter the check number. 5. Enter a payment reference, if applicable. 6. Confirm the cash receipts transaction amount or enter the amount, if applicable. 7. Accept the age code for the transaction code or enter another age code, if applicable. 8.
To complete the cash receipts transaction, press [Enter]
or click Add
to List 9.
When all cash receipts transactions for the customer are
entered, click Commit List
10. Print a receipt and check endorsement, if applicable. |
Displays clerk name from the cash receipt control information. Displays the cash date from the cash receipt control. |
|
Entry Options:
|
|
If Cash Receipts Entry is set to apply payments to locations, the location field is active for you to enter a Location ID rather than a customer. For open item customers with multiple locations, the locations will display in the drop-down list. If the customer does not have multiple locations this field is not active. Entry Options:
|
|
Customer Information |
After clicking Retrieve, customer information displays including customer balances, lien transactions and their the Cash transaction profile, if applicable. If cash transactions have already been entered and committed, the transaction detail lines display in yellow and can be edited. The cursor stops at the Total Proof Amount field or at the Tran. Code field for transaction detail lines to be entered. For directions, see Cash Receipts Entry - Cash Transaction Profiles and Proof Amount Area.
|
|
The Cash Transactions Profile and Proof Amount area shows the transaction codes associated with the cash transaction profile assigned to the customer and to enter a proof amount, if applicable. The transaction codes are used to generate the cash receipts transactions. The table following the window example describes the cash transactions profile and proof amount area for Cash Receipts Entry. The rate code displays as the abbreviated transaction code description and the transaction code description displays for your reference.
|
|
The total proof amount displays from the outstanding balance. This can be edited, if needed. (-7.2 numeric) Note: The total proof amount is controlled by the proof type setting of the Application Options. If the proof type is set to Not Active, you can not enter a total proof amount. |
|
|
Use the Cash Receipts Entry - Cash Receipts Entry Area to enter the payment details for the customer. Cash Receipts Transaction Detail Area Example:
|
|
Displays the transaction number that is automatically generated and is incremented after each successive transaction is entered. Notes:
|
|
To accept the first transaction code from the Transaction Code List, press [TAB] or enter another transaction code for the payment. (3.0 numeric) Or, enter a valid G/L account, if you are using the GL Mode. For directions to enter cash receipts in GL Mode, see Cash Receipts Entry - Transaction Detail GL Mode. (up to 12 characters) Notes:
|
|
Displays for your reference the description of the transaction code or of the GL account, if you are using the GL Mode. Note: This field is display-only and can not be edited. |
|
Enter the check number, if applicable. (9.0 numeric) Note: If you do not enter a check number, this entry is considered cash. |
|
Enter a reference to print on the Cash Receipts Edit Journal. (up to 20 characters) |
|
Enter the dollar amount of the payment transaction. (-7.2 numeric) Notes:
|
|
To accept the default Age Code for the Transaction Code, press [TAB] or enter another Age Code, if applicable. (4.0 numeric) Notes:
|
|
Enter the statement invoice number the amount is applied to, if applicable. (14.0 numeric) |
|
Current Total |
Displays a running accumulation of the cash transaction amounts committed for the customer. Note: If the Proof Type Application Option is set to Auto Distribution or Manual, when the Current Total equals the Total Proof Amount, the payment distribution for the customer is complete and you can commit the list. |
|
To complete the cash receipts transaction detail line, press [ENTER] or click Add to List. Keyboard shortcut: [ALT + a] Or, to cancel the transaction detail
line prior to adding
it to the Transaction Detail List, click Cancel
Keyboard shortcut: [CTRL + c] Note: The completed detail line displays in the Transaction Detail List and is highlighted. The cursor returns to the Tran. Code field. You are ready to add another line or complete the cash receipts transactions for the customer. |
|
Note: If the Proof Type
Application
Option is set to Auto Distribution
or Manual, when the Current
Total equals the Total Proof Amount the payment distribution for
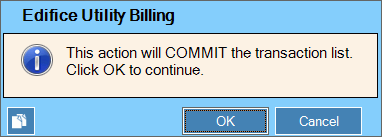
the customer is complete. The following message on the Status Bar alerts you: To complete entry and to commit the transactions for the customer after all associated detail lines are entered, click Commit List. Keyboard shortcut: [CTRL + o] Or, if this is a credit card payment, click Commit CC. For directions, see Credit Card Payments.
After clicking Commit List, this window displays: Commit Transactions Window Example:
To commit the entered transactions if they are correct, click OK. Keyboard shortcut: [Alt +o] Note: After clicking OK:
|
Cash Receipts Entry Detail List Use
the Cash Receipts Transactions Details List Area to view entered
cash receipts for the customer. You can click Toggle
Cash Receipts Transaction Detail Area Example:
|
|
Balance Forward |
Displays the transaction number that is automatically assigned. The transaction number is incremented after each successive transaction is entered and then reset to 1 after the Cash Receipts Post. Notes:
|
Open Invoice List |
Note: To display the open
invoices for the customer, click Toggle
|
|
Use the Cash Receipt Printing window of Cash Receipts Entry to print a receipt for the customer's payment. When the form of payment is a check, an endorsement can be printed on the check at this time, if the system is set to do so. Notes:
|
|
Validate Check(s)? |
To print endorsement information on this customer's check, select the box. For directions to print endorsements, see the Receipt Printer Endorsement Step below. To prevent the check endorsement information from printing, de-select the box. Note: The Validate Check(s)? prompt is only available, if the Receipt Type option of the Company Table is set appropriately. For Endorsement Printing, if applicable, see below. |
Would you like to print a Cash Receipt for this account? |
|
|
To begin printing, click Print, or press [ENTER]. Keyboard shortcut: [ALT + p] Or,
to print to the Print
View screen, click Print View Or,
to escape from the print routine, click Cancel
Keyboard shortcut: [ALT + c] |
Receipt Printer Endorsement Step Note: The Receipt Printer Endorsement option is only available, if:
|
|
|
To print endorsement information on the check, click OK. Keyboard shortcut: [ALT + o] Note: Click OK or press [Enter] after the check is placed in the receipt printer. If you do not wish to print endorsement
information on the check, click Cancel
Keyboard shortcut: [ALT + c] |
Editing a Cash Receipt |
Editing Uncommitted and Committed Cash Receipts TransactionsNote: Cash transactions can be edited as many times as necessary until the Cash Receipts Post is performed. 1. From the Transaction Detail List, click to highlight the desired cash transaction detail line to change. 2. Position the pointer to the information that you want to change and enter the changes. 3. To complete the edit
process, click Add to List
Editing Posted Cash Receipts TransactionsTo correct an incorrectly posted cash receipts, you can enter a reversing payment during Cash Receipts Entry, then perform the Cash Receipts Post and next enter the correct payment. For more information, see Cash Receipts Entry - Entering Special Payments - Payment Reversal.
|
Deleting a Cash Receipt |
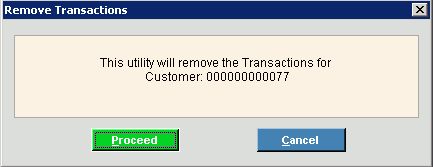
Deleting Uncommitted and Committed Cash Receipts TransactionsNote: Use these steps to a single delete uncommitted or committed cash transaction. To delete all committed transactions see below. To delete posted cash transactions, see below. 1. From the Transaction Detail List, click to highlight the cash transaction detail line to delete. 2. To delete the highlighted
cash transaction, click Delete
Deleting All Committed Cash Receipts Transactions for a Customer1. Recall the customer
with the transactions. Then, click Delete
All 2. The following prompt
displays: 3. Click Proceed to finish the delete. Deleting Posted Cash Receipts TransactionsTo delete a posted cash receipts transaction you can enter a reversing payment during Cash Receipts Entry, then perform the Cash Receipts Post and next enter the correct payment. For more information, see Cash Receipts Entry - Entering Special Payments - Payment Reversal.
|
![]()

 to switch to the Open Invoices list view
if this is an open item customer. You can use the Open Invoices
list to select the invoice to which the payments will be applied.
to switch to the Open Invoices list view
if this is an open item customer. You can use the Open Invoices
list to select the invoice to which the payments will be applied.


 .
.