Billing Post
Use the Billing Post to finalize the billing run and to update the customers, transaction codes, customer history, usage analysis, the inventory files (meters, meter trailers, or components, if applicable) and the General Ledger Journal file with the billing information. Review the Post Summary that is generated to verify that the post completes as expected.
![]() Important:
Important:
Prior to beginning Billing Post make sure that you have entered all billing transactions and have printed all necessary reports including the Billing Print Journal and customer statements.
A copy of the Billing Post Summary is saved in Report History for a complete audit trail.
Do not enter readings or billing transactions while the Billing Post is being performed.
To see how to correct a bill that was posted incorrectly, see Special Bills - Entering a Charge Reversal.
To see an example of the report, click Billing Post Summary Sample.
To open:
From the Billing Explorer, click Post and then click Billing.
Or from the Billing Panel, click Post
 .
.
Or, use the keyboard shortcut: [ALT] [y [b] [u].
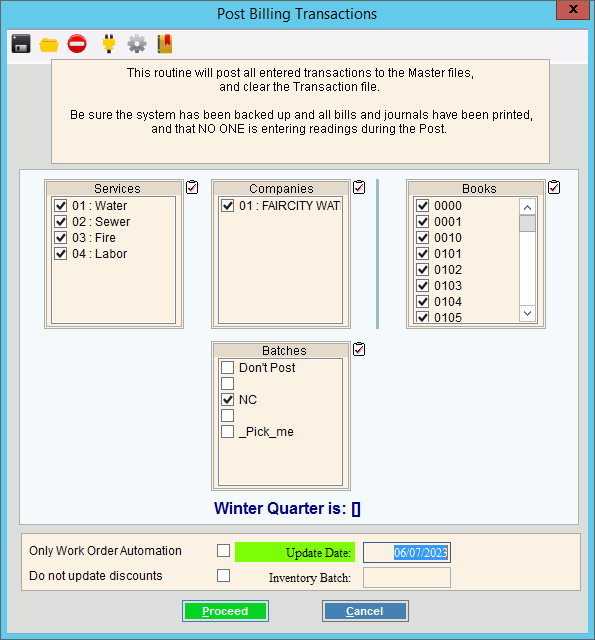
Billing Post Window Example:

Billing Post Prompts
|
|
To select the services to post, click to check the appropriate services listed. Tip:
To quickly select or de-select all
services listed, click the Check
All icon |
|
To select the companies to post, click to check the appropriate companies listed. Tip:
To quickly select or de-select all
companies listed, click the Check
All icon |
|
To select the books to post, click to check the appropriate books listed. Tip:
To quickly select or de-select all
books listed, click the Check
All icon |
|
Winter Quarter is: |
Displays the current winter quarter for your reference. |
Only work order automation |
To only post transactions that are generated from mobile work order automated events, check this box. To post both work order automation events and billing, leave this box unchecked. Note: This option only applies to mobile work orders. Mobile work order automation events must be printed on the billing journal before the events can be posted. |
Do not update discounts |
To omit updating the discount amount and the discount date for accounts eligible for a discount, check this box. To issue discounts for eligible accounts, leave this box unchecked. |
Inventory Batch |
Note: This option is not active for the Billing Post. |
Update Date |
Enter the date to be assigned as the billing post date for all billing transactions to be posted. |
General Ledger Period |
For each service, enter the General Ledger period for the generated Billing Post entries. (1-13) |
|
To start the Billing Post, click Proceed. Keyboard shortcut: [ALT + p]
Or, to escape without performing the
Billing Post, click Cancel Keyboard shortcut: [ALT +c] |
After clicking Proceed, the following confirmation window displays:
To accept the Billing Post settings and to continue, click Ok. Note: If you want to omit displaying the confirmation step, check the Do not show this again box. Or, leave this box unchecked if you want to continue to see this confirmation page. |
|