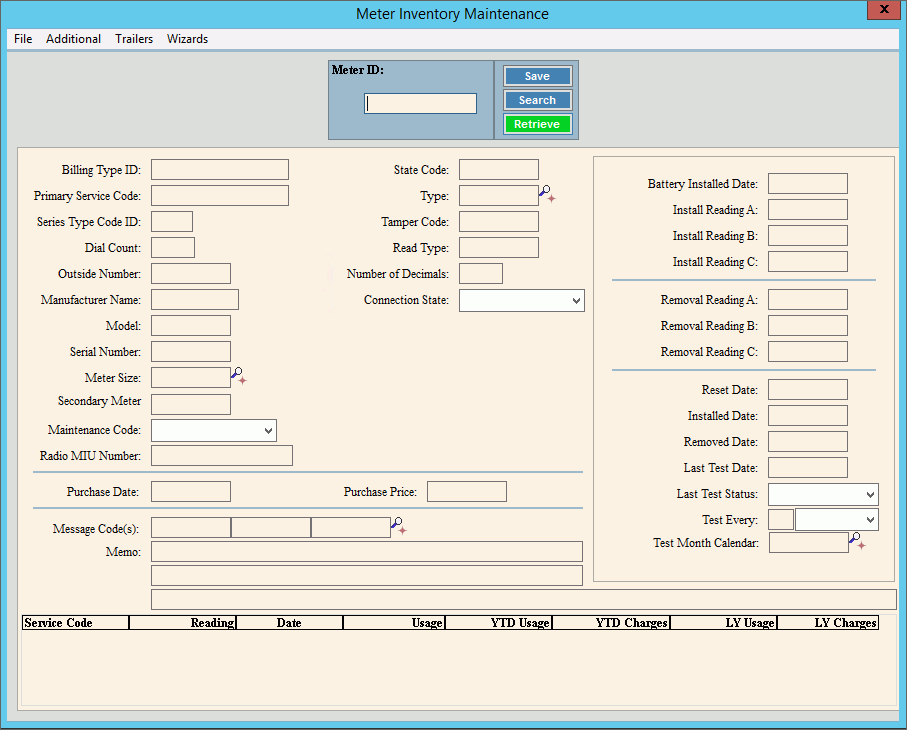
Meter Inventory Maintenance
Use Meter Inventory Maintenance to maintain information for the meters in inventory including usage, subtract, compound, credit compound, peak, and demand meters. There is also an Inquiry panel that displays the meter's service information and the meter's testing detail history. When viewing the Service Inquiry information you will see the meter's usage and reading information for the last billing, as well as, the meter's year-to-date total and last year's total for usage and charges. When viewing the Testing Detail History you can see the meter's last test date and the test status.
Tip: You can access the Meter Trailer Window and the Meter Additional Fields Window from Meter Inventory Maintenance.
To open:
1. Click Daily Work from the menu.
2. Click File Maintenance.
3. Click Code Maintenance.
4. Click Meter File Maintenance.
5. Click Meter
Inventory Maintenance.
Tip: Or, use the keyboard
shortcut: [ALT] [y] [m] [c]
[m] [m] [ENTER].
Meter Inventory Maintenance Window Example:
To create a meter enter the new meter ID and press [ENTER]
or click Retrieve
![]() .
.
Keyboard shortcut: [ALT + t]
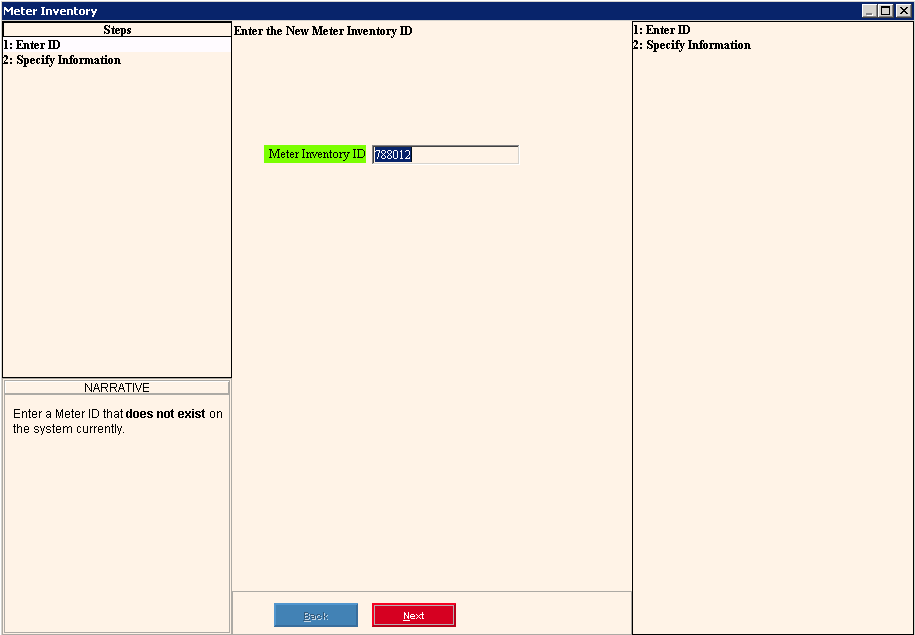
The Meter Wizard displays.
For general information about the Wizard menu, window layout and navigation,
see the Wizard
- Introduction.
3. To confirm the Meter ID, click
Next ![]() and
the next window of the Meter Wizard displays.
and
the next window of the Meter Wizard displays.
Meter Inventory Wizard Prompts
|
|
Primary Service Code |
To select the primary service code for the meter, click a choice in the drop-down list. (2.0 numeric) |
Enter the present reading for the meter, if applicable. (10.0 numeric) |
|
|
To update the new or changed information, click Finish or press [ENTER]. Keyboard shortcut: [ALT + s] |
To avoid losing data, you must click Finish. |
|
|
To close the Wizard without validating or saving the data, click Close. |
After you click Finish, the Meter Wizard closes and the Meter Inventory Maintenance window displays for entry of the remaining fields.
Meter Inventory Maintenance Prompts
|
|
Enter a
unique identification for the meter and press [Enter]
or click Retrieve Or, to view all of the meters, click
Search
Keyboard shortcut: [ALT + r] Required |
|
|
To update the new or changed information, click Save or press [ENTER]. Keyboard shortcut: [ALT + s] |
To avoid losing data, you must save new or changed records. |
|
Enter a valid billing type ID to assign to the meter, if additional billing information is needed for the meter. (up to 10 characters) |
|
Primary Service Code |
Displays the primary service for the meter. (2.0 numeric) |
Enter a valid meter series type code ID, if applicable. (0-4) Note: This field is used during the export phase of the Meter Communications routines. |
|
Enter the number of digits the meter has to read, if applicable. (2.0 numeric) Note: This field only pertains to meters with multiple dials. |
|
Enter the number of the electronic transmitter-receiver for the meter, if applicable. (up to 10 characters) Note: This field is used during the export phase of the Meter Communications routines. |
|
Enter the name of the meter manufacturer. (up to 12 characters) |
|
Enter the model number of the meter. (up to 10 characters) |
|
Enter the serial number of the meter. (up to 10 characters) |
|
Enter the size ID to identify the meter size. Frequently, the meter size is determined by the size of the pipe going into the meter. (up to 10 characters) Tips:
|
|
Enter the second meter number associated with the meter, if applicable. (up to 10 characters) Note: The secondary meter number is informational only. |
|
To assign a maintenance code click a choice in the drop-down list. Note: The maintenance code is informational only. |
|
Enter the radio MIU number for the meter, if applicable. (up to 20 characters) Note: This field is used during the export phase of the Meter Communications routines. |
|
Enter the user-defined State code for the meter if applicable. (up to 5 characters) |
|
Enter an optional device type ID that describes the type of meter, if applicable. If a device type is assigned, the device type description will replace the generic text of Meter wherever the trailer is displayed. For more information, see Device Descriptions. Tips:
|
|
Enter the tamper code for the meter, if applicable. (up to 5 characters) Note: This field is used during the export phase of the Meter Communications routines. |
|
Enter the read type for the meter, if applicable. (up to 5 characters) Note: This field is used during the export phase of the Meter Communications. |
|
Enter the number of decimals for the meter, if applicable. (2.0 numeric) Note: This field is used during the export phase of the Meter Communications. |
|
Connection Status |
|
Enter the date the meter was purchased. (mmddccyy - slashes and century optional) |
|
Enter the meter purchase price. (-6.2 numeric) |
|
Enter a message code to assign to the meter, if applicable. (up to 5 characters) Tips:
|
|
Enter a memo pertaining to the meter, if applicable. (up to 40 characters) While there are 3 lines available, you only use as many lines as you need. |
|
Enter the date the battery was installed, if applicable. (mmddccyy - slashes and century optional) |
|
Enter the reading at the time of installation for Dial A, dial B and dial C, if applicable. (10.0 numeric) |
|
Leave blank until the meter is removed. When removed, enter the reading at the time of removal for Dial A, dial B and dial C, if applicable. (10.0 numeric) |
|
Enter the date the meter was reset, if applicable. (mmddccyy - slashes and century optional) |
|
Enter the date the meter was installed at the service connection. (mmddccyy - slashes and century optional) |
|
Enter the date the meter was removed. (mmddccyy - slashes and century optional) |
|
Enter the date the meter was last tested. (mmddccyy - slashes and century optional) Tip: Generally, this field is maintained during the Meter Testing routines. |
|
Enter the results of the test on the meter, if applicable. Tip: Generally this field is maintained during the Meter Testing routines. |
|
Test Every |
|
Test FrequencyTest Month Calendar |
Enter the number of times the meter is tested annually. (2.0 numeric) Entry Options:
|
Meter Service Reading Inquiry Panel Notes: The following fields are maintained by EDIFICE. They are display-only and can not be edited. Because a meter can be assigned multiple services, one detail line displays for each service assigned to the meter. To view Meter Testing Detail, right-click and then click View Meter Testing Detail. For more information, see Viewing Meter Testing Detail below. |
|
Displays the Service Code associated with the meter's reading and usage information. |
|
Displays the amount of the last reading for the meter. Note: This field is used during the Export phase of the Meter Communications routines. |
|
Displays the date of the last reading. |
|
Displays the usage amount as determined from the last reading. Note: This field is used during the Export phase of the Meter Communications routines. |
|
Displays the amount of usage this meter has used so far this year. |
|
Displays the A/R dollar amount of service for the meter so far this year. |
|
Displays the total amount of usage for the meter for last year, if applicable. |
|
Displays the A/R dollar amount of service for the meter for last year, if applicable. |
|
Meter Testing Detail History Panel Notes: To view Meter Testing Detail, right-click within the Meter Service Inquiry Panel and click View Meter Testing Detail. The following fields are maintained by EDIFICE. They are display-only and can not be edited. |
|
Displays the date of the last meter test. |
|
Displays the status or results of the meter test. |
|
Displays the code for the technician who performed the meter test. |
|
Displays the tester number, if applicable. |
|
Displays the reference associated with the meter test, if applicable. |
|
Viewing Meter Testing To display the Meter Testing Detail Panel, right-click within the Meter Service Reading Inquiry Panel and click View Meter Testing Detail.
View Meter Testing Detail of Meter Inventory Maintenance Example:
|
|
Displays the date of the last meter test. |
|
Displays the status or results of the meter test. |
|
Displays the code for the technician who performed the meter test. |
|
Displays the tester number, if applicable. |
|
Displays the reference associated with the meter test, if applicable. |
|
Editing a Meter |
1. Enter the meter ID and click Retrieve
2. Click in the field to change and enter the data changes. 3. To complete the edit
process, click Save
|
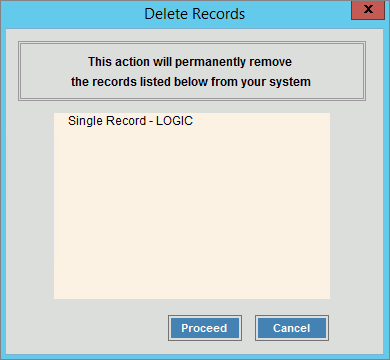
Deleting a Meter |
1. Enter the meter ID and click Retrieve
2. Click File
from the menu,
and next click Delete. 3. At the Delete prompt,
click Proceed to delete
the meter, or click Cancel
to escape from the delete routine.
|
![]()