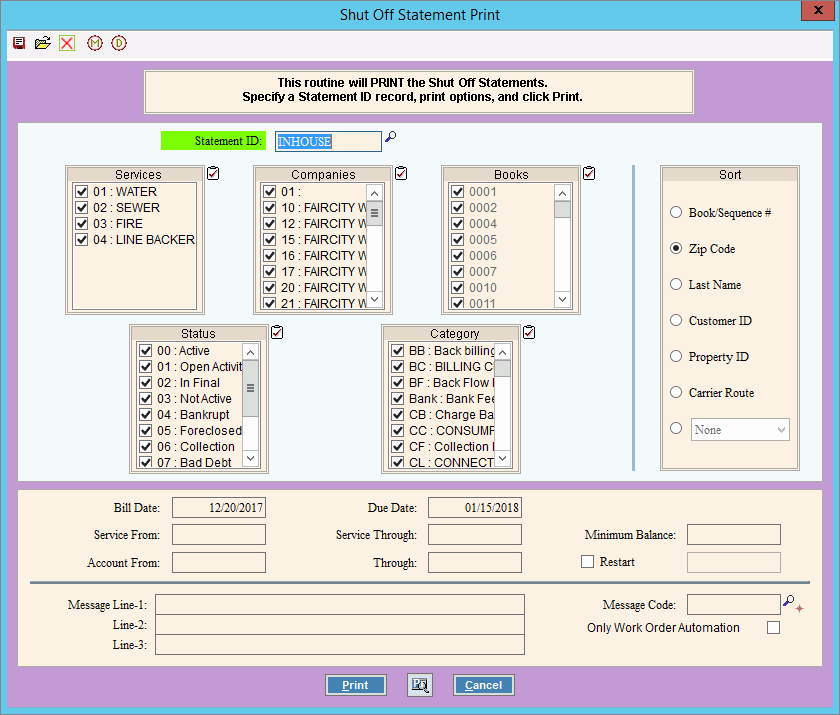
Shut Off Print Statements Instructions
Use the Shut Off Print Statements routine to print statements for customers who have been assessed shut off charges for their overdue balances.
Notes:
The Shut Off Statement Print window looks similar to the regular Billing Print Statements window. To distinguish between the two programs, the Shut Off Statements window has a Lavender border and the title of the window is Shut Off Statement Print.
The printing of Shut Off Statements works the same way as printing regular billing statements.
For more information about the timing and sequence of the shut off steps, see the Shut Off Procedures.
For more information about running reports, see Print View.
To open:
1. Click Processes from the Menu.
2. Click Shut Off.
3. Click Print
Statements.
Or, use the keyboard
shortcut: [ALT] [p] [s] [t].
Shut Off Print Statements Window Example:

Shut Offs Print Statements Options Tip:
To quickly select or de-select all
items listed, click Check All
|
|
Enter the defined statement ID to print miscellaneous receivables statements. Notes:
|
|
To select the services to report, click to check the appropriate services listed. |
|
To select the companies to report, click to check the appropriate companies listed. |
|
To select the books to report, click to check the appropriate books listed. |
|
To select the customer statuses to report, click to check the appropriate statuses listed. |
|
Sort |
To choose a sort option, click to select the appropriate button. Sort Options:
|
To accept the displayed bill date, press [TAB]. Or, enter another date for the bill date to print on all statements. (mmddccyy) Note: The bill date is entered during Billing Message Table Maintenance. |
|
To accept the displayed due date, press [TAB]. Or, enter another date for the due date to print on all statements. (mmddccyy) Note: The due date is entered during Billing Message Table Maintenance. |
|
Service From |
Enter the service from date to print on all customer statements, if applicable. (mmddccyy) Note: The service from date that prints on statements can be entered here or it can retrieved from the customer's billing transactions, if specified by the bill format that is set by NDS. |
Service Through |
Enter the service through date to print on all statements, if applicable. (mmddccyy) Note: The service through date that prints on customer statements can be entered here or it can retrieved from the customer's billing transactions, if specified by the bill format that is set by NDS. |
Minimum Balance |
Enter the minimum balance the customer must have for a statement to print, if applicable. (6.2 numeric) |
Account From |
Entry Options:
|
Through |
Entry Options:
|
Restart Account |
If your statement run aborted unexpectedly, perhaps during a printer jam, you can restart it. Entry Options:
Note: When you run a restart, make sure that all your other options are the same as the original print run. |
Notes:
|
|
The lines of the statement message that will print on all statements display and can be edited. (up to 40 characters) |
|
To include an additional message on the statements, enter the message code. Tips:
|
|
Only Work Order Automation |
To only print statements for mobile work order automation transactions, check this box. And, then make all the selections as you normally would. Or, to only print statements for transactions that are not automated events, leave this box unchecked. Note: This only pertains to mobile work orders. |
|
To begin printing, click Print,
or press [ENTER]. To print to the Print View window, click Print View. Or, to
escape from the print routine, click Cancel
|
|
To check the statement alignment by printing a test pattern on the first statement, click Alignment. Notes:
|