Opening 1099 Workfile Maintenance, click More.
1. Click Utilities from the Menu Bar.
2. Click 1099 Forms.
3. Click
1099 Workfile Maintenance.
Or, use the keyboard
shortcut: [ALT]
[t] [1] [m].
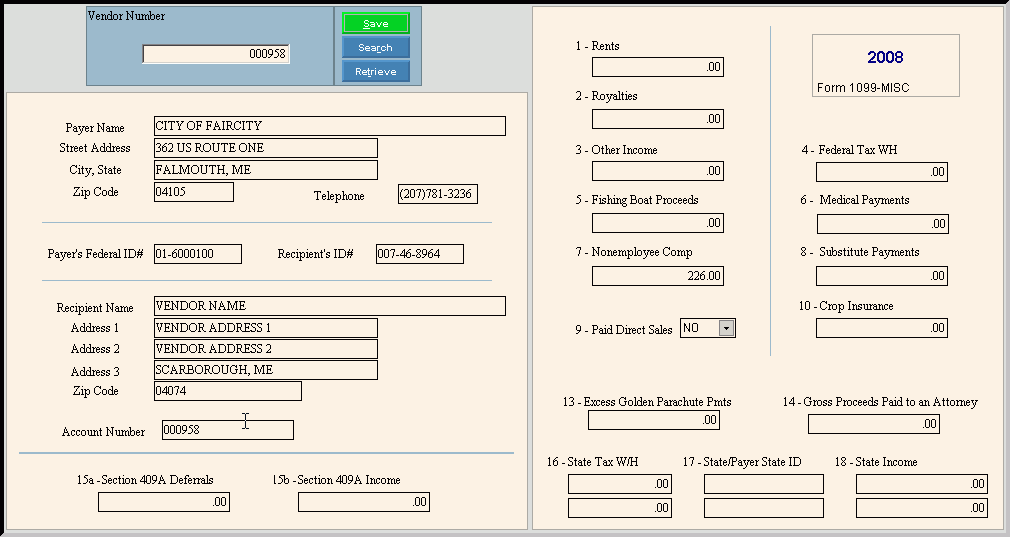
1099 Workfile Maintenance Window Example:

Creating a New 1099 Record, click More.
To create a new record choose one of these methods:
-
Enter the new Vendor Number and click Retrieve
 ,
or press [ENTER].
Keyboard shortcut: [ALT + t] -
Or, enter the new Vendor Number and click File from the Menu Bar; next click New.
Keyboard shortcut: [ALT] [f] [n]
Tip: To
indicate that you are building a new 1099 Record, New  displays near the Vendor Number. Default
entries display and the first field is highlighted
to let you know you can begin entering information.
|
1099 Workfile Maintenance Prompts Tip: To see more information about a field, click the hyperlink for the field name. | |
|
Enter the defined Vendor Number for the vendor receiving the 1099. (6.0 numeric) | |
|
|
To update the new or changed information, click Save or press [ENTER]. Keyboard shortcut: [ALT + s] |
|
To avoid losing data, you must save new or changed records. | |
|
|
To view all of the existing Vendor 1099 Records, click Search. From the Search list you can select the record to change or delete. Keyboard shortcut: [ALT + r] |
|
|
To display an existing Vendor 1099 Record, enter the Vendor Number and click Retrieve, or press [ENTER]. Keyboard shortcut: [ALT + t] |
|
Payer Name and Address Information Tip: The Payer Name and Address information is maintained on the Company Control Options Record. | |
|
Payer Name |
Displays your Company Name. |
|
Street Address |
Displays the street address portion of the mailing address for your company. |
|
City, State |
Displays the city and state portion of the mailing address for your company. |
|
Zip Code |
Displays the Zip Code portion of the mailing address for your company. |
|
Telephone |
Enter the Payer Telephone Number. (10.0 numeric) Tip: For Vendor 1099s created during Build 1099 Workfile, the 1099 Parameter record Telephone Number is assigned. |
|
Recipient Information Note: For Vendor 1099s created during the Build 1099 Workfile routine, the Recipient Name and Address information is generated from the Vendor Master information. | |
|
Enter the name of the vendor. (up to 30 characters) | |
|
Enter the address line 1 for the vendor's mailing address. (up to 20 characters) | |
|
Enter the address line 2 for the vendor's mailing address. (up to 20 characters) | |
|
Enter the address line 3 for the vendor's mailing address. (up to 20 characters) | |
|
Enter the Zip Code for the vendor's mailing address. (up to 12 characters) | |
|
Account Number |
Enter thevendor number as the Account Number for the vendor. (6.0 numeric) |
|
1099 Amounts | |
|
15a - Section 409A Deferrals |
Enter the dollar amount for Section 409A - Deferrals, if applicable. (7.2 numeric) |
|
15b - Section 409A Income |
Enter the dollar amount for Section 409A Income, if applicable. (7.2 numeric) |
|
1 - Rents |
Enter the dollar amount for rent, if applicable. (9.2 numeric) |
|
2 - Royalties |
Enter the dollar amount for royalties, if applicable. (9.2 numeric) |
|
3 - Other Income |
Enter the dollar amount for other income, if applicable. (9.2 numeric) |
|
4 - Federal Tax W/H |
Enter the dollar amount for federal tax withholding, if applicable. (9.2 numeric) |
|
5 - Fishing Boat Proceeds |
Enter the dollar amount for fishing boat proceeds, if applicable. (9.2 numeric) |
|
6 - Medical Payments |
Enter the dollar amount for medical payments, if applicable. (9.2 numeric) |
|
7 - Nonemployee Comp |
Enter the dollar amount for non-employee compensation. (9.2 numeric) |
|
8 - Substitute Payments |
Enter the dollar amount for substitute payments, if applicable. (9.2 numeric) |
|
9 - Paid Direct Sales |
To maintain the default setting of No, press [TAB]. Or, to set to Yes, click Yes in the drop-down list. |
|
10 - Crop Insurance |
Enter the dollar amount for crop insurance, if applicable. (9.2 numeric) |
|
13 - Excess Golden Parachute Pmts |
Enter the dollar amount for golden parachute payments, if applicable. (7.2 numeric) |
|
14 - Gross Proceeds Paid to an Attorney |
Enter the dollar amount for gross proceeds paid to an attorney, if applicable. (7.2 numeric) |
|
16 - State Tax W/H |
Enter the dollar amount for state tax withholding, if applicable. (7.2 numeric) |
|
17 - State/Payer State ID |
Enter the Payer State ID, if applicable. (up to 14 characters) |
|
18 - State Income |
Enter the dollar amount for state income, if applicable. (7.2 numeric) |
|
16 - State Tax W/h |
If you paid the vendor for work in another state, enter a second dollar amount for state tax withholding, if applicable. (7.2 numeric) |
|
17 - State/Payer State ID |
If you paid the vendor for work in another state, enter the second Payer State ID, if applicable. (up to 14 characters) |
|
18 - State Income |
If you paid the vendor for work in another state, enter the second dollar amount for state income, if applicable. (7.2 numeric) |
Editing an Existing 1099 Record, click More.
 CAUTION: To
avoid losing data, you must save new or changed records.
1. To
display the record to be changed, enter the Vendor Number
and click Retrieve  ,
or press [ENTER].
Keyboard shortcut: [ALT
+ t]
Tip: If
you do not know the Vendor Number, you can click Search  to see a list of Vendor 1099 Records.
2. To position the pointer to the information that you want to change, press [TAB] or click the field using the mouse.
3. Enter the data changes.
4. To
complete the edit process, click Save  , or press [ENTER].
Keyboard shortcut: [ALT
+ s]
Deleting an Existing 1099 Record, click More.
1. To
display the record to be deleted, enter the Vendor Number
and click Retrieve  ,
or press [ENTER].
Keyboard shortcut: [ALT
+ t]
Tip: If
you do not know the Vendor Number, you can click Search  to see a list of vendors.
2. Click
File from the Menu
Bar, and next click Delete.
Keyboard shortcut: [ALT]
[f] [d]
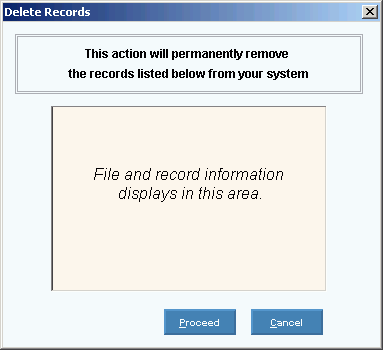
3. At the Delete Records prompt, click Proceed to delete the record, or click Cancel to escape from the delete routine.
Example:

Note: After
you click Proceed, you will see
the following message on the Status Bar.