To see directions for opening Function Keys, click More.
-
Click File from the Menu Bar.
-
Click Settings.
-
Click Client Options.
-
Click System.
Or, use the keyboard shortcut: [ALT] [f] [e] [o] [s]
-
From the System Parameters window, click the Function Keys Tab
 .
.
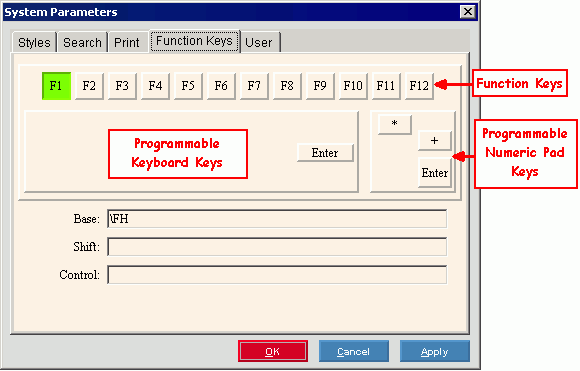
System Parameters Window - Function Keys Tab Example:

For directions on programming Function Keys, click More.
|
Function Key Prompts | |
|
through
|
Click the button for the Function Key or special keyboard key to be assigned to a command. The button for the selected key becomes highlighted. Tips:
|
|
Caution: Make all entries without spaces. Entering a space indicates to add a space when performing the keystroke or task. | |
|
Base |
Enter the keystrokes or commands for the tasks or commands that you want to assign to the selected key. Tips:
|
|
Shift |
Enter the keystrokes or commands for the tasks or commands that you want to assign to the selected key when pressed along with the [SHIFT] key. Tips:
|
|
Control |
Enter the keystrokes or commands for the tasks or commands that you want to assign to the selected key when pressed along with the [CTRL] key. Tips:
Note: [CTRL + F4] is reserved for closing launched windows. |
|
|
To save the changes and close the window, click
OK. |
|
|
To exit without changing the Function Keys, click
Cancel. |
|
|
To apply the changes without closing the window,
click Apply. |
To view Function Key Commands, click More.
|
Function Key Commands | |
|
Keystroke |
Function/Command |
|
Note: Make all entries without spaces. If you enter a space the system will add a space when performing the keystroke or task. | |
|
\e |
Performs [ESC](escape). |
|
\r |
Performs [ENTER]. |
|
\t |
Performs [TAB]. |
|
\s |
Performs [SHIFT + TAB]. |
|
\\ |
Enters the back slash (\) character. |
|
\o |
Opens a window. Performs the same function as [ALT + o] to open a window. |
|
\x |
Performs the same function as [CTRL + x], which clears an active window or cancels an active window. |
|
\c |
Performs click if the cursor is at a button (IButton). |
|
\Mx |
Performs a pointer move, where x = direction. Replace x with:
|
|
\Ax |
Performs [ALT] + x, where x = any character. |
|
\Sx |
Performs [SHIFT] + x, where x = any character. |
|
\Cx |
Performs [CTRL] + x, where x = any character. |
|
\1x |
Performs [CTRL] INNER FORM, where x = any character. |
|
\IAx |
Performs [ALT] INNER FORM, where x = any character. |
|
\ISx |
Performs [SHIFT] INNER FORM, where x = any character. |
|
\ICx |
Performs [CTRL] INNER FORM, where x = any character. Tip: This command is an alternative to \1x for some cases. |
|
\Fx |
Performs these functions, where x is replaced with the following:
|
To see an example of a General Ledger Function Key assignment, click More.
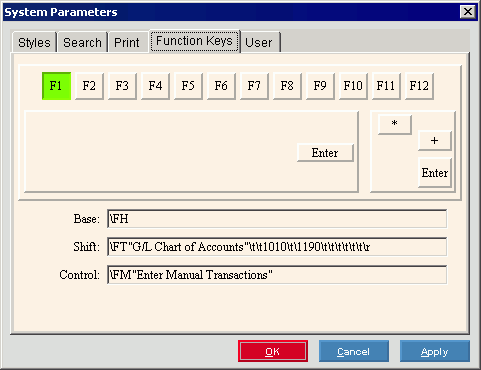
General Ledger Function Key Tab Example - Programming F1:

In this example, when you press...
-
[F1] WebHelp displays.
Tip: WebHelp is the default for [F1]. -
[SHIFT + F1] Activates the Chart of Accounts
 button, enters an Account Number
range of 101-0 through 119-0, and then displays the report in Print
View.
 -
[CTRL + F1] Opens Enter Manual Transactions.


