Auto Fringe Distribution Maintenance
Use Auto Fringe Distribution Maintenance to create a cross-reference that links Appropriation Account Numbers to Department Numbers for distributing the Fringe Amounts. You must enter all of the Department Numbers for employees that might be associated with a Fringe Number. Then you link each Department Number to an Appropriations Account Number (which is usually the same number). Fringe benefits provide a method of paying vendors for the fringe benefits through the optional Vendor Invoices and Checks feature.
Important: If there are employees with Department Numbers missing from this cross-reference, the Payroll Post creates a cross-reference record, listing the invalid Department Number 99999999. You must correct all 99999999 Department Numbers in Auto Fringe Distribution Maintenance and during Employee Fringe Maintenance.
For additional information, click More.
Tips:
For this
program to appear on the menu, you must set the Company
Control Option for Automatic Fringe
Distribution to Y(es).
Automatic vs. Manual Fringe Distribution: If
the Company Control Option is Y(es),
Payroll automatically calculate the fringe amounts, where the fringe benefit
is always assigned to a deduction. The
Payroll Post
uses the Deduction Code
to link to the fringe master and then automatically calculates the fringe
distribution amounts. Also,
the Retirement Fringe
Post automatically generates fringes for the MSRS.
To set up manual fringes change the Company Control Option to N(o). Use
Employee
Fringe Maintenance or Fringe
Distribution Entry, which is a similar manual entry program.
For either the automatic or manual method, use the Fringe
Distribution Post to load the generated invoice transactions into
Vendor
Invoices and Checks for payment.
For more information about fringes, see...
For more information about working with data in fields, see the Data Entry Guidelines.
Directions:
To see directions for...
Opening Auto Fringe Distribution Maintenance, click More.
Click Payroll from the Menu Bar.
Click Other Payroll Work.
Click
Auto Fringe Distribution Maintenance.
Tip: Or,
use the keyboard shortcut:
[ALT]
[p] [o] [a].
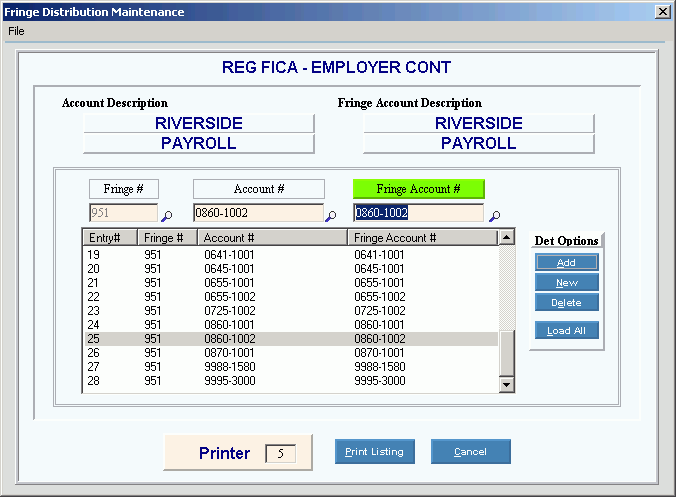
Auto Fringe Distribution Maintenance Window Example:
Creating a cross-reference for a new fringe, click More.
Enter
the new Fringe Number and click
New or press
[ENTER].
Keyboard shortcut: [ALT
+ n]
Tip: If
you do not know the Fringe Number, you can click Search to see a list of fringes.
Enter the Account # and Fringe Account Number.
Click
Add to update
the list.
Keyboard shortcut: [ALT
+ a]
Repeat Steps 1 through 3 for all Department Numbers associated with
the fringe.
Tip: To clear the window for starting a new Fringe Number, click File and then click Clear.
Auto Fringe Distribution Maintenance Area Prompts Tip: To see more information about a field, click the hyperlink for the field name. | |
Displays the Fringe Description. | |
Displays the Payroll Department Number/Expense Account description. | |
Fringe Account # Description |
Displays the Appropriations Account Number/Expense Account description. |
Enter the Fringe Number to maintain. (3.0 numeric) | |
Enter the Payroll Department Number or Expense Account related to the employees who participates in this fringe benefit. Tips:
| |
Enter the Appropriations Account Number or Expense Account used for the Vendor Invoices and Checks invoice transaction. Tips:
| |
To add a line to the list of accounts associated with the fringe, click Add or press [ENTER]. Keyboard shortcut: [ALT + a] | |
To create the cross-reference for a new fringe, enter the Fringe Number and click New, or press [ENTER]. Keyboard shortcut: [ALT + a] | |
To remove a cross-reference from a fringe, click to highlight the appropriate line in the list, and then click Delete. Keyboard shortcut: [ALT + e] | |
To display all cross-references for all fringes, click Load All. Keyboard shortcut: [ALT + e] | |
Printer |
Displays the default printer number. For more information, see Printing Options. |
To generate the report, click Print Listing. Keyboard shortcut: [ALT + p] | |
To escape from the window, click Cancel. Keyboard shortcut: [ALT + c] |
Editing a cross-reference for an existing fringe, click More.
To
display the list of cross-references for a fringe, enter the Fringe
Number and click Add , or press [ENTER].
Keyboard shortcut: [ALT
+ a]
Tip: If
you do not know the Fringe Number, you can click Search to see a list of fringes. Or,
click Load All
to see the existing cross-references for all fringes.
To change an existing cross-reference...
Click to highlight the line you want to change so the values appear in the entry fields.
Enter the changes to the Account # or Fringe Account #.
Click Add.
Or, to add a new cross-reference...
Enter the new Account # and Fringe Account #.
Click Add.
Deleting a cross-reference from an existing fringe, click More.
To
display the list of cross-references for a fringe, enter the Fringe
Number and click Add , or press [ENTER].
Keyboard shortcut: [ALT
+ a]
Tip: If
you do not know the Fringe Number, you can click Search to see a list of fringes. Or,
click Load All
to see the existing cross-references for all fringes.
Click to highlight the line you want to remove so the values appear in the entry fields.
Click
Delete .
Keyboard shortcut: [ALT
+ e]
Printing a listing of the cross-references for all fringes, click More.
Viewing the Report Sample, click More.