Payroll Post Instructions
Use the Payroll Post process to finalize the Payroll Run and to update various files, including employee totals, postings to the General Ledger module, postings to the Fund Accounting module (if applicable), and invoice transactions for the Vendor Invoices and Checks feature (if applicable).
For additional information, click More.
Tips:
To see information about timing, refer to the Payroll Runbook.
The Payroll Post uses data from the following tables, when applicable: GL W/H, GL Pay, GL PAYnn, GLSTID, O DED, ST W/H, PRINVCHK, and PRVNDST.
The Payroll Post prints the following reports:
Employee Fund List
Payroll Post Messages
Post to Appropriations (for municipalities with Fund Accounting)
Post to Expense Distribution (for municipalities)
Post to G/L Journal
For more information about running reports, see Print View.
Directions:
Routine Tasks:
To see directions for...
Opening the Payroll Post, click More.
Click Payrollfrom the Menu Bar, and next click Daily Work; then click Payroll Post.
Or, use the keyboard shortcut: [ALT] [p] [d] [p].
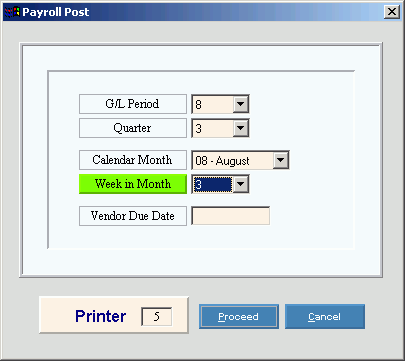
Payroll Post Window Example:

Choosing the selections at the prompt window, click More.
| 
    Payroll Post Prompt Options Tip: To see more information about a field, click the hyperlink for the field name.  | |
| 
    In the drop-down list, click the General Ledger Period Number for the posted entries. (1 - 13)  | |
| 
    Quarter  | 
   
    In the drop-down list, click the calendar Quarter in which this payroll falls to update the correct quarterly total records. (1-4)  | 
| 
    Calendar Month  | 
   
    In the drop-down list, click the Calendar Month in which this payroll falls to update the correct monthly total records.  | 
| 
    Week in Month  | 
   
    In the drop-down list, click the Week of the month in which this payroll falls to update the correct weekly total records. (1 - 5)  | 
| 
    Enter the Date to be assigned as the due date for all of the invoice transactions to be processed by the Vendor Invoices and Checks feature. (MM/DD/CCYY. Slashes are optional.) Notes: 
  | |
| 
    Printer  | 
   
    Displays the default printer number. For more information, see Printing Options.  | 
| 
    
  | 
   
    To run the process and generate the report, click Proceed, or press [ENTER]. Keyboard shortcut: [ALT + p]  | 
| 
    
  | 
   
    To escape from the routine, click Cancel. Keyboard shortcut: [ALT + c]  | 
Report Sample(s), click More.
Special Tasks:
To see...
A list of Payroll Post steps in the sequence that they are performed, click More.
Paychecks: Update the following information for each paycheck:
Update Employee Deductions: Set the posting flag to 10. Update the Employee Deductions Totals for MTD, QTD, and YTD. Update the Roll Balance.
Update the Deductions Masters: Set the posting flag to 11. Update the Deduction Totals for MTD, QTD, and YTD.
Update the Employee Quarterly Totals: Set the posting flag to 12 & 13. Update all monthly totals and quarterly totals for the specified quarter in EMPQTD.
Update the Employee Monthly Totals: Set the posting flag to 14. If a monthly record does not exist, build a new record. Update every field in the record in EMPMTD.
Update the Employee Weekly Totals: Set the posting flag to 15.
Update the Employee Totals Masters: Set the posting flag to 16. Update all of the fields except Vacation Accrual/Period and Sick Accrual/Period.
Print Fund List: For municipal sites only, print a fund list showing the employees and their gross pay split into Federal % and Local %.
Update the Department Master Totals: Set the Check Detail posting flag to 1. Update the time fields (hours or days) and dollars fields for the month, quarter, and year.
Update the Other Pay Masters: Set the Check Detail posting flag to 2. Update the Other Pay Master time fields (hours or days) and dollars fields for the month, quarter, and year.
Update Labor Overhead: For sites using the Labor Distribution feature, update the labor and overhead files. Set the Check Detail posting flag to 4.
Check History: Update the Check History files according to the setting for the Check History Active Flag in Company Control Options.
Flag 0 = None: Skip this step.
Flag 1 = No Detail: No detail updates for regular pay, but other pay details are updated. Write a Check Master History record for each Check Master with the Check Date and Period End Date. Write an Other Pay Detail History record for each Other Pay Check Detail record.
Flag 2 = Summary Detail: Write a Check Master History record for each Check Master with the Check Date and Period End Date. Write an Other Pay Detail History record for each Other Pay Check Detail record. Summarize Check Detail Regular Pay by Employee Number and Department Number.
Flag 3 = Full Detail: Write a Check Master History record for each Check Master with the Check Date and Period End Date. Write an Other Pay Detail History record for each Other Pay Check Detail record. Write all Check Detail Regular Pay records to the detail history file.
Increment the posting flags on the Check Masters to 2. Increment the posting flags on the Check Details to 3. Update the posting flag on the Weekly Detail to 5. Set the master posting flag to 2 when this part of the post is complete.
Check Reconciliation: Update the Check Reconciliation file. Increment the Check Masters posting flags to 30. Write a Check Reconciliation record for each paycheck. Write void checks for checks that are direct deposit or have a negative net pay. (Write direct deposit prenotes.) When complete, print a message, the total positive net pay, the total negative net pay, the total direct deposit net pay, and the total net pay posted to the Check Reconciliation file. Set the master post flag to 3 when this part of the post is done.
Post Work File for Appropriations (Fund Accounting 
 module):  Initialize 
 and build the Post Work file for checks with appropriation department 
 numbers.  Build 
 one work file record for each appropriation department, containing a post 
 flag (initially set to 0) and the department total to be posted to the 
 Appropriation Master.  When 
 the work file build is finished, print a message and set the master post 
 flag to 4.
	Note:  Skip 
 this step for non-municipal sites.
	 
Appropriation Master (Fund Accounting): 
  Update 
 the Appropriation Master file from the work file.  Increment 
 the post flag on the work file to 1.  Update 
 the Expended, Balance, and MTD Expended fields (for Version 2 sites only). 
  As the 
 records are updated, print a listing of the appropriation accounts and 
 the total updated.  When 
 all of the Appropriations Masters are updated, set the master post flag 
 to 5 .
	Note:  Skip 
 this step for non-municipal sites.
 
Expense Distribution:  Update 
 the Expense Distribution File.  Write 
 one expense record for each account/department total in the work file. 
  Increment 
 the post flag on the work file to 2 if posting by summary.  Increment 
 the check detail posting flag to 4 if posting by detail.  As 
 each expense record is written, print a listing of appropriation accounts 
 with the total for each account.  When 
 all the expense records have been written, set the master post flag to 
 6.
	Note:  Skip 
 this step for non-municipal sites.
 
Appropriation Monthly File:  Update 
 the Appropriation Monthly file.  Set 
 the post flag on the work file to 3.  Update 
 the actual total for the period indicated and the last post date fields. 
  When the 
 Appropriation Monthly file update is complete, print a message and set 
 the master post flag to 7.
	Note:  Skip 
 this step for non-municipal sites.
 
Post Work File for the General Ledger Journal: Initialize the Post Work file and rebuild the amounts to be posted to the General Ledger Journal. Each record contains the General Ledger Account Number to be updated, the description of the account, a post flag (initially set to 0), and the amount to be posted. When the work file is built, print a completion message and set the master post flag to 8.
General Ledger Journal: Update the General Ledger Journal file. Write one journal entry for each general ledger account total. Increment the work file post flag to 1. Print a list of the posted general ledger entries including the entry number, the account description, the account number, and the debit or credit amount. When all the journal entries have been written, set the master post flag to 9. Make entries against the following non-zero general ledger accounts:
    
 
  | 
    
    
  | 
Post Work File for Vendor Invoices: 
  Initialize 
 and rebuild the Post Work file for the post to the payroll vendor invoice 
 and check transaction files.  When 
 complete print a message and set the master post flag to 10.
	Note:  You 
 must set up the deduction masters and fringe masters ahead of time.  For 
 more information, refer to Understanding 
 Vendor Invoices and Checks.
	Note:  Perform 
 this step only if the Vendor Invoicing feature is active.  The 
 Company Control Option setting for Create 
 Automatic Vendor/Invoices/Check must be 1 
 - Single Post. (For 
 2 - Dual Post, you must run the 
 Post to Vendor 
 Transaction Files program separately.)
	 
Vendor Invoice and Check Transactions: 
  Update 
 the Vendor Invoices and Check Transactions files.  Write 
 one record for each deduction master that is set up with the proper Vendor 
 Payment Method and Vendor Number.  Write 
 one record each for Federal W/H, FICA W/H, State W/H, and Maine State 
 Retirement W/H.  A 
 table is created with the deduction codes. Set 
 the work file post flag to 1.  When 
 this section is complete, print a message and set the master post flag 
 to 11.
	Note:  Perform 
 this step only if the Vendor Invoicing feature is active.  The 
 Company Control Option setting for Create 
 Automatic Vendor/Invoices/Check must be 1 
 - Single Post.
 
Post Work File for Employee Fringes: 
  Initialize 
 and rebuild the Post Work file for the post to the Employee Fringe file. 
  Upon completion, 
 print a message and set the master post flag to 12.
	Note:  Perform 
 this step only if the Post to Employee Fringes and Vendor Invoicing features 
 are active.  The 
 Company Control Option setting for Create 
 Automatic Vendor/Invoices/Check must be 1 
 - Single Post.
 
Employee Fringes:  Update 
 the Employee Fringe file.  Build 
 an Employee Fringe Record if not found.  When 
 this section of the post is complete, print a message and set the work 
 file flag to 1.
	Note:  If 
 an employee deduction has a matching component in the Fringe file (for 
 example FICA or matched annuities), you can enter the Fringe Number during 
 Deduction Master Maintenance to trigger the post to update the Employee 
 Fringe total with the amount from the paycheck.
	Note:  Perform 
 this step only if the Post to Employee Fringes and Vendor Invoicing features 
 are active.  The 
 Company Control Option setting for Update 
 Employee Fringes During Post must be (Y)es. 
  The setting 
 for Create Automatic Vendor/Invoices/Check 
 must be 1 - Single Post.
 
Set the master post flag to 13.
Directions for restarting the Payroll Post after an interruption, click More.
To restart the Payroll Post...
Correct the error that caused the post to stop before completion.
Contact NDS Technical Support to determine the restart point.
Set the master flag in Edit Master Posting Flag, according to instructions from NDS Technical Support.
Run Payroll Post.
A list of error messages and solutions, click More.
| 
    Payroll Post Error Messages  | |
| 
    File Full  | 
   
    If a file fills up during the post routine, the post process stops and a message both prints and displays on the screen. Directions: 
  | 
| 
    Invalid Account or Invalid G/L Master prints on the report.  | 
   
    If the post routine can't find the Appropriation Master file or the G/L Account Number, one of these messages prints. Directions: 
 
 
  | 
| 
    File Initialization Error  | 
   
    If there is an error initializing a file, the post stops and displays a message. Directions: 
  | 
How to correct a paycheck that was posted incorrectly, refer to the Advanced Feature - Entering Reverse Checks topic.