Enter the Patient Account Number.
Press [ENTER].
Click
Charge Entry in the Menu Tree.
Advanced Methods: To see additional methods for opening the Batch Entry Window, click More
Charge Entry - Batch Entry Window
Use the Charge Entry - Batch Entry Window to view and maintain default codes and other information for entering charge and payment detail transactions. It is the first window displayed when you open Charge Entry. Batch values simplify the entry of like charges and group the charges together for reconciliation. For example, a batch of hospital charges requires admittance and discharge dates whereas, office charge batches do not.
For additional information, click More.
The table following the window example describes the fields in the Batch Entry Window.
Directions:
To open the Batch Entry Window:
Basic Method:
Enter the Patient Account Number.
Press [ENTER].
Click
Charge Entry in the Menu Tree.
Advanced Methods: To see additional methods for opening the Batch Entry Window, click More
Tips:
Always load a patient before using the Menu Tree to start Charge Entry.
To see several methods and shortcuts for entering the Account Number, see Tips for Entering the Patient Account Number.
You are
automatically prompted to enter the Batch Window information only
once per session.
However, you can easily re-display the window by clicking Batch ![]() at the Batch Identifiers Area.
at the Batch Identifiers Area.
To see detailed steps for entering an example charge, refer to the Charge Entry - Step-By-Step Example.
Charge Entry - Batch Entry Example:
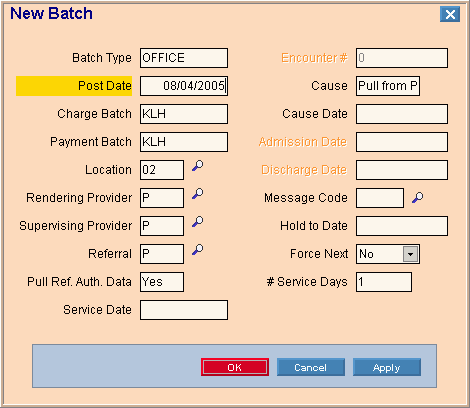
Charge Entry - Batch Entry Window Prompts Notes: The default values are displayed from Charge Entry Preferences Maintenance. If the preferences are set accordingly, you can override many of the values here at the batch level, or later for a specific charge at the Charge Entry - Work Window. If you leave a non-required field blank at the Batch Entry Window, you can later enter it for each transaction at the Work Window. Tips: If a field is unexpectedly disabled, check the Batch setting in Charge Entry Preferences Maintenance. To see more information about a field, click the hyperlink for that field. |
|
The Charge Batch Type determines the group of settings to use for this batch. To select a Batch Type, click a choice from the drop-down list. Required Examples: OFFICE, HOSPITAL, FULL Tips:
|
|
The Batch Post Date is the date the transactions are entered, usually today's date. (mmddccyy - slashes and century optional) Required Entry Options:
Tip: If the Batch Post Date is blank in Charge Entry Preferences Maintenance, it automatically defaults to the system date in the Batch Entry Window. |
|
The Charge Batch, also called the Batch Number, groups the transactions together in a batch and is useful for sorting and selecting specific batches for the journals. (up to 7 characters - XXX or yymmXXX) Required Entry Options:
|
|
The Payment Batch, also called the Batch Number, groups the payment transactions together in a batch and is useful for sorting and selecting specific batches. (up to 7 characters - XXX or yymmXXX) Required Entry Options:
Tip: It is common to use the same value for both the Charge Batch and the Payment Batch. |
|
The Location Code identifies the place where the services were performed. (up 2 characters) Entry Options:
Tip: To simplify your work, if you have a single location you can enter the Location Code here. If you have multiple locations and are entering charges for all the locations at the same time, leave the Location Code blank, so you can enter it later at the Work Window. |
|
Rendering Provider |
The Rendering Provider Code identifies the person who provided the services. (up to 4 characters) Entry Options:
|
Supervising Provider |
The Supervising Provider Code identifies the person who supervised the rendering provider. (up to 4 characters) Entry Options:
Tip: The Supervising Provider can be the same as the Rendering Provider. |
The Referral Source Code identifies the physician or practice that is the source of the referral. (up to 4 characters) Entry Options:
Tips:
|
|
The Charge Entry Pull Referral Authorization Data option determines if a referral authorization that is attached to an Encounter Number triggers Charge Entry to automatically load the Referral Source, Cause, Cause Date, and Insurance Code associated with the referral. Entry Options:
Tip: For more information, see Adding a Referral to a Charge. |
|
The Charge Service Date is the date services were performed for the patient (Date of Service). (mmddccyy - slashes and century optional) Entry Options:
|
|
The Encounter Number is the number assigned to the patient's Encounter Form (also called the superbill). Usually, the system assigns the Encounter Number and it is displayed here for your reference. (7.0 numeric) |
|
The Patient Cause Code identifies the origin of the patient's condition. (up to 2 characters) Required Entry Options:
Tip: Generally, select Pull From Patient to automatically pull the patient's Cause Code into Charge Entry from the Patient Entry - Balance Detail Window. |
|
The Patient Cause Date is the date the patient's condition occurred. (mmddccyy - slashes and century optional) Entry Options:
Tip: Generally, leave this field blank to automatically pull the patient's Cause Date into Charge Entry from the Patient Entry - Balance Detail Window. |
|
The Patient Admission Date is the date the patient was admitted to the hospital. (mmddccyy - slashes and century optional) Entry Options:
Tips:
|
|
The Patient Discharge Date is the date the patient was discharged from the hospital. (mmddccyy - slashes and century optional) Entry Options:
Tips:
|
|
The Message Code (also called the Remarks Code) identifies the message to print with the charge on patient statements. (up to 5 characters) Entry Options:
|
|
The Charge Hold to Date is a date used to delay billing of charges for a patient. (mmddccyy - slashes and century optional) Entry Options:
|
|
The Force Next Statement value controls when patient statements are printed. (Y/N) Required Entry Options:
|
|
Leave blank. This field is reserved for future use. |
|
|
To apply the changes made to the batch and leave the Batch Entry Window open, click Apply. |
|
To complete Batch Entry, close the Batch Entry Window, and open the Work Window, click OK. |
|
To exit close the Batch Entry Window and exit Charge Entry, click Cancel. |
![]()