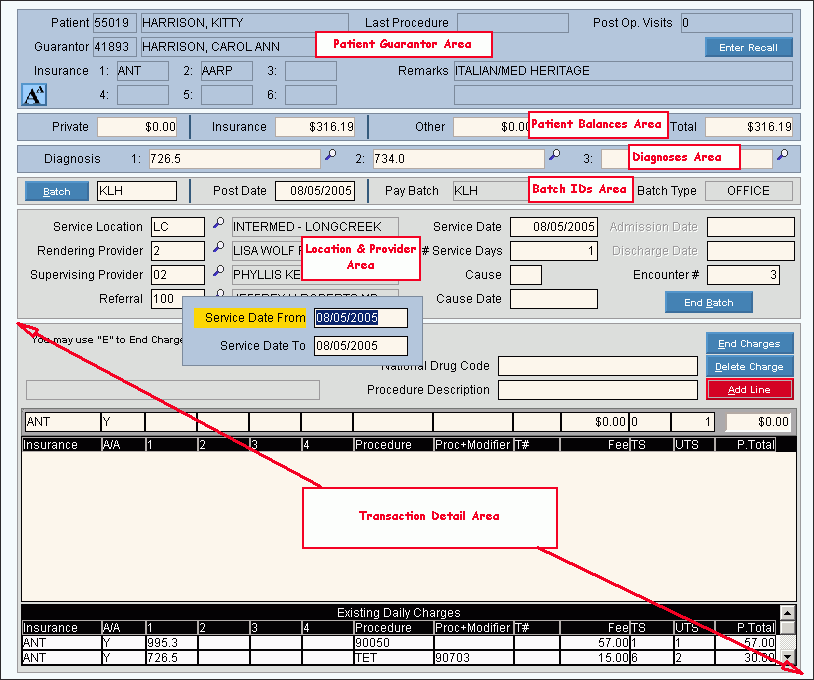
Charge Entry - Work Window
Use the Charge Entry - Work Window to enter detail charge transactions for a patient. The Work Window, which displays directly after the Batch Entry Window, contains several major data entry areas. The table following the window example describes each area within the Work Window.
Tips:
To see detailed steps for entering an example charge, refer to the Charge Entry - Step-By-Step Example.
For information about setting up the Work Window for hospital charges, see Entering Hospital Charges.
Directions:
To display the Work Window, click OK at the Charge Entry - Batch Entry Window.
Charge Entry - Work Window Example:
Tip: To see detailed instructions for each section or field name, the cursor becomes a hand ![]() when you position the cursor over the field or section. Click once to display the associated topic.
when you position the cursor over the field or section. Click once to display the associated topic.

|
Charge Entry - Work Window Details by Area Tips: To see more information about an area, click the hyperlink for that area. The Work Window displays after you complete the Batch Entry Window. There are several areas for data entry in the Work Window. To see more information about one of the areas listed below, click the hyperlink. |
|
|
Displays the patient's guarantor information, patient insurances and patient remarks for your reference. |
|
|
Displays patient balances for your reference. |
|
|
Contains the diagnoses for this patient, which can be edited. |
|
|
Contains the default batch parameters, which can be edited. |
|
|
Contains the default values entered during Batch Entry, which can be edited. |
|
|
Contains the fields for entering detail charge transactions for the patient. Tip: There are several sections within the Transaction Detail Area:
|
|
|
Contains fields to complete the charge detail transactions and the command to apply a payment to the transactions. Tips:
|
|