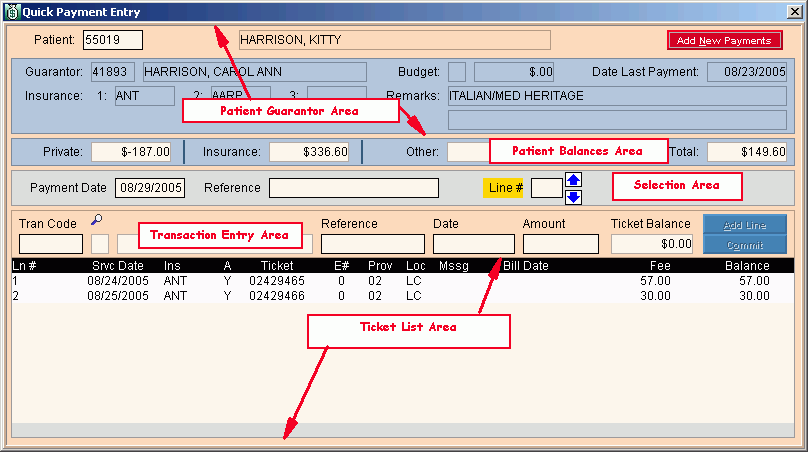
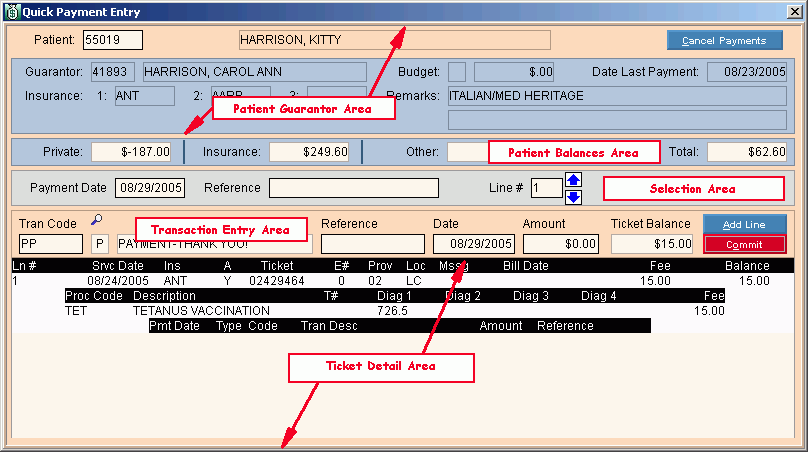
Use the Quick Payment Entry Window to enter a payment for a patient at the time that you enter charges. This alternative to Payment Entry is a speedy method for collecting co-pays and other payments received from the patient at the time of service. The table following the window example describes the Quick Payment Entry Window for Charge Entry.
To display the Quick Payment Entry Window.
|
Charge Entry - Quick Payment Entry Window Prompts
Tip: To see more information about a field, click the hyperlink for the field name.
|
|
Patient Guarantor Area
|
|
|
Displays the patient's Account Number.
Note: The patient's and display for your reference.
|
|

|
To enter a payment transaction, select the ticket in the Ticket List Area and click Add New Payments, or press [ENTER]. Focus moves to the Transaction Entry Area.
Keyboard shortcut: [ALT + n]
Tips:
-
Another method for selecting the ticket is simply to double-click the ticket line.
-
INSight automatically selects the ticket for you if there was only one committed charge.
-
This button displays only when the Ticket List is displayed.
|
|

|
To cancel entry of a payment transaction and display the Ticket List, click Cancel Payments.
Keyboard shortcut: [ALT + c]
Tip: This button displays only when the Ticket Detail is displayed.
|
|
|
Displays the patient's guarantor .
Notes:
|
|
|
Displays the insurance codes currently assigned to the patient's account. (up to 5 characters)
Note: While the patient may have up to six insurances assigned to their account, insurances 4, 5 and 6 are informational only. They are not used during the billing process. Generally, insurances 4, 5 and 6 are reserved for insurances that had insured the patient, but are no longer active (for example, maintain expired insurances here). To bill a charge to an insurance in insurance 4, 5 or 6, first move the insurance to insurance 1, 2 or 3 at the Patient Entry - Assigned Insurances Area.
|
|
|
Displays the patient's Budget Type Code, if the patient is on a budget payment plan. (1 character)
|
|
|
Displays the amount the patient is expected to pay each budget period, if they are on a budget payment plan. (7.2 numeric)
|
|
|
Displays the date the last payment was applied to the patient's account. (mmddccyy - slashes and century optional)
|
|
|
Displays the patient remarks line 1 and line 2 for your reference. (up to 20 characters)
Note: You can edit Remarks 1 and 2 at this time.
|
|
Patient Balances Area
Note: The patient balances are display-only during Quick Payment Entry.
|
|
|
Displays the balance which is the patient's responsibility. (7.2 numeric)
|
|
|
Displays the patient's current Insurance Balance, which is the responsibility of the insurance carriers. (7.2 numeric)
|
|
|
Displays the patient's current Other Balance, if applicable. (7.2 numeric)
|
|
Total
|
Displays the account's Total Balance. The Total is an accumulation of the patient's Private, Insurance and Other balances. (7.2 numeric)
|
|
Selection Area
Note: Before clicking Add New Payments to enter an individual payment transaction, you must select a ticket in the Ticket List Area.
Tip: If there was only one committed charge, INSight automatically selects the ticket for you.
|
|
|
To accept the system date displayed, press [TAB]. Or, enter the appropriate payment date for this group of payments. (mmddccyy - slashes and century optional)
Tip: The Payment Date can be edited on an individual payment basis.
|
|
|
Enter a Payment Reference for the payment transactions, if applicable. (up to 15 characters)
|
|
- OR -
Click Line
|
To select the ticket you want to pay:
-
Enter the line number containing the ticket that you want to pay.
-
Or, in the Ticket List Area click to highlight the line containing the ticket that you want to pay.
Tips:
-
To display additional tickets for the patient use the right-side .
-
To display the detail for a ticket, double-click the ticket line.
|
|

|
To reposition your selection:
-
Click the Up Arrow to select a ticket with a later date (lower in the list).
-
Or, click the Down Arrow to select a ticket with an earlier date (higher in the list).
-
Or, in the Ticket List Area click to highlight the line containing the ticket that you want to pay.
|
|
Transaction Entry Area
Note: You must select a ticket before entering data in this area.
Tip: When focus moves to the Transaction Entry Area, the Ticket Detail Area replaces the Ticket List Area.
|
|
|
Enter the defined Transaction Code that corresponds to the type of payment, adjustment, refund or descriptive transaction you are entering. (up to 6 characters)
Note: To search for the appropriate Transaction Code, click Search  . .
Keyboard shortcut: [CTRL + f].
|
|
|
The Transaction Type displays for your reference.
|
|
|
The Transaction Description displays for your reference.
|
|
|
Displays the default Reference if entered in the Selection Area. Press [TAB] to accept or enter the appropriate Reference for this payment transaction. (up to 15 characters)
|
|
|
Displays the default Payment Date from the Selection Area. Press [TAB] to accept the default value for the Payment Date displayed. Or, enter the appropriate Payment Date. (mmddccyy - slashes and century optional)
|
|
|
Enter the amount of the payment. (7.2 numeric)
Notes:
-
If the Transaction Type is D(escription), you do not need to enter an amount.
-
The payment amount can exceed the balance on the ticket. In that case, the balance amount for the ticket will appear as a negative amount. You can see the payment details in the Ticket Detail Area.
|
|
Ticket Balance
|
The balance amount for the ticket displays for your reference.
|
|

|
To complete the transaction detail line, click Add Line or press [ENTER].
: [ALT + a]
Note: You can add additional lines and you can edit the Reference and Payment Date for the sequential lines as necessary.
|
|

|
To commit the payments for this ticket after all associated detail lines have been entered, click Commit.
Keyboard shortcut: [ALT + o]
For more information about committing payments, see the Payment Entry - Commit Payments Area.
|
|
Ticket List Area
|
|
Line for each Ticket
|
For each ticket associated with a charge, the fields listed below display:
-
LN # - for ticket selection
-
Srvc Date - of charge
-
Ins - assigned to the charge
-
A - Insurance's value
-
assigned to the charge
-
E# - for the superbill
-
Prov - for the person providing the service
-
Loc - for where the charge was incurred
-
Mssg - Any assigned to print with the charge on a statement
-
Bill Date - , if the charge has been billed
-
Fee - The procedure's extended or the procedure's for the if maintained (multiplied by units)
-
Balance - Ticket balance
|
|
Ticket Display Functions
|
Functions:
-
To highlight a ticket, click the appropriate ticket.
-
To display transaction details for a specific ticket, double-click the appropriate ticket.
-
To close the detailed display and redisplay the Ticket List, click Cancel Payments or press [CTRL + x].
-
To select a ticket to apply a payment transaction to, highlight the ticket and click Add New Payments.
-
To display additional tickets for the patient use the right-side .
|
|
Ticket Detail Area
Note: To select the ticket and display the detail, double-click the line containing the ticket you want to pay, or click Add New Payments in the Selection Area.
Tips:
If there was only one committed charge, INSight automatically displays the Ticket Detail for you.
To return to the Ticket List, click Cancel Payments.
Unapplied Credits appear highlighted. The Unapplied Credits Ticket Number = 99 + Patient Account Number.
|
|
Ticket Detail Line 1
|
For each ticket the fields listed below display.
-
LN # - for ticket selection
-
Srvc Date - of charge
-
Ins - assigned to the charge
-
A - Insurance's value
-
assigned to the charge
-
E# - for the superbill
-
Prov - for the person providing the service
-
Loc - for where the charge was incurred
-
Mssg - Any assigned to print with the charge on a statement
-
Bill Date - , if the charge has been billed
-
Fee - The procedure's or the procedure's for the if maintained (multiplied by units)
-
Balance - Ticket balance
|
|
Ticket Detail Line 2
|
For each ticket the fields listed below display.
|
|
Ticket Detail Line 3+
|
For each previous payment applied to the ticket, the fields listed below display (on a separate line for each payment).
-
Pmt Date -
-
Type -
-
Code -
-
Tran Desc -
-
Amount -
-
Reference -
|
![]() to finish entry of the charges.
to finish entry of the charges.![]() to commit the charges.
to commit the charges.![]() .
.
