Entering a payment, click More.
The following topics describe the steps for the various Payment Entry procedures:
-
Payment Entry - Step-By-Step Example: Includes general examples for using Payment Entry Method 1, Method 2, and Method 3.
-
Payment Entry - Tasks: Lists specific tasks and the help topics that guide you through the tasks.
-
Payment Entry - Entering an Adjustment Transaction: Includes steps for entering adjustment using Method 1.
-
Payment Entry - Entering an Adjustment by Percent: Includes steps for entering payments with adjustments by % using Method 3.
-
Payment Entry - Entering a Reversal Transaction: Includes steps for reversing transactions.
-
Payment Entry - Entering a Rebill Transaction: Includes steps for generating claims to rebill insurance.
-
Payment Entry - Entering a Payment from Medicare or a Contractual Company: Includes steps for entering payments when allowed amounts are on file using Method 3.
-
Payment Entry - Entering an Automatic Transfer Payment: Includes steps for entering a payment from an insurance company and automatically transferring the remaining balance to another insurance.
-
Payment Entry - Entering a Transfer from Insurance to Patient: Includes steps for transferring an amount from the Insurance to the Patient using Method 3.
-
Payment Entry - Creating and Applying Unapplied Credits: Includes steps for applying an unapplied credit amount to a specific ticket.
Opening Payment Entry, click More.
-
Basic Method:
-
Enter the Patient Account Number.
-
Press [ENTER].
-
Click Payment Entry in the Menu Tree.
-
Advanced Methods:
-
Click the Payment Entry button
 on the INSight Toolbar.
 -
Or, click Daily Work from the Menu Bar, and next click Payment Entry.
-
Or, use the keyboard shortcut: [ALT] [k] [Payment Entry]
-
Or, if you use superbills, retrieve the superbill data by entering the Encounter Number in the Patient Account Number field.
-
Or, enter the patient's last name in the Account Number and press [ENTER] to launch the patient Search.
Tips:
-
You must load a patient before using the Menu Tree to start Payment Entry.
-
To see several methods and shortcuts for entering the Account Number, see Tips for Entering the Patient Account Number.
Payment Entry - Batch Entry Window Example:
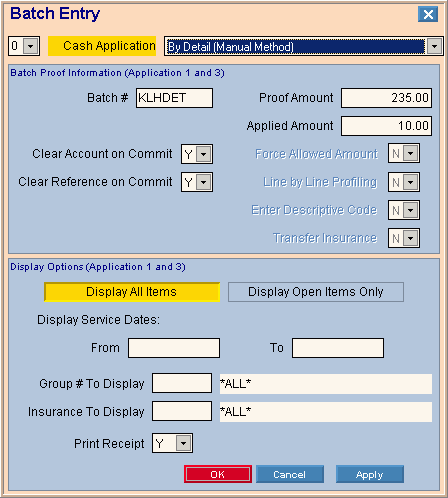
Tip: The above window displays automatically the first time of the day that you launch Payment Entry or when you click Batch ![]() in the Payment Entry - Batch Information Area.
in the Payment Entry - Batch Information Area.
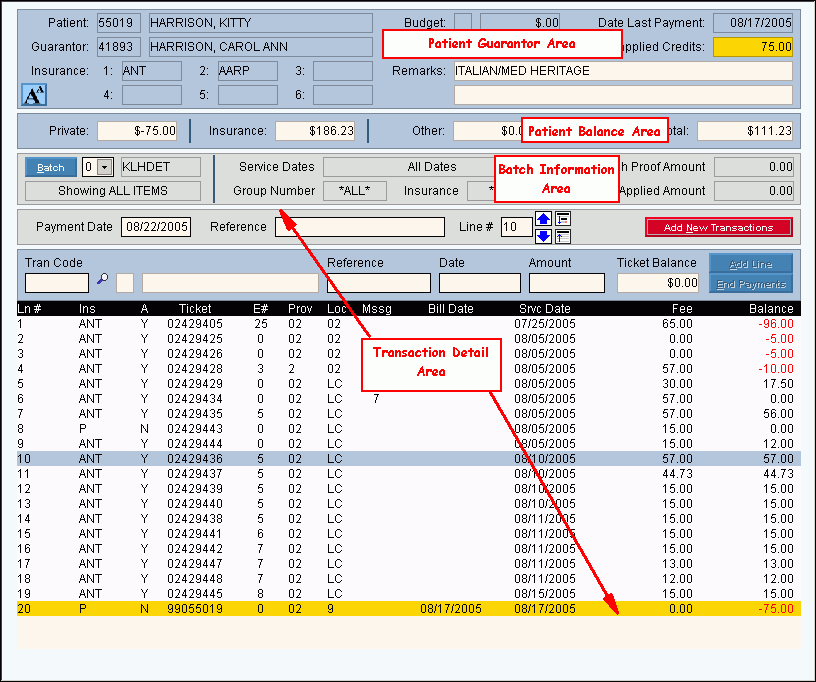
Payment Entry - Work Window Example:
Creating a new patient payment transaction, click More.
-
Enter a patient Account Number in the Patient Reference Panel.
Tip: To see several methods and shortcuts for entering the Account Number, see Tips for Entering the Patient Account Number.
-
Press [ENTER] to activate Patient Load
 .
. -
Select the Batch Sequence Number, the Cash Application, and confirm the defaults for the batch entries.
-
Enter the payment detail transactions.
-
To complete the patient payments, commit the payment transactions.
Tip: For more details, see the Payment Entry - Step-By-Step Example.
Editing a patient payment transaction, click More.
The directions in the sections below describe how to edit uncommitted and committed payment transactions.
Tip: For information about creating a reversal, see the Payment Entry - Entering a Reversal Transaction procedure.
Editing Uncommitted Payments
Follow these steps to edit uncommitted payment transactions.
![]() CAUTION! To avoid losing data, you must click Change Line to save the changed payment transactions.
CAUTION! To avoid losing data, you must click Change Line to save the changed payment transactions.
-
To display the record to be changed in the transaction entry line , click to highlight the desired payment transaction in the Ticket Detail Section.
-
To position the pointer to the information that you want to change, press [TAB] or click the field using the mouse.
-
Enter the data changes.
-
To complete the edit process, click Change Line
 or press [ENTER].
Tip: After you click Change Line, you can see the changed payment transaction in the Ticket Detail Section.
Editing Committed Payments
There are two methods for editing committed payments.
-
During Payment Entry you can enter a reversal transaction and next enter the correct payment transaction.
Note: NDS recommends using this method to provide a complete audit trail. -
Or, you can edit the incorrect payment during Patient Inquiries - Transaction Details.
Deleting a payment transaction, click More.
Use these steps to delete uncommitted payment transactions.
-
To delete the current payment transaction displayed in the Ticket Detail Section, click End Payments
 .
.
Keyboard shortcut: [Alt + e]
-
To complete the delete process, click Cancel Payments
 .
.
Keyboard shortcut: [Alt + c]
Tip: The associated payment transaction no longer displays in the Ticket Detail Section.
Tip: To delete committed payment transactions, see the Payment Entry - Entering a Reversal Transaction procedure.
Understanding the field values for the following areas, click the section name in the table below: