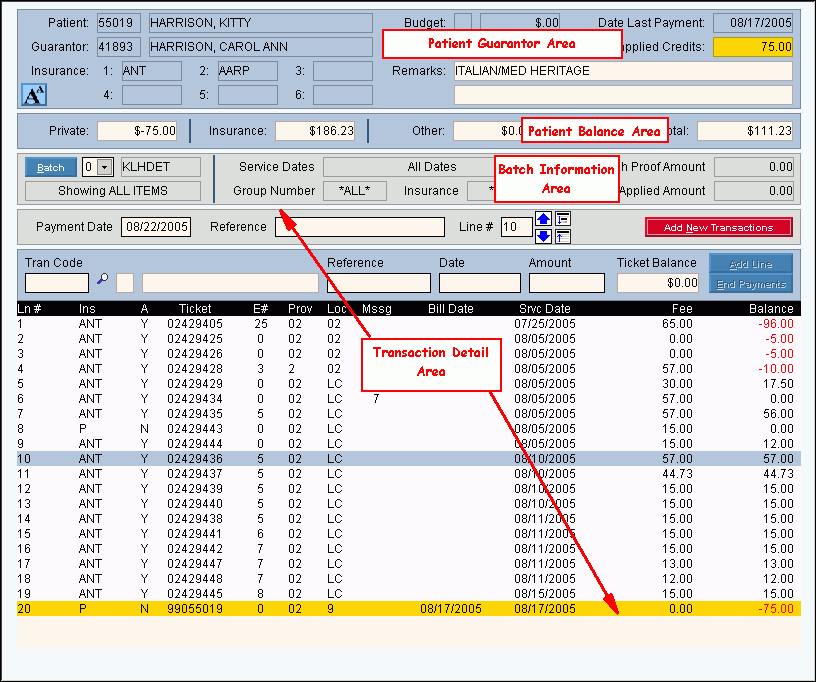
Payment Entry - Work Window
Use the Payment Entry Work Window to enter payment transactions for a patient. The Work Window, which displays directly after the Batch Entry Window, contains several data entry areas. The table following the window example describes each area within the Work Window.
Directions:
To open the Work Window:
-
Enter the .
-
Press [ENTER].
-
Click Payment Entry in the .
-
Advanced Methods: To see additional methods for opening the Work Window, click More
Payment Entry - Work Window Example:
Tip: To see detailed instructions for each section or field name, the cursor becomes a hand  when you position the cursor over the field or section. Click once to display the associated topic.

|
Field Details by Area
|
|
Patient Guarantor Area
|
Displays information for the patient's guarantor, patient insurances, and patient remarks for your reference.
|
|
Patient Balances Area
|
Displays the patient balances for your reference.
|
|
Batch Information Area
|
Contains the default batch parameters, which can be edited.
|
|
Transaction Detail Area
|
Contains the fields for entering the detail payment transactions for the patient. There are three formats for the Transaction Detail Area. The Cash Application option at the Batch Entry Window controls which format is displayed.
Formats:
|
|
Commit Payments Area
|
Contains the fields to complete the payment transactions.
Tip: The Commit Payments Area (not depicted in the example above) overlays the upper portion of the Transaction Detail Area when you click End Payments  . .
|

![]() .
.