Quick Bar: Overview---Demographics---Insurance (More)---Credit_Messages---Balance_Detail---Workers'_Compensation---Patient_Specifics---Referral_Authorization---Recall_Logging---Appointments_List
Patient Entry - Assigned Insurances Area
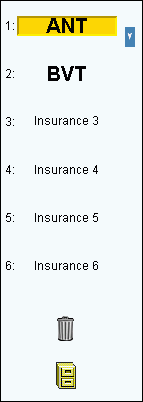
Use the Patient Entry - Assigned Insurances Area to view the list of assigned insurances for the patient and to assign additional insurances to the patient. You can assign up to six insurances to a patient. The table following the window example describes the Patient Entry - Assigned Insurances Area for Patient Entry at the Insurance Window.
Notes:
The Assigned Insurances Area is the left column of the Patient Entry - Insurances Window.
To assign an insurance to a patient, see the Patient Entry - Insurance Entry Area.
Directions:
To display the Assigned Insurances Area, open the Insurance Window.
Tip: For details about opening windows, refer to the Patient Reference Panel.
Assigned Insurances Area Window Example:

|
Patient Entry - Assigned Insurances Area Prompts Tip: To see more information about a field, click the hyperlink for that field . |
|
|
Insurance 1 |
Displays either Insurance 1 or the Insurance Code of an insurance assigned to the patient. Entry options:
Tip: To maintain assigned insurances, see the Recycle Bin, Archive Insurance, and Up/Down arrows prompts below. Note: If an insurance is assigned to a patient, the Insurance 1 field label is replaced with the assigned Insurance Code. |
|
Insurance 2 |
To assign a second insurance to a patient (if applicable), click Insurance 2 in the Assigned Insurance Area. |
|
Insurance 3 |
To assign a third insurance to a patient (if applicable), click Insurance 3 in the Assigned Insurance Area. |
|
Insurance 4 |
To assign a fourth insurance to a patient (if applicable), click Insurance 4 in the Assigned Insurance Area. |
|
Insurance 5 |
To assign a fifth insurance to a patient (if applicable), click Insurance 5 in the Assigned Insurance Area. |
|
Insurance 6 |
To assign a sixth insurance to a patient (if applicable), click Insurance 6 in the Assigned Insurance Area. |
|
|
To remove an insurance assigned to the patient, drag the patient's Insurance Code to the Recycle Bin. |
|
|
An alternative to removing an insurance is to save an insurance to the archive. Drag the patient's Insurance Code to the Archive Insurance icon, which looks like a file cabinet. Notes:
|
|
|
To re-arrange the order of the patient's insurances, click the UP and Down Arrows located beside the Insurance Code List. Click the Insurance Code to be re-arranged and click the appropriate arrow to move it. Tip: Use these arrows to quickly re-arrange the order of the patient's insurances if their insurance coverage changes. For example, if the patient has a new primary insurance, add that insurance information in Insurance 2, 3, or 4 and then use the arrows to move that information to Insurance 1. |