Opening PR A/P Check Transaction Maintenance, click More.
-
Click Payroll from the Menu Bar.
-
Click Vendor Invoices and Checks.
-
Click Payroll A/P.
-
Click PR A/P Check Transaction Maintenance.
Tip: Or, use the keyboard shortcut: [ALT] [p] [v] [p] [m].
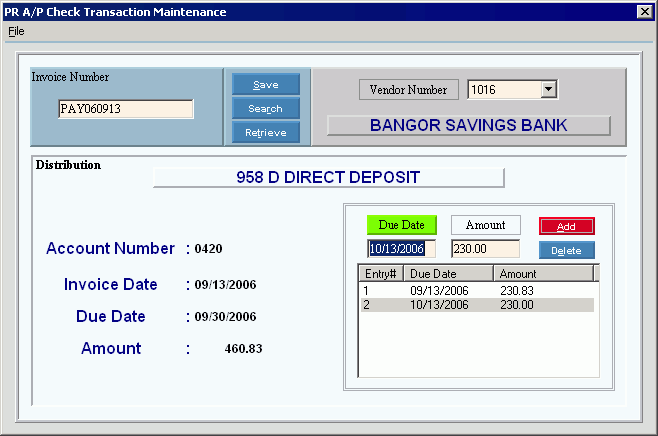
PR A/P Check Transaction Maintenance Window Example:

Creating a new PR A/P Check Transaction, click More.
Note: You can not create new check transactions using this program. You can only maintain existing transactions that have been created by the Payroll Post, Post to Vendor Transaction Files, or Fringe Distribution Post.
Editing an existing PR A/P Check Transactions, click More.
![]() CAUTION: To avoid losing data, you must save new or deleted records.
CAUTION: To avoid losing data, you must save new or deleted records.
-
To display the record to be changed, enter the Vendor Invoice Number and click Retrieve
 , or press [ENTER].
Keyboard shortcut: [ALT + t]
Tip: If you do not know the Vendor Invoice Number, you can click Search to see a list of check records.
-
Tab to the Vendor Number field and click the appropriate Vendor Number in the drop-down list.
Tips:
-
If there are multiple invoices for the vendor, click Retrieve to see the next record.
-
Because the post programs base the Invoice Number on a date, the same Invoice Number can be reused among multiple vendors.
-
To change a Vendor Due Date, add a line to the list, and enter the new Vendor Due Date with the original Vendor Invoice Amount.
Or, to break up the Vendor Invoice Amount among multiple Vendor Due Dates, add a line for each new Due Date and Invoice Amount until you have distributed the entire original amount for this invoice transaction. -
If you made any mistakes in the list, Delete the line in error and Add it again correctly.
-
To complete the edit process, click Save
 .
.
Keyboard shortcut: [ALT + s]
|
PR A/P Check Transaction Maintenance Prompts Tip: To see more information about a field, click the hyperlink for the field name. |
|
|
Enter the Vendor Invoice Number for the transaction you want to change. (up to 9 characters) |
|
|
|
To update the Due Date records in the list, click Save or press [ENTER]. Keyboard shortcut: [ALT + s] Note: If the distributed Vendor Invoice Amounts in the list do not add up to the original Invoice Amount for this invoice transaction, the program displays an error message. Make the corrections before continuing. |
|
To avoid losing data, you must save new or changed records. |
|
|
|
To view all of the existing invoice transactions, click Search. From the Search list you can select the record to change. Keyboard shortcut: [ALT + r] |
|
|
To display an existing invoice transaction, enter the Vendor Invoice Number and click Retrieve, or press [ENTER]. Then click the appropriate Vendor Number in the drop-down list. Keyboard shortcut: [ALT + t] Tip: If there are multiple invoices for the vendor, click Retrieve to see the next record. |
|
To display the invoice transaction that you want to maintain, click one of the Vendor Numbers associated with the Invoice Number in the drop-down list. (predefined) Tip: Because the post programs base the Invoice Number on a date, the same Invoice Number can be reused among multiple vendors. |
|
|
Retrieved Record Information Note: The following data is originally generated by one of the following three post programs: |
|
|
Account Number |
Displays the Deduction Code or Appropriations Account Number for this invoice transaction. |
|
Displays the Vendor Invoice Date for this invoice transaction. (MM/DD/YYYY) |
|
|
Displays the Vendor Due Date for this invoice. (MM/DD/YYYY) |
|
|
Displays the Vendor Invoice Amount. (7.2 numeric) |
|
|
Due Date Distribution Entry Note: Enter the new Vendor Due Date and Invoice Amount for the displayed check record, then click Add to add it to the list. If you want to split up the amount among multiple Vendor Due Dates, add more records. Tip: Remember to click Save after completing the data entry for the distribution list. |
|
|
Enter the new Vendor Due Date for this distribution amount. (MM/DD/YYYY) |
|
|
Enter the Vendor Invoice Amount for this Due Date. (7.2 numeric) Note: The Invoice Amounts in the distribution list must add up to the original Invoice Amount displayed on the left. |
|
|
|
To add a line to the list, click Add, or press [ENTER]. Keyboard shortcut: [ALT + a] |
|
|
To remove a line from the list, perhaps to make a correction, click Delete. Keyboard shortcut: [ALT + e] |
Deleting an existing PR A/P Check Transaction, click More.
![]() CAUTION: When you click Delete, there is no warning and the record is immediately deleted.
CAUTION: When you click Delete, there is no warning and the record is immediately deleted.
-
To display the record to be changed, enter the Vendor Invoice Number and click Retrieve
 , or press [ENTER].
Keyboard shortcut: [ALT + t]
Tip: If you do not know the Vendor Invoice Number, you can click Search to see a list of check records.
-
Tab to the Vendor Number field and click the appropriate Vendor Number in the drop-down list.
Tip: If there are multiple invoices for the vendor, click Retrieve to see the next record. -
Click File from the Menu Bar, and next click Delete.
Keyboard shortcut: [ALT] [f] [d]