Tip: To build the workfile for a single provider, click the Check All icon
Patient Recall Letters Procedure
Below are the steps for processing patient recall letters. While there are several ways to maintain the letter to print, this procedure describes how to set up a Microsoft Word document and enter bookmarks for places to fill with the XML patient recall information. In addition, you have the ability to print postcards and patient mailing labels as needed.
Note: For more information on setting up other types of recall letters, contact NDS Support.
Use the Print Recall List to view the patients and their recall dates. You can run the report for each of the patient Recall Types or the types of recall Letters that you print.
1. From the Reports menu, click Print Recall List.
2. Select the desired Print Recall List parameters.
This builds the Recall Letters Workfile. The information in the workfile is generated based upon the parameters you select. Each time you run the Recall Letters Create Workfile, as the first step the workfile is initialized, to prevent duplicate entries.
1. From the Reports menu, click Patient Letters, then Recall Letters, then Create Workfile.
2. Select the Provider(s),
Recall Dates and Recall Types to build
the workfile for.
Tip: To build the workfile for a single provider, click the
Check All icon ![]() .
This will quickly select or de-select all providers on the list.
.
This will quickly select or de-select all providers on the list.
Using Recall Letters Workfile Maintenance you can view the patient recall appointments in the workfile and delete any patients prior to printing the letters.
Note: To view a simple list of the patients in the workfile, simply click Search.
1. From the Reports Menu, click Patient Letters, then Recall Letters, then Workfile Maintenance.
2. To remove a patient from the workfile so that they do not receive a recall letter, enter the Workfile ID (which is the patient account number).
3. From the Workfile Maintenance menu bar click File.
4. Click Delete.
Before you print the recall letters for the first time, you must create the recall letter form and generate the patient data field names for fill bookmarks.
1. From the Reports Menu, click Patient Letters, then Recall Letters, then Print Letters.
2. To include patient credit messages and appointments to the XML stream, click Credit Messages and Appointments, if applicable.
3. Click Print
View to generate a list of the available fields to print in the
Recall Letter. See the window example below:

Using Print View you will get a list of recall patient data fields that can each be copied and then inserted (or just typed) into a Word document bookmark where the field data should be placed. This list can be printed for review and selection. It can also be Exported (File, Export, Word Document) to a Word document to be copied and then inserted into the form letter, from there as well. See the example below:

To create your Recall letter (if you already created the letter, continue with the next step to print the letters):
1. Open Microsoft Word and enter the
document. Enter a field name for each “filler field” (for example,
Patient Name, Address, Recall Date, etc.).
Note: In the next step you will mark these “filler”
fields as bookmarks.
2. A bookmark tells the system that this is a “fill” field and draws the data from the Recall Letters Workfile. To bookmark a field, do the following:
a. In Microsoft Word, click to highlight the filler field name.
b. Click the Insert
menu and click Bookmark.
The Bookmark Dialog Window displays:
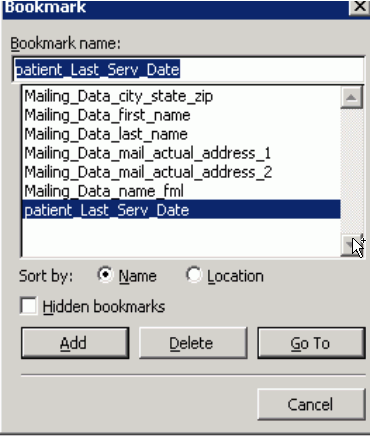
c. Toggle to the Recall Letters Print View Output window.
d. Click to highlight the appropriate XML data field name in the Print View window (for example: patient_Last_Serv_Date as shown above).
e. Press [CTRL + c] to copy the XML data field name.
f. Toggle back to Microsoft Word and the Bookmark Dialog window.
g. Click in the Bookmark Name field
and press [SHIFT] [INSERT] to
paste the XML Recall Letters data field name. This insures that
the names are spelled exactly as they appear on the XML Stream list.
Note: If a field is used multiple times in a document, the
second, third and subsequent instances must be marked with “_CC1” and
“_CC2” extensions respectively.
h. Click Add to add the bookmark name.
i. Repeat steps a-h until all data fields are bookmarked.
4. After you have created the form letter and bookmarked all fill fields, then save the letter with a “.dot” extension. By saving the document as a .dot document, this allows for the Word merge later in the process and also when opened by Double-Clicking (rather than using the OPEN), you will be viewing and editing a copy of the form letter so as not to overwrite the original. If you need to edit the original, use the Open command.
After the form letter has been saved, you are ready to print recall letters.
1. Open the XML Recall Letters Print routine.
2. Click Print
![]() .
.
3. The Print Dialog window displays
for you to select the appropriate interface printer for this job. See
the example below:
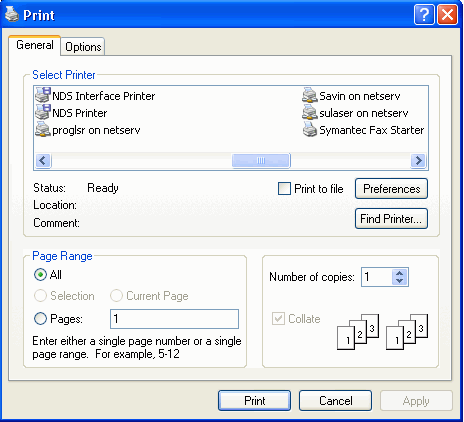
4. Click Print.
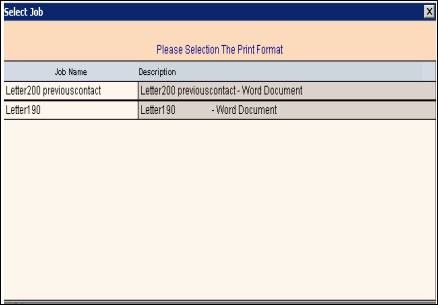
5. Next the Select Job
window displays where you can browse for and select the appropriate recall
form letter. See the example below:
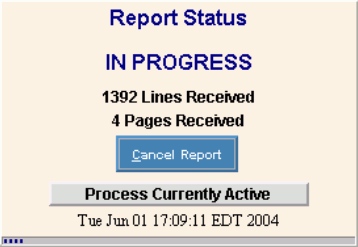
After the form letter is selected, the Status
Processing window displays the lines and pages created as it is filling
the bookmarked fields and creating the letters.
Once the letters have been created, you can access all of your recall letters in Microsoft Word and you can view all the requested data. Your Recall letters are now complete. The next time you build the recall letters workfile the previous recall appointments will be initialized and a new set of appointments will be pulled into the workfile.