Opening Item Master Maintenance, click More.
1. Click File Maintenance from the Menu.
2. Click Item Master Maintenance.
Item Master Maintenance Window Example:

Creating an Item Master, click More.
|
Item Master Maintenance Prompts
|
|
|
To create a new record enter the unique identifier for the inventory item and click Retrieve To recall an item, enter the Item ID and press [Enter]. Or, to look for an item, click Search Required |
|
|
|
To update the new or changed information, click Save or press [ENTER]. |
|
To avoid losing data, you must save new or changed records. |
|
|
Enter up to 2 lines of description. (up to 150 characters per line) |
|
|
To select the type of item, click a choice in the drop-down list. Choices are:
Note: The Item Type can not be edited once the item is created. Required |
|
|
Enter a valid Item ID that can be substituted for this item if the item is out of stock, if applicable. An example would be to use 6 penny nails (Item XYZ) as a substitute for 10 penny nails (Item ABC). Note: To search for the desired Item ID to assign as the alternate item, click Search |
|
|
From the drop-down list, select a product category for the item. The drop-down list contains all of the current product categories defined during Product Category Maintenance. Required |
|
|
From the drop-down list, select a defined General Ledger category for the item. The drop-down list contains all of the GL Categories defined during GL Category Maintenance. Note: If the General Ledger interface is activated, this field may be used to determine the GL account to create entries for when the Transaction Post routine is run. |
|
|
Enter the Catalog Number for the item, if applicable. This allows you to track the product catalog that the item is listed in. (up to 20 characters) |
|
|
Enter the catalog Page Number that contains the item, if applicable. The page number allows you to locate vendor item information quickly. (up to 20 characters) |
|
|
Enter the lead time for an item in days. Lead time is the average number of days between the order date and receipt. Use this information to better plan orders so that under stock situations do not occur. (numeric) |
|
|
Enter the weight of the item. The weight can be used to determine the shipping costs for the item. (numeric, decimal) |
|
|
Note: Please leave blank. This field is reserved for future use. |
|
|
Enter the average cost of the item. Or, leave the default of 0. (numeric, decimal) Required |
|
|
Enter the last cost of the item. This is the cost that was charged on the item the last time it was purchased. Or, leave the default of 0. (numeric, decimal) Required |
|
|
Enter the standard cost for the item. Or, leave the default of 0. (numeric, decimal) Required |
|
|
The List Price Type determines if the item price is generated as a markup percentage of cost or if the item uses a fixed price. The default List Price Type displays but can be changed to another type if needed. List Price Type options:
Note: The List Price Type works with the Markup % field to generate the item price. The default values for List Price Type and Markup % are maintained under Inventory Settings. |
|
|
If the list price type is average cost markup %, last cost markup % or standard cost markup %, the default markup percentage displays, but can be changed if needed. Note: The field name changes based on the List Price Type selected. If the default list price type is set to Fixed Price, this field is not available. |
|
|
Enter the price to charge the customer who purchases the item. The list price is generally higher than the cost for the item. Or, leave the default of 0. (numeric, decimal) Required |
|
|
From the drop-down list select the defined Unit of Measure to use when manipulating the quantity counts of the item. The Stocking Unit represents the way you stock this item in your warehouse. Tip: Often the Stocking Unit is set to Each to represent a single item. Required |
|
|
From the drop-down list select the defined Unit of Measure to use when reporting quantity counts of the item. Sometimes, you may want reports and inquires to show a different unit of measure. Required |
|
|
Leave the default value of Each to represent a single item. Required |
|
|
Taxable |
To indicate if the item is taxable:
|
|
Enter any notes applicable to the item. (unlimited characters) |
|
Viewing Locations with this Item, click More.
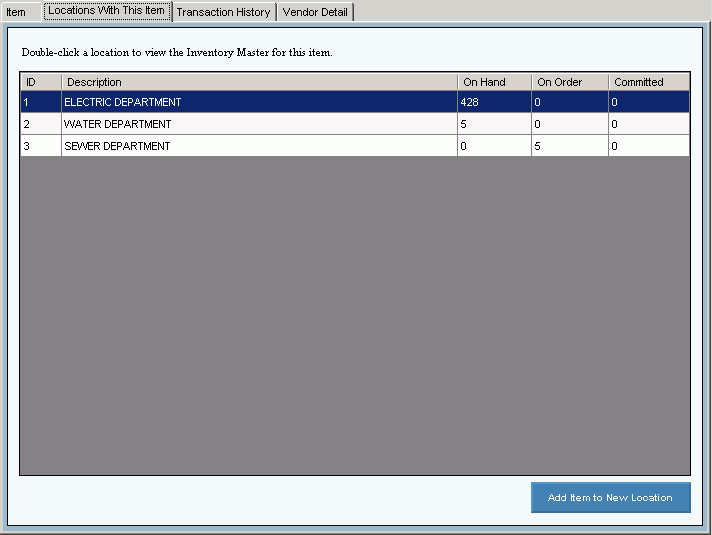
Use the Locations With This Item tab  to see all of the locations that have this item. Inventory counts display totals for on hand, on order and committed for the item at each location. You can drill down to more inventory detail by double-clicking on a specific location line and you can add an item to a new location during this window.
Locations with This Item Tab for Item Master Maintenance Window Example:

|
Locations With This Item Tab for Item Master Maintenance Prompts Tip: To see more information about a field, click the hyperlink for the field name. |
|
|
|
To view the inventory counts and information about items at their locations, click Locations With This Item. |
|
Enter the unique identifier for the inventory item. (up to 45 characters) |
|
|
|
To display an item, enter the Item ID and click Retrieve, or press [ENTER]. |
|
Locations With This Item Fields Tip: Each line represents a location that has this item and provides inventory counts for the location. |
|
|
Displays the unique identifier for the location. |
|
|
Displays the location description for your reference. |
|
|
Displays a count of the number of items that are at the location at any one time. |
|
|
Displays a count of the number of items that you have ordered but have not yet been received. |
|
|
Displays a count of the total number of items that have been committed to a job, but that have not been removed from the location. |
|
|
Double-click to view Inventory Detail |
To view inventory item detail, double-click the desired location and the Inventory Master Maintenance opens. For more information, see Inventory Master Maintenance. |
|
|
To add the item to a new location, click Add Item to New Location. Note: The Inventory Master Maintenance window opens with the Item ID specified and the cursor positioned for selection of the location. |
Viewing Transaction History for an Item, click More.
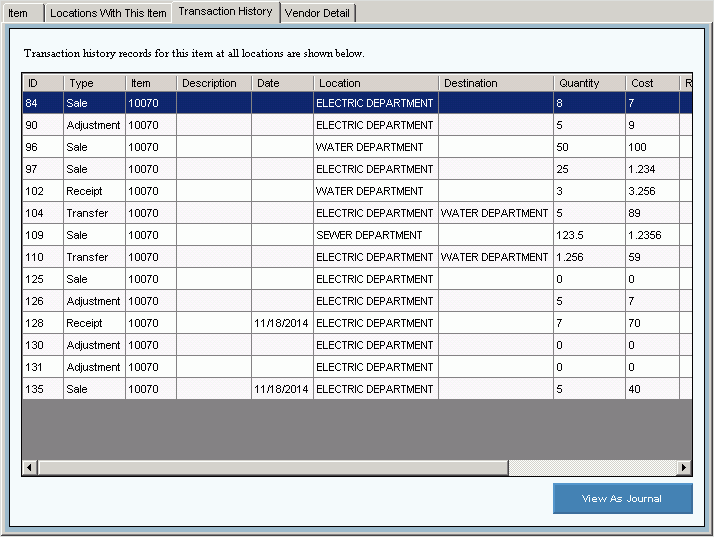
Use the Transaction History tab  to view all history transactions for the item at all locations. You have the option to View as Journal which will create a report format from the currently displayed transactions. In addition, the journal can be printed and the information can be exported to a file for use with third-party reporting tools. Click Transaction History and the following window displays:
Transaction History Tab for Item Master Maintenance Window Example:

|
Transaction History Tab for Item Master Maintenance Prompts Tip: To see more information about a field, click the hyperlink for the field name. |
|
|
|
To view the Transactions that updated the item, click Transaction History. |
|
Enter the unique identifier for the inventory item. (up to 45 characters) |
|
|
|
To display the transaction history, click Retrieve or press [Enter]. |
|
Transaction History Fields Tip: Each line contains a transaction that updated the item for a specific location. |
|
|
Displays the unique identifier for the item transaction. |
|
|
Displays the type of transaction. |
|
|
Displays the Item ID. |
|
|
Displays the description of the item. |
|
|
Displays the date the transaction occurred. |
|
|
Displays the description of the location where the item is located. |
|
|
Destination |
Displays the description of the Location where the item is assigned to be. |
|
Displays a total count of the quantity of the item updated during the transaction. |
|
|
Displays the cost of the item for the transaction. |
|
|
Displays the reference for the transaction. |
|
|
|
To view the transaction history in a journal format, click View As Journal. Notes:
|
Maintaining Vendor Detail for an Item, click More.
Editing an Item Master, click More.
![]() CAUTION: To avoid losing data, you must save new or changed records.
CAUTION: To avoid losing data, you must save new or changed records.
1. To display the record to be changed, enter the Item ID and click Retrieve ![]() , or press [ENTER].
, or press [ENTER].
Tip: If you do not know the Item ID, you can click Search ![]() to see a list of items.
to see a list of items.
2. To position the pointer to the information that you want to change, press [TAB] or click the field using the mouse.
3. Enter the data changes.
4. To complete the edit process, click Save  , or press [ENTER].


