Opening Inventory Master Maintenance, click More.
1. Click File Maintenance from the Menu.
2. Click Inventory Master.
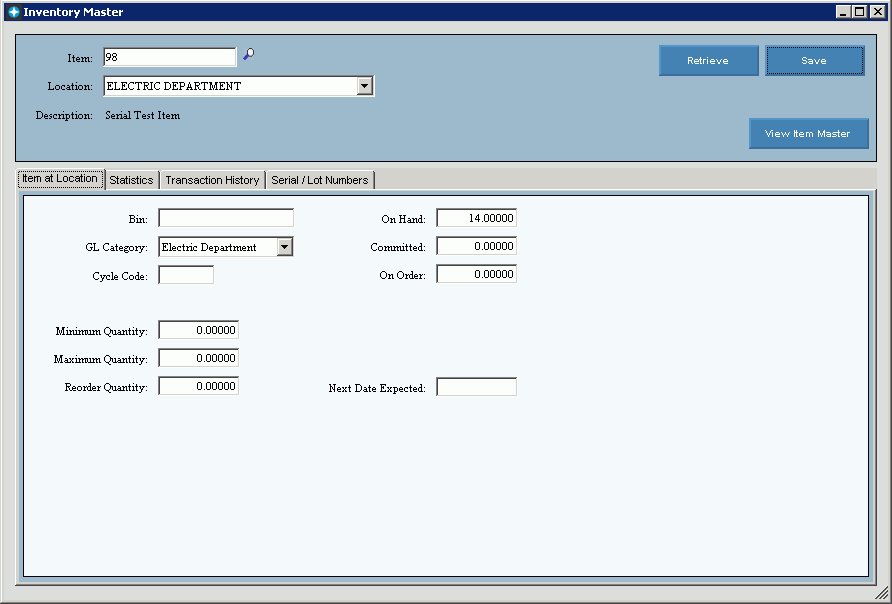
Inventory Master Maintenance Window Example:

Creating an Inventory Master, click More.
To create a new record enter the defined Item ID and select the Location.
Tip: To indicate that you are building a new inventory master, New! ![]() displays near the Location. Default entries display and the first field is highlighted to let you know you can begin entering information.
displays near the Location. Default entries display and the first field is highlighted to let you know you can begin entering information.
|
Inventory Master Maintenance Prompts
|
|
|
Enter the valid defined ID for the item. (up to 45 characters) Note: To search for the desired Item, click Search Required |
|
|
To specify the location for the inventory item, click a choice in the drop-down list. Required |
|
|
|
To update the new or changed information, click Save or, press [ENTER]. |
|
To avoid losing data, you must save new or changed records. |
|
|
|
To display an existing Inventory Item, enter the Item ID, Location and click Retrieve. |
|
|
To view details about the item, click View Item Master. Tip: After clicking View Item Master, the Item Master Maintenance screen opens. For more information, see Item Master Maintenance. |
|
Displays the item description for your reference. |
|
|
Enter the number of the Bin that contains the item at the location. Note: If the item is stored in multiple bins, it is recommended to list each bin number with a comma separating numbers. (i.e. 4,7,9) |
|
|
GL Category |
From the drop-down list, select a defined General Ledger category for the inventory item. The drop-down list contains all of the GL Categories defined during GL Category Maintenance. Note: If the General Ledger interface is activated, this field may be used to determine the GL account to create entries for when the Transaction Post routine is run. |
|
Enter the cycle code that represents which physical inventory cycle this item at this location fits into. When physical inventories are taken in companies with large inventories, they are often split into different parts. In order to make counting of the inventory more manageable, a different part of the inventory may be counted each year. Cycle codes are used during the physical inventory count to make sure that the correct items are being counted. Tip: Cycle Code defaults to zero. |
|
|
Displays the count of the total number of items present and available (stocking unit of measure) at the location currently. On hand inventory is increased when items are received through inventory transactions. On hand inventory is reduced when sold through inventory transactions. (numeric) Required Note: In most cases, On Hand should not be edited manually. If changes need to be made, a transaction should be created to perform the change. |
|
|
Displays the total number of the item at this location which are currently committed to a job but that have not been removed from the warehouse. Committing an item does not reduce the on hand quantity. (numeric) Required Note: In most cases, Committed should not be edited manually. If changes need to be made, a transaction should be created to perform the change. |
|
|
Displays the total number of the item at this location which is currently ordered, but has not yet been received. On Order keeps track of the items that are in transit between the vendor and your warehouse. On Order inventory is increased when an item is ordered during Transaction Entry. On Order inventory is reduced and on hand is increased when items are received in inventory transactions. (numeric) Required Note: In most cases, On Order should not be edited manually. If changes need to be made, a transaction should be created to perform the change. |
|
|
Enter the minimum quantity that should trigger an understock condition for the item or the smallest amount you are willing to have available. Available is defined as On Hand minus Committed. (numeric) Required |
|
|
Enter the largest quantity of the item at this location that you would like to have available at one time, or that constitutes an overstock condition. Available is defined as On Hand minus Committed. (numeric) Required |
|
|
Enter the default number of items that should be ordered when creating a new order. The Reorder Quantity represents the minimum number that you are allowed to buy at a time from the vendor or the minimum you must buy to take advantage of a quantity discount. (numeric) Required |
|
|
Enter the date the next shipment of items to the location is expected to arrive. (date) |
|
Viewing Statistics for an Inventory Item, click More.
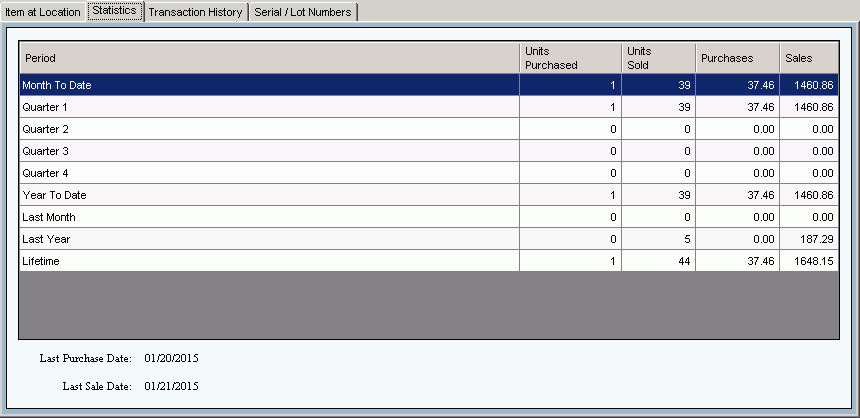
Use the Statistics tab  to view statistical information gathered from the history transactions for the item at the location. Each date range shows the quantity and dollar amount of items sold and purchased.
Statistics Tab for Inventory Master Maintenance Window Example:

|
Statistics Tab for Inventory Master Maintenance Prompts Tip: To see more information about a field, click the hyperlink for the field name. |
|
|
|
To view the statistics for the inventory item, click Statistics. |
|
Enter the valid defined ID for the item. (up to 45 characters) Note: To search for the desired Item, click Search |
|
|
To specify the location for the inventory item, click a choice in the drop-down list. |
|
|
Statistics Fields Tip: Each line contains statistics for the item at the location for the specified period. |
|
|
Period |
The periods are:
|
|
Units Purchased |
Displays the total number of units of the item at this location that have been purchased for the period. This field is increased through inventory transactions (receipts). |
|
Units Sold |
Displays the total number of units of the item at this location that have been sold for the period. |
|
Purchases |
Displays the accumulated dollar amount of purchases of the item at this location for the period. |
|
Sales |
Displays the accumulated dollar amount for sales of the item at this location for the period. |
|
Last Purchase Date |
Displays the date that the item for this location was last purchased. |
|
Last Sale Date |
Displays the date that the item for this location was last sold. |
Viewing Transaction History for an Inventory Item, click More.
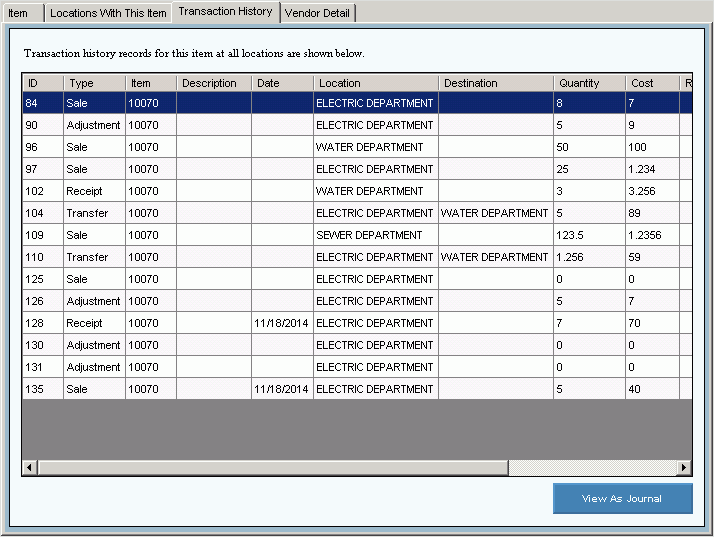
Use the Transaction History tab  to view all history transactions for the item at this location. You have the option to View as Journal which will create a printable report from the currently displayed history transactions. In addition, the journal can be printed or the information can be exported to a file for use with third-party reporting tools.
Transaction History Tab for Item Master Maintenance Window Example:

|
Transaction History Tab for Inventory Master Maintenance Prompts Tip: To see more information about a field, click the hyperlink for the field name. |
|
|
|
To view the Transactions that updated the item, click Transaction History. |
|
Enter the valid defined ID for the item. (up to 45 characters) Note: To search for the desired Item, click Search |
|
|
To specify the location for the inventory item, click a choice in the drop-down list. |
|
|
Transaction History Fields Tip: Each line contains a transaction that updated the item for a specific location. |
|
|
Displays the unique identifier for the inventory transaction. |
|
|
Displays the type of transaction. |
|
|
Displays the Item ID. |
|
|
Displays the description of the item. |
|
|
Displays the date the transaction occurred. |
|
|
Displays the description of the location where the item is located. |
|
|
Destination |
Displays the description of the Location where the item has been transferred. Tip: Destination only pertains to transfer transactions. |
|
Displays a total count of the quantity of the item updated during the transaction. |
|
|
Displays the cost of the item for the transaction. |
|
|
Displays the reference for the transaction. |
|
|
Displays the User ID of the person who posted the transaction. |
|
|
Displays the Job associated with the Inventory Item, if applicable. |
|
|
Displays the phase of the job associated with the Inventory Item, if applicable. |
|
|
|
To view the transaction history in a journal format, click View As Journal. Notes:
|
Viewing Serial/Lot Numbers for an Inventory Item, click More.
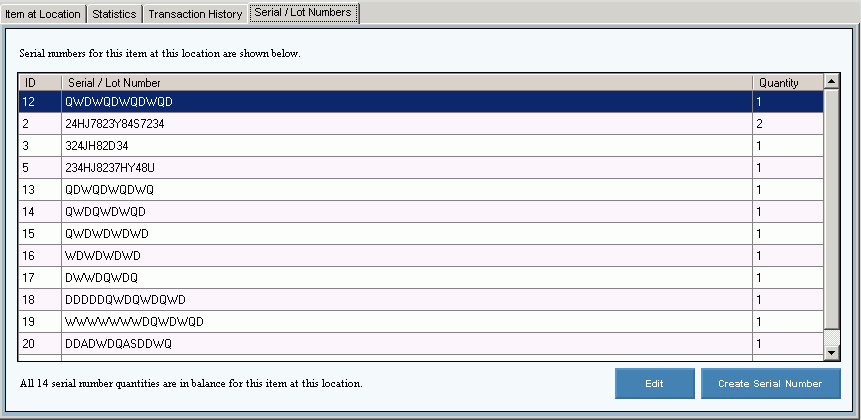
Use the Serial/Lot Numbers tab  to view all serial numbers for the item at the location if this is a serialized item. You can edit, add and delete serial numbers associated with the inventory item at this time.
Notes:
-
Only items with an Item Type of Serial can be assigned Serial Numbers.
-
If serial numbers are assigned to at least one physical item, they should be assigned to all the remaining physical items for a serialized item master record. A message will display the number of physical items for the serialized item, which do not have serial numbers assigned. The count is determined by the total quantity of all serial numbers for that item.
Serial/Lot Numbers Tab for Item Master Maintenance Window Example:

|
Serial/Lot Numbers Tab for Inventory Master Maintenance Prompts Tip: To see more information about a field, click the hyperlink for the field name. |
|
|
|
To view the Serial/Lot Numbers for the item at the location, click Serial/Lot Numbers. |
|
Enter the valid defined ID for the item. (up to 45 characters) Note: To search for the desired Item, click Search |
|
|
To specify the location for the inventory item, click a choice in the drop-down list. |
|
|
Serial Number Fields Notes: Each line contains the serial number assigned to the item and the quantity. The following message alerts you if there are no serial numbers for the inventory item:
If serial numbers are assigned to at least one physical item, they should be assigned to all the remaining physical items for a serialized item master record. A message will display the number of physical items for the serialized item, which do not have serial numbers assigned. The count is determined by the total quantity of all serial numbers for that item. |
|
|
ID |
Displays the number of the line containing the serial number. |
|
Displays the serial number assigned to the item. |
|
|
Displays the quantity of the serial number. |
|
|
|
To edit or remove a serial number for the item, click Edit. Note: After clicking Edit, the Serial Number Maintenance routine opens. For directions, see Serial Number Maintenance. |
|
|
To add a serial number for the item at this location, click Create Serial Number. Note: After clicking Create Serial Number, the Create Serial Number Maintenance opens. For directions, see Create Serial Number Maintenance. |
Editing an Inventory Master, click More.
![]() CAUTION: To avoid losing data, you must save new or changed records.
CAUTION: To avoid losing data, you must save new or changed records.
1. To display the record to be changed, enter the Item ID and select the Location.
Tip: If you do not know the Item ID, you can click Search ![]() to see a list of items.
to see a list of items.
2. To position the pointer at the information that you want to change, press [TAB] or click the field using the mouse.
3. Enter the data changes.
4. To complete the edit process, click Save  .
.
Deleting an Inventory Master, click More.
Note: To maintain data integrity Inventory items can not be deleted during Inventory Master Maintenance. To delete an Inventory Item use the Purge Orphaned Records routine.


