From the EDIFICE Inquiry, load an account. Click View
and then, click Messages.
EDIFICE Inquiry - Messages View Prompts |
Viewing Messages |
A
list of messages and alerts display for the customer or location.
The list can be sorted and filtered
so that you only see the desired ones. To sort,
click the desired column heading. To sort in reverse order,
click the column heading a second time.
Use
Settings  to add or remove the columns to display. column order can
be changed by dragging the column header to the desired location.
to add or remove the columns to display. column order can
be changed by dragging the column header to the desired location.
|
Filter |
To
limit the messages to those that meet certain criteria, click
Filter  next to the desired column heading. The available filter
choices display. Here is an example of Message filter, which
you can use to look for a specific message.
next to the desired column heading. The available filter
choices display. Here is an example of Message filter, which
you can use to look for a specific message.
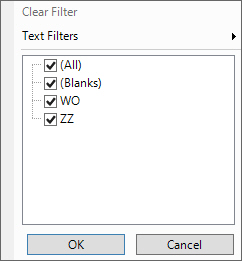
To select the choices to use as criteria,
click to check the desired box or boxes and then, click OK.
Note:
Advanced filtering options are available by
clicking Text Filters. |
Maintaining Messages |
Messages
for an account can be added, changed and removed.
Add message - To add a message,
click Add Message
 and the
Add
Messages Wizard opens for adding a message. and the
Add
Messages Wizard opens for adding a message. Edit Message Codes - To
change the content of a message, click to highlight the desired
message and then click Edit
Message Codes  .
Message
Maintenance opens where the message can be edited. .
Message
Maintenance opens where the message can be edited. Remove Message - To remove
a message from the account, click Remove
Message  .
At the delete message, prompt click Yes
to delete or click No
to save the message. .
At the delete message, prompt click Yes
to delete or click No
to save the message. |
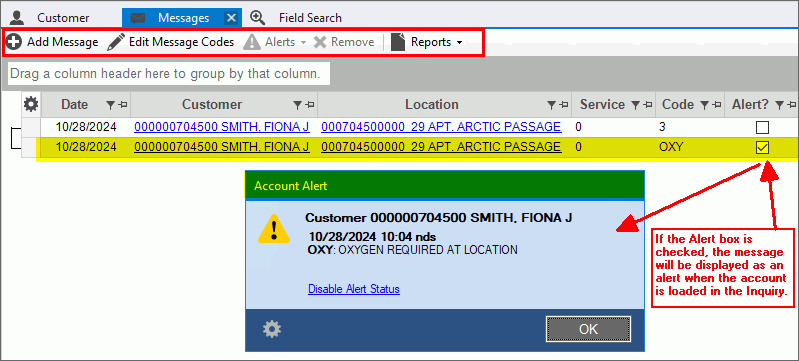
Alerts |
Messages
can be set as an alert or removed as an alert. You can select
multiple messages at the same time to change by holding the shift
key and clicking the desired rows.
To
include the message as an account alert, click to highlight
the message and then click Alert
--> Show messages as alert. To
turn off a message as an alert, click to highlight the message
and then click Alert -->
Do not show messages as alerts.
|

|
To
view the following reports, click Reports
and then select the desired report.
Credit Messages - View Credit
Messages for the account
Tip: Do not confuse
customer messages with customer
credit messages. They are two separate types of
messages and have separate functions. Message Codes - View messages
and alerts for the account Reason Code - View reasons
for the account |
|
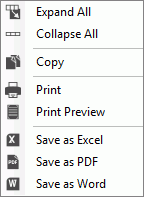
To
see additional options, right-click within the grid.
To
expand all rows in the grid, click Expand
All. To
collapse all rows in the grid, click Collapse
All. To
copy the information highlighted in the selected rows, click
Copy.
Printing
& Exporting Functions - These functions can be handy
for further manipulating or formatting the data or sending copies
to coworkers. In addition, Print and Print Preview functions
are available.
To
begin printing a report of the items in the list, click Print. Or,
to view a list of the account messages in the Print Preview
window, click Print
Preview. To
create a Microsoft Excel spreadsheet from the list of messages,
click Save as
Excel.
Tip: This can
be handy if you want to further manipulate the list. To
create a PDF document from the list of messages, click Save as PDF. To
create a Microsoft Word document of the list of messages,
click Save as Word.
The
Windows Save As steps:
At the Save
In field, navigate to the desired location. At the File Name field,
enter a file name. The Save as Type is set based
on the Save as selected: Excel document to save as
an Excel file. PDF to save as a PDF document. Word Document to save as
a Word document. Click Save  . . |