Use the Scheduling view to quickly see your appointments and to easily
book appointments for service, as well as, reschedule, cancel and double-book
appointments. You can also create anytime appointments, which are
appointments for tasks like dig safe, which do not require an allotted
time and that can be done at any time during the day. Work orders
can be created from the appointments and printed. The schedule format
is very flexible and can be customized for the unique requirements of
each technician. There are several ways to view the schedule as
well, which allows your company to utilize scheduling to more effectively
service the needs of your customers.
Scheduling Window |
Scheduling Window
Areas
The
Scheduling consists of 3 main areas or panels: the
Scheduling Parameters, the Appointment Book Area and the grid
with the appointments list. |
Scheduling Parameters
Area |
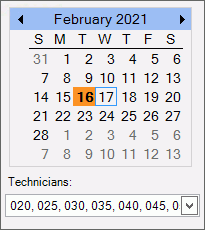
To display the schedule for a specific
time period, use the calendar located in the left panel to control
the dates shown in the schedule.
To select a specific date, click the
date in the calendar. To select multiple dates, click the
starting date and drag to the ending date in the calendar. Or,
press [Ctrl] and click
each desired date.

Choose the technicians to include in
the schedule, or choose to include all technicians.
Notes:
You
can choose to view the calendar by day, week, month or in
a timeline format by clicking one of these choices:
 You
can quickly reset the schedule to today's date by clicking
Today  on the toolbar.
 To
increase the appointment book area, click left
arrow  to collapse the Scheduling Parameters panel.
 The
donut below the calendar highlights how much of the technician's
day is utilized based on the duration of the scheduled appointments. |
Appointment
Book Area
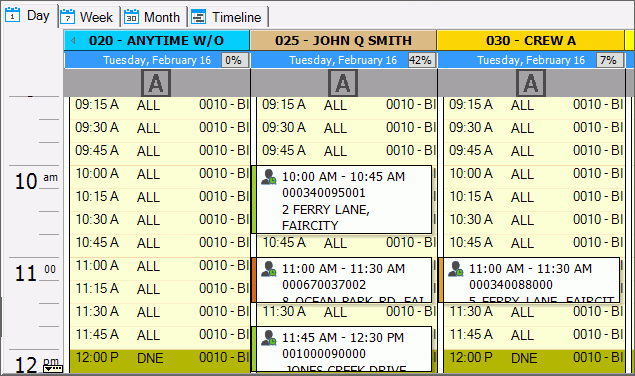
The Schedule
is made up of a column for each selected ,
for each day. Each column includes a header and a list of
the daily . Times that are
not available are a different color. Appointments are color
coded based on the problem/task for the appointment. If
you hover over an appointment, additional details display. To
schedule an appointment, right-click the time slot and then, follow
the directions below. Appointments can be dragged to a new
time slot to easily reschedule it.

|
Column Header |
At
the top of each column is a header containing the following information:
The
and Day
of the week, the calendar date and the percentage of the day
that is booked Anytime
appointments display in this area  . .
Tip: To schedule
an anytime appointment, double-click Anytime
area and the schedule
Appointment window opens. |
|
Each
unreserved time slot
in a column contains the following information:
Each reserved
time slot displays the following information within a color coded
appointment block:
and Color
coded and location address |
Appointment List
A list of
scheduled appointments and the details for each appointment displays
in the grid at the bottom of Scheduling. Columns of information
can be added or removed from the grid by clicking Grid
Settings  . Double-click
an appointment in the grid to open the Schedule
Appointment window. . Double-click
an appointment in the grid to open the Schedule
Appointment window.
Tip:
To reschedule an appointment you
can drag it from the grid to a new date or time.

|

|
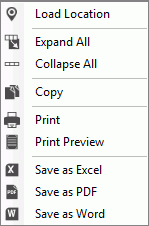
Functions
are available by right-clicking in the grid.
To
load the account information into the Inquiry,
click to highlight the account. Then, right-click and
select Load Account. To
expand all rows in the grid, click Expand
All. To
collapse all rows in the grid, click Collapse
All. To
copy the information highlighted in the selected rows, click
Copy.
The functions below can be handy for
further manipulating or formatting the data or sending copies
to coworkers. In addition, Print and Print Preview functions
are available.
To
begin printing a report of the appointments in the grid, click
Print. Or,
to view a list of the appointments to the Print Preview window,
click Print
Preview. To
create a Microsoft Excel spreadsheet of the appointments in
the grid, click Save
as Excel.
Tip: This can
be handy if you want to further manipulate the list. To
create a PDF document of the appointments in the grid, click Save as PDF. To
create a Microsoft Word document of the appointments in the
grid, click Save as
Word. |
Scheduling Functions |
Schedule Appointment |
To
schedule an appointment,
click here. |
Cancel Appointment |
Cancelled
appointments are moved to Cancellation history and can be viewed
there. If there is a work order for an appointment being
canceled, the work order is also canceled.
To cancel an appointment:
1. Click to highlight
the desired appointment.
2. Right-click and select
Cancel.
3. The Cancel Appointment
window displays.

4. Enter a reason why
the appointment is canceled, if desired.
5. Click Ok
to complete. |
Reschedule Appointment |
To
reschedule an appointment, drag the desired appointment and drop
it on the new time slot. The following prompt displays.

Select Yes
to complete the change.
Note:
You can also reschedule an appointment by dragging the desired
appointment from the grid to the desired time slot in the schedule.
The above prompt will display to confirm the change. |
Schedule Right-click
Functions |
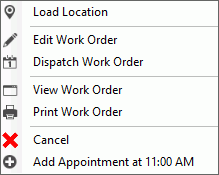
Right-click
an appointment in the schedule and the following options are available.

To double-book an appointment, click
to highlight the time slot. Then, right-click and select
Add Appointment. The
Schedule
Appointment window opens.
To cancel an appointment, see Cancel
Appointment above. |
Scheduling Toolbar
Functions
The toolbar
contains buttons to control the schedule display and to perform
certain scheduling functions. |

|
To
look for work orders for a selected date range, click Search. |

|
To
open the schedule in a new floating window, click New
Window. The new window can be moved to the
desired location on the screen, or it can be moved to another
screen. |

|
View
offers choices for formatting and displaying the schedule. Here
you can turn on/off automatic refresh of the schedule, show appointment
tooltips or not and change the font size of text in the schedule.
You can also set the number of columns, time intervals and
determine the fields of information to show with the appointment.
From the menu, click View
and the following displays.

|

|
To
view a list of all cancelled appointments, click Cancellations. |

|
To
see appointment history including current and canceled appointments
for a selected location and a selected date range, click Appointment History. You
can use this screen to look for an appointment by loading the
desired location and specifying a date range.
To display all current and canceled
appointments for a selected time, leave location blank and enter
the desired date range.

|

|
To
load the technicians assigned to the territory where the currently
loaded location is located, click Load
Current Territory. |

|
To
open a menu for building and editing the year
and day
formats for the schedule, click Maintenance.
Note:
Generally, once the schedule is formatted you do not need
to change it unless your organization changes its hours of operation. |
 on the toolbar.
 .
.


 to collapse the Scheduling Parameters panel.
 .
.  . Double-click
an appointment in the grid to open the


