ACH Receipts Journal Instructions
Use the ACH Receipts Journal to list the ACH receipts transactions generated during the ACH Receipts Create Payments routine. Generally, you print the ACH Receipts Journal after running the Create Payments routine and before performing the ACH Receipts Post Receipts. You can print the journal as many times as needed prior to running the post. Use this journal to verify the contents of the ACH payments file before the file is sent to the bank. If you use the print combined services option, all of the customers' transactions are listed in order.
Tips:
Maintain a final copy of the ACH Receipts journal for a complete audit trail.
For information about the timing and sequence of tasks, see ACH Receipts Procedures.
For more information about running reports, see Print View.
For more information about the buttons on the toolbar, see the Reporting Toolbar.
To see an example of the report, click
Cash
Receipts Edit Journal Sample.
Tip: Because the ACH Receipts Journal reports the same
fields in the same order as the Cash Receipts Edit Journal, please
refer to the Cash Receipts Edit Journal for a report sample.
To open:
1. Click Processes from the Menu.
2. Click ACH Receipts.
3. Click Receipt
Journal.
Tip: Or, use the keyboard
shortcut: [ALT] [p] [a] [b].
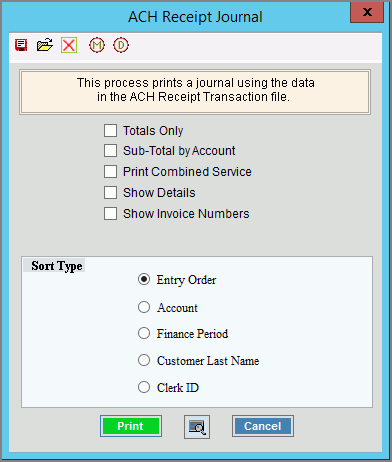
ACH Receipts Journal Window Example:

ACH Receipts Journal Prompts |
|
Totals Only |
To omit the receipt details and only print the journal totals, click to check Totals Only. The report will provide totals by transaction codes and finance periods as well as a total for each type of payment. To include receipt details, leave this box unchecked. |
Sub-Total by Account |
To print a sub-total for each customer account, select this box. To omit printing a sub-total for each customer account, leave this box unchecked. |
Print Combined Service Journals |
To print the journal for combined services, select this box. To omit printing the journal for combined services, de-select this box. |
Show Detail |
To include a second line for the location ID and location address, check this box. Or, to omit this information, leave this unchecked. Note: Show Detail only pertains to location aware customers. |
Show Invoice Numbers |
To include the invoice number associated with the payment, check this box. Or, to omit the invoice numbers leave this unchecked. |
Account Information |
Select an option:
Note: This generally pertains to open item accounts. |
|
|