Opening Problem/Task Code Maintenance, click More.
1. Click Service Management from the Menu Bar.
2. Click File Maintenance.
3. Click Problem/Task
Code.
Tip: Or, use the keyboard
shortcut: [ALT] [m]
[f] [p].
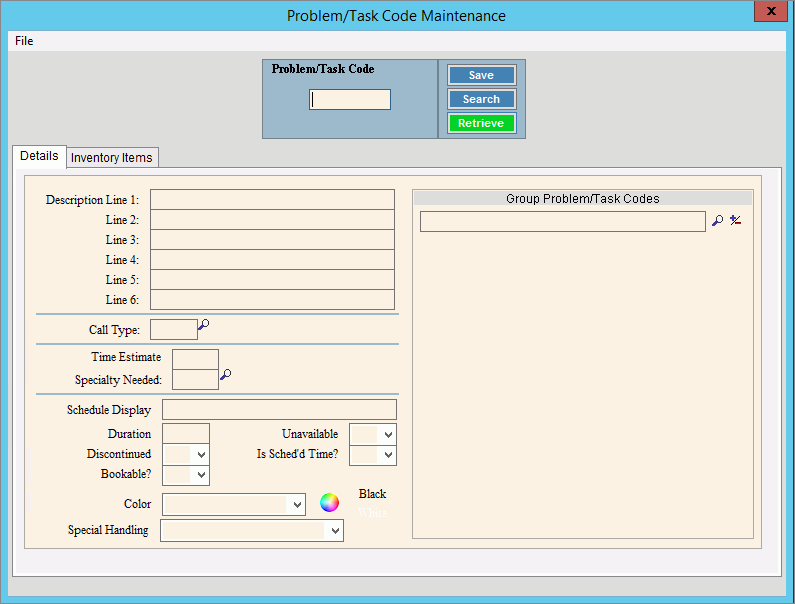
Problem/Task Code Maintenance Window Example:

Creating a new problem or task code, click More.
Problem/Task Code Maintenance Prompts Tip: To see more information about a field, click the hyperlink for the field name. |
|
Enter
the unique code that identifies the service call problem
or task and click Retrieve
Required Tip:
To indicate that
you are building a new Problem/Task, New |
|
|
To update the new or changed information, click Save or press [ENTER]. Keyboard shortcut: [ALT + s] |
To avoid losing data, you must save new or changed records. |
|
|
To view all of the existing Problems or Task Codes, click Search. From the Search list you can select the record to change or delete. Keyboard shortcut: [ALT + r] |
|
To display an existing Problem or Task Code, enter the Problem/Task Code and click Retrieve, or press [ENTER]. Keyboard shortcut: [ALT + t] |
Enter the first line of the problem or task description. (up to 35 characters) |
|
Enter up to six lines to describe the problem or task. (up to 35 characters per line) Tip: Use only as many lines as you need. |
|
Enter the default standard amount of time estimated to complete the task or repair the problem. (hh:mm) |
|
Specialty Needed: |
Enter the defined Specialty Code ID to assign as a specialty skill a technician needs to complete the task or problem. (up to 5 characters) Tip:
To search for a Specialty Code ID, click Search
|
Enter the text to display as the description for the Problem/task during Scheduling. (up to 40 characters) |
|
Enter the default number of minutes to allow in the schedule for this problem or task. (3.0 numeric) |
|
To indicate the Problem or Task is discontinued and not available for scheduling, click Y(es) in the drop-down list. To indicate the Problem or Task is active, click N(o) in the drop-down list. |
|
Note: This field is reserved for future use. Please maintain the default setting. |
|
To assign a color to appointments scheduled with this Problem/Task Code, click a choice in the drop-down list. |
|
To specify the type of work order automation reading and which determines how read transactions are created, click a choice from the drop-down list. Special Handling Types:
Note: If no special handling is required, select None. |
|
To prevent this Problem/Task from being booked in the schedule, click Y(es) in the drop-down list. To allow this Problem/Task to be available for scheduling, click N(o) in the drop-down list. |
|
Note: This field is reserved for future use. Please leave blank. |
|
Group Problem/Task Codes |
To
build a group of Problem/Tasks associated with the Problem,
enter the Problem/Task Code and click Add/Delete
Tip:
To search for the Problem/Task Code to include,
click Search
|
Inventory Items Use this area to assign inventory items to the problem code. When a work order is completed and the Create Miscellaneous Receivable is clicked, the Miscellaneous Receivable transactions for the items are automatically created. Note:
To open the Inventory Items area, click Inventory
Items
|
|
Item ID |
Enter the defined inventory Item ID to associate with the task or problem. (up to 12 characters) Tips:
|
Quantity |
Enter the quantity of the item that is used with this problem. (3.2 numeric) |
Unit of Measure |
Enter a defined unit of measure ID for the item. (up to 10 characters) Or, to search for an unit of
measure ID, click Search
|
Inventory Location |
Enter a defined inventory location ID where the item is stored. (up to 10 characters) Or, to search for an inventory
location, click Search
|
Enter the transaction code for generating a miscellaneous receivables transaction when the problem code is used, if applicable. (up to 10 characters) |
|
|
To add the inventory item to the problem code, click Add Item. Tip: The item information displays in the Items Detail area for your reference. |
|
To remove the highlighted inventory item from the problem code, click to highlight the item and then click Remove Item. |
|
To update the new or changed information, click Save or press [ENTER]. Keyboard shortcut: [ALT + s] |
Default Inventory Location |
To specify the default location for items for the problem code, enter a defined inventory location ID. (up to 10 characters). The location description displays for your reference. Or, to search for an inventory
location, click Search
|
|
To save the default location for future use, click Save Default Location. |
Editing an existing problem or task code, click More.
![]() CAUTION: To
avoid losing data, you must save new or changed records.
CAUTION: To
avoid losing data, you must save new or changed records.
1. To display the record
to be changed, enter the Problem/Task Code and click Retrieve
![]() , or press
[ENTER].
, or press
[ENTER].
Keyboard shortcut: [ALT
+ t]
Tip: If you do not know the Problem/Task Code, you
can click Search ![]() to see a list of codes.
to see a list of codes.
2. To position the pointer to the information that you want to change, press [TAB] or click the field using the mouse.
3. Enter the data changes.
4. To complete the edit
process, click Save ![]() , or
press [ENTER].
, or
press [ENTER].
Keyboard shortcut: [ALT
+ s]
Deleting an existing problem or task code, click More.
1. To display the record
to be deleted, enter the Problem/Task Code and click Retrieve
![]() , or press
[ENTER].
, or press
[ENTER].
Keyboard shortcut: [ALT
+ t]
Tip: If you do not know the Problem/Task Code, you
can click Search ![]() to see a list of codes.
to see a list of codes.
2. Click File
from the Menu Bar,
and next click Delete.
Keyboard shortcut: [ALT]
[f] [d]
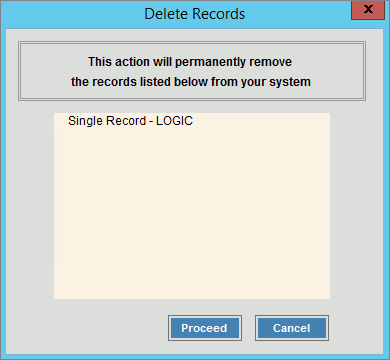
3. At the Delete Records
prompt, click Proceed
to delete the record, or click Cancel
to escape from the delete routine.
Example:

Note: After you click Proceed,
you will see the following message on the Status
Bar.
![]()
 .
.


