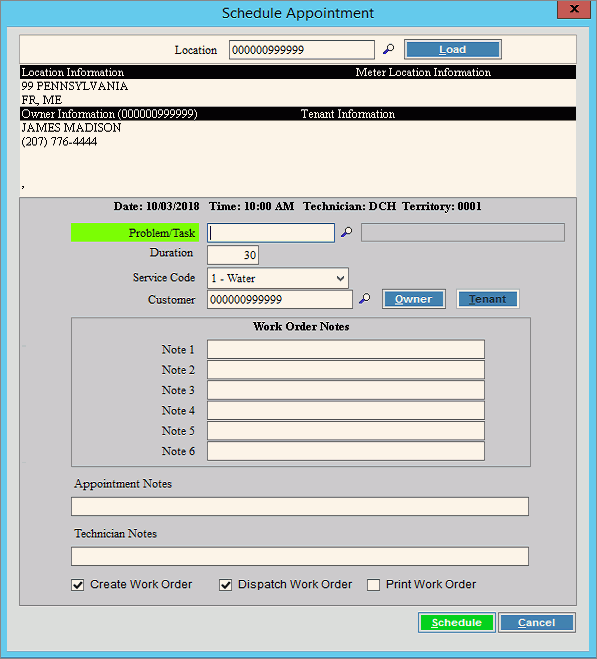
Opening Schedule Appointment Window, click More.
1. Open Scheduling:
a. Click Service Management from the Menu Bar.
b. Click Daily Work.
c. Click Schedule Appointments.
2. To Open the Schedule Appointment Window:
a. Click to highlight an appointment time slot.
b. Click Schedule
![]() on the Scheduling Toolbar.
on the Scheduling Toolbar.
c. Or, simply double-click on the desired appointment time slot to select an appointment time slot.
Scheduling - Schedule Appointment Window Example:

Creating a new Appointment, click More.
Scheduling - Schedule Appointment Window Prompts Tip: To see more information about a field, click the hyperlink for the field name. |
|
To accept the currently displayed Location, click Load. Or, enter the Location ID that identifies the location for the appointment. (up to 12 characters) Required Tips:
|
|
|
To load a new location, enter the Location ID and click Load or press [ENTER]. Tip: Load is only active if Location started out blank. |
Location Information |
Displays the following location information for your reference:
|
Owner Information |
Displays the following owner customer information for your reference:
|
Tenant Information |
Displays the following tenant customer information for your reference:
Tip: The tenant information only applies if there is a tenant assigned to the location. |
Appointment Information Area |
|
Displays the date you highlighted in the schedule for the appointment. |
|
Displays the time you highlighted in the schedule for the appointment. |
|
Displays the Technician Code assigned to the appointment. |
|
Displays the Territory Code associated with the location. |
|
Enter the problem or task to be performed during the appointment. (up to 3 characters) Tip:
To search for the appropriate Problem or Task Code,
click Search
|
|
Displays the description of the Problem/Task Code for your reference. |
|
Displays the default duration for the Problem/Task. Press [TAB] to accept or enter another duration - in minutes. (3.0 numeric) |
|
To accept the Service Code assigned to the location, press [TAB]. Or, to select another Service Code associated with the appointment, click a choice in the drop-down list. |
|
To accept the Customer ID associated with the Location for the appointment, press [TAB]. Or, enter another Customer ID, if applicable. (up to 12 characters) Tip:
To search for
the appropriate Customer ID, click Search |
|
To maintain optional work order notes pertaining to the appointment, enter the appropriate text. (up to 6 lines of text) Tip: Because the Work Order Notes field labels can be tailored to suit your needs, your software field labels may not match the documentation. You can maintain the field labels during Work Order Notes Labels Maintenance. |
|
To maintain optional notes pertaining to the appointment, enter the appropriate text. (up to 255 characters) |
|
To maintain optional technician notes pertaining to the appointment, enter the appropriate text. (up to 255 characters) |
|
Create Work Order |
To automatically create a work order from the appointment information, click to check this box. To omit creating a work order, leave this box unchecked. Note: If a work order is not created at this time, you can create it later by selecting Create Scheduled Work Orders from the Service Management Daily Work menu or by right-clicking on the appointment slot and choosing Create New Work Order. |
Dispatch Work Order |
To dispatch the work order to the mobile work order module, check this box. When the mobile work order module syncs, work orders can be seen in the field. A dispatch date is added to the work order. To dispatch the work order later, leave this box unchecked. |
Print Work Order |
To print the work order at the time the appointment is scheduled, check this box. To print the work order at a later time, leave this box unchecked. |
|
To commit the appointment to the schedule, click Schedule or press [ENTER]. Note: If the appointment is scheduled in a time slot that exceeds the time needed, a message alerts you that the appointment is overriding the master schedule. For more information, see Appointment Override. |
|
To close the window without scheduling the appointment, click Cancel. |
Editing an existing Appointment, click More.
To reschedule an appointment:
1. First, cancel the current appointment by performing these steps:
a. Click to highlight the appointment in the Appointment Book Area to be canceled.
b. Click Cancel
on the Scheduling Toolbar.
Tip: For more information, see Scheduling
- Cancel Appointment Window.
2. Next, schedule a new appointment. Refer to the Scheduling - Schedule Appointment Window.
Deleting an existing Appointment, click More.
Note: To delete an appointment see the Appointment Cancel Window.