Opening the PR A/P Check Preparation routine, click More.
-
Click Payrollfrom the Menu Bar.
-
Click Vendor Invoices and Checks.
-
Click Payroll A/P.
-
Click PR A/P Check Preparation.
Or, use the keyboard shortcut: [ALT] [p] [v] [p] [c].
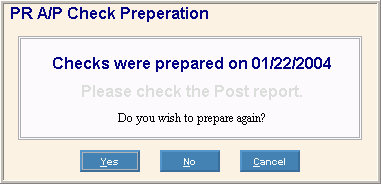
 Caution: If
you see the following message when you open the program, take precautions.

Notes:
-
If you are simply re-running the preparation to correct the date or to include different vendors, click Yes to continue.
-
However, if this is the first preparation for this PR A/P check run, then the last PR A/P Check Post may have failed to complete properly. To proceed, follow these steps:
-
Print the PR A/P Check Register and compare it to the last check register.
-
If the registers do not agree, click Yes and continue with the preparation.
Or, if the registers agree...
-
Click No to escape from this program.
-
Run the PR A/P Check Post before preparing checks again. Be sure to select the proper General Ledger Period Number for the post.
-
Run the PR A/P Check Register.
-
Run the PR A/P Check Report and confirm that it now lists only unpaid transactions.
Tip: If you need assistance, contact NDS Technical Support.
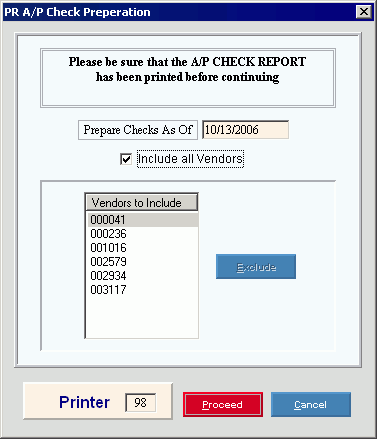
PR A/P Check Preparation Window Example:

Choosing the selections at the prompt window, click More.
|
PR A/P Check Preparation Prompt Options Tip: To see more information about a field, click the hyperlink for the field name. | |
|
Prepare Checks As Of |
Enter a date that includes all invoice transactions to be paid. All check records with Vendor Due Dates on or before this date are flagged to be printed. (MM/DD/YYYY, century and slashes optional) |
|
Include All Vendors |
To specify if you want to include all vendors for check preparation: |
|
Vendors to Include |
To specify which vendors you want to include for check preparation.
|
|
|
To remove a Vendor Number from the list, click to highlight the Vendor Number, and then click Exclude. Keyboard shortcut: [ALT + e] Tip: You must de-select the Include All Vendors box before clicking Exclude. |
|
Printer |
Displays the default printer number. For more information, see Printing Options. |
|
|
To start the process and generate the report, click Proceed. Keyboard shortcut: [ALT + p] |
|
|
To escape from the routine, click Cancel. Keyboard shortcut: [ALT + c] |
Report Sample(s), click More.


