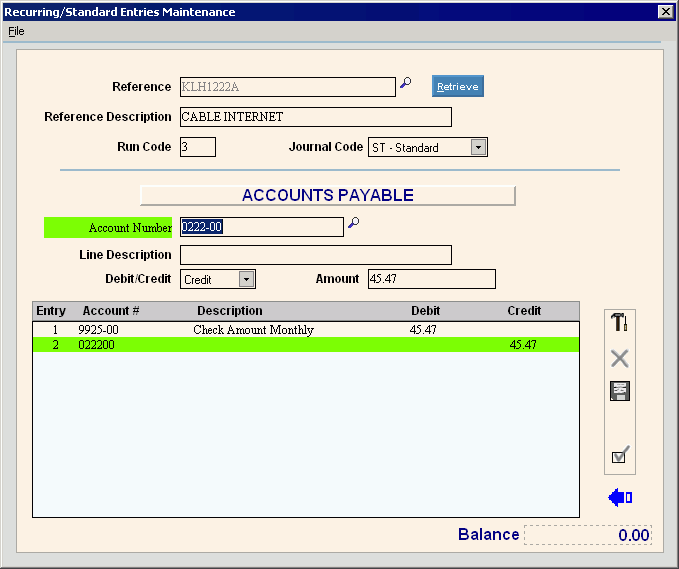
Recurring-Standard Entries Maintenance
Use Recurring-Standard Entries Maintenance as a labor saving tool to create and maintain entries for standard and recurring journal entries that are to be posted repeatedly from one period to the next. The entries are also useful for assuring that certain journal entries are entered every period. The recurring-standard entries look like regular journal entries, however they are not yet associated with any specific period. After you create the entries here, you can use Create Recurring Entries and Create Standard Entries tools in Journal Processing to quickly create the journal entries for a specific period.
Tips:
For a list of the recurring-standard journal entries, see the Recurring-Standard Entries Listing.
Recurring vs. Standard journal entries:
RC Journal Code.
The amounts are exactly the same for every period.
You can not override the amounts during Create Recurring Entries.
Examples: Depreciation, prepaid insurance
ST Journal Code.
The amounts can vary from period to period.
You can override the amounts during Create Standard Entries.
Example: Bank service charge.
Directions:
To open click File Maintenance
from the menu. Then
click Recurring-Standard Entries.
Tip: Or, use the keyboard
shortcut: [ALT] [m] [r].
Recurring-Standard Entries Maintenance Window Example:

Recurring Entries Maintenance Window Prompt
|
|
Entry Summary |
To create a standard or recurring journal entry: 1. Enter the new Reference. 2. Press [ENTER]
or click Retrieve 3. Enter the Reference Description, Run Code, and select the appropriate Journal Code. 4. Press [Tab] to enter the debit and credit entry details for the recurring or standard entry. 5. Enter the account number or look for it enter [Ctrl + f] or click Search. The account description will display. 6. Enter a reference if desired. 7. If the entry is a debit amount enter the entry amount in the Debit column. If the entry is a credit, enter the amount in the credit column. Or for a standard entry leave the debit and credits as zero. 8. Press [Tab] to complete the line. 9. Repeat steps 5-8 to continue entering the debit and credit entries until the debit and credit amounts balance. 10. To finish, press [Enter] or click
Save |
To build a new entry, enter a unique reference to identify the journal entry. (up to 20 characters) To display an existing recurring or
standard journal entry, enter the Reference and press [ENTER]
or click Retrieve Tips:
|
|
Enter a description for the journal entry. (up to 30 characters) Tip: This description applies only to the entries in the maintenance for your convenience. When you create the live journal entries, it is not attached to the entries. |
|
Enter the optional run code that you can use to group types of recurring journal entries together. When you create the live journal entries, you can select the entries to use by the run code. (3.0 numeric) Examples: You can use the following convention for run codes on the recurring journal entries, or you can create your own meaning for the run codes.
|
|
Enter R to select recurring or enter S to select standard. Or click one of the journal codes in the list. REQUIRED
|
|
Entering the detail lines for the entries |
|
Enter the account number for the entry. The account number description displays. Required. Tips:
|
|
Enter an description for each credit or debit transaction. (up to 30 characters) Tip: You can see the entry description on the Journal Processing list after running Create Recurring Entries or Create Standard Entries for the period, as well as in the General Journal Listing and the General Journal Report. |
|
Tab to the credit or debit and enter the entry amount. (12.2 numeric) Note: Always enter the transaction amount as a positive number. To create a negative transaction, simply select the opposite Debit/Credit option. Tip: If you override the amount for a Standard (ST) template during Create Standard Entries, it also changes the template amount here. |
|
Grand Summaries |
Displays the sum of the debit and credit amounts in the list. Note: Do not complete the journal entries unless this value is 0.00 (zero). |
|
To save
changes to a line, press [Enter]
or click Save
|
|
To add a new detail line for an entry, press [Tab] or click Add. |
Editing a Recurring/Standard Entry |
1. Enter the Reference
and press [ENTER] or
click Retrieve 2. Position the pointer to the information that you want to change. 3. Enter the changes. 6. To complete the process
click Save
|
Deleting a Recurring or Standard Entry |
To delete an individual detail line, click to highlight the line, and then press Delete. At the Delete row prompt click Yes.
To delete an entire entry, do the following: 1. Enter the Reference
and click Retrieve 2. Click File
from the main menu,
and next click Delete. 3. At the Delete prompt,
click Yes to delete the
record, or click Cancel
to escape from the delete routine. |