Create Customer Location Step 4 Window
Use the Create Customer Location Step 4 window to enter geographic and physical location information, as well as, special conditions that may exist at the location.
Tip: For general information about using wizards, see the Wizard - Introduction.
To display the Create Customer Location Step 4 window:
1. From the Inquiry, click Tools and then, click Wizards.
2. In the Create section, click Customer.
3. To navigate
to the step that you want to maintain click Next
![]() or click Back
or click Back ![]() until
the data that you want to maintain displays in the Data Entry Panel.
until
the data that you want to maintain displays in the Data Entry Panel.
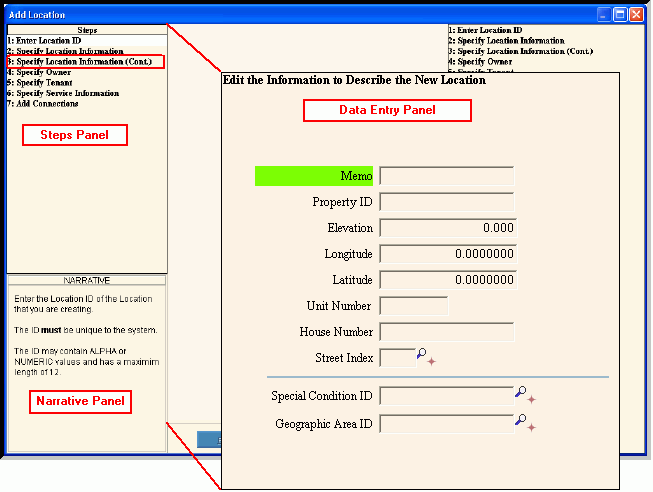
Create Customer Location Step 4 Data Entry Panel Example:
Create Customer Location Step 4 Prompts
|
|
Enter an informational line pertaining to the location, if applicable. (up to 10 characters) |
|
Enter the location's property ID number also known as the Map/Lot number. (up to 20 characters) |
|
Notes:
|
|
Enter the geographic elevation of the location, if applicable. (6.3 numeric) |
|
Enter the geographic longitude position of the location, if applicable. (3.7 numeric) |
|
Enter the geographic latitude position of the location, if applicable. (3.7 numeric) |
|
Enter the Unit Number if this is an apartment, if applicable. (up to 10 characters) Note: While Unit Number is generally informational, it may print on customer bills. |
|
Enter the number assigned to the property at the location. (up to 10 characters) Note: The House Number combined with the Street Index ID forms the Property Location. The Property Location describes the physical location of the location and may be different than the customer's mailing address. The Property Location displays in various places including the Customer Inquiry and prints on customer bills. |
|
Enter a defined Street Index ID. (4.0 numeric) Notes:
|
|
Enter a Special Condition ID to alert you to special conditions or concerns to be aware of at the location, if applicable. (up to 10 characters) Tips:
|
|
Enter the unique identification for the service management Geographic Area the location is part of. (up to 5 characters) Tips:
|
|
Enter a description for the type of facility at this location, if applicable. For example, types of facilities can be multi-unit, Mall, Cafe, or industrial. Tips:
|
|
|
To complete the entries and continue to the next window, click Next. Keyboard shortcut: [ALT + n] For directions to the next step, click here. |
|
To return to the previous window, click Back. Keyboard shortcut: [ALT + b] For directions to the previous window, click here. |
![]()