Shut Off Balance Report Instructions
Use the Shut Off Balance Report to list the accounts that have an outstanding balance for the time period specified. While this report is similar to the Shut Off Notice Journal, it is another way to look at the shut off information. You can print the Shut Off Balance Report anytime after you have performed the Create Workfile routine.
Notes:
For more information about running reports, see Print View.
To see an example of the report, click Shut Off Balance Report Sample.
To open:
1. Click Processes from the Menu.
2. Click Shut Off.
3. Click Shut
Off Balance Report.
Or, use the keyboard
shortcut: [ALT] [p] [s] [r].
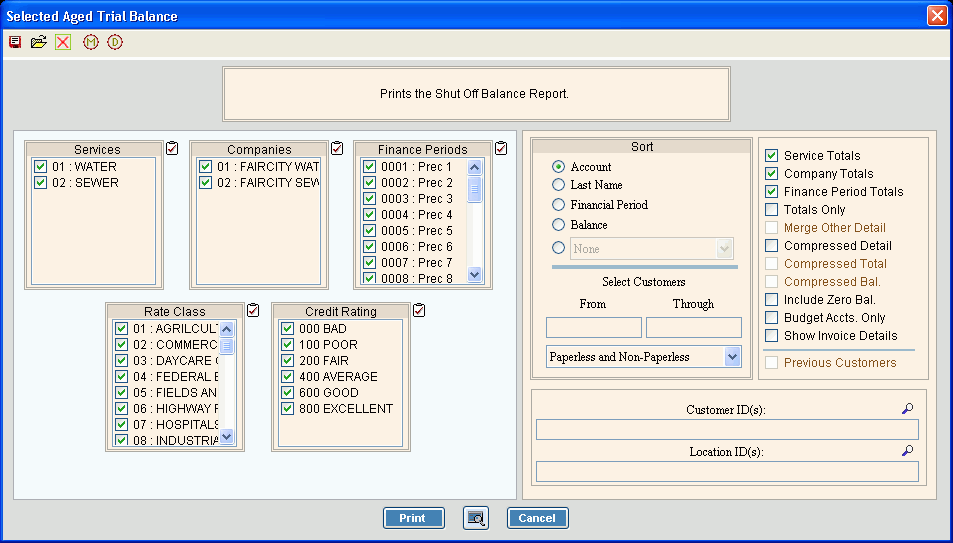
Shut Off Balance Report Window Example:

Shut Off Balance Report Prompts Tip:
To quickly select or de-select all
items listed, click Check All
|
|
To select the services to report, click to check the appropriate services listed. |
|
To select the companies to report, click to check the appropriate companies listed. |
|
To select the finance periods to report, click to check the appropriate periods listed. |
|
To select the rate classes to report, click to check the appropriate rate classes listed. |
|
To select the customer credit ratings to print, click to check the appropriate credit ratings listed. |
|
Sort |
To choose a sort option, click to select the appropriate button. Sort Options:
|
Select Customers |
To build a range of customers to report, enter the beginning customer ID, followed by a hyphen (-) and then the ending customer ID. Note: The From and Through fields are only active if you select Account as the Sort option. |
To include all customers on the report, choose Paperless and Non-Paperless. To only include customers who receive paper statements on the report, click to select Non-paperless only. To only include customers with paperless statements on the report, click to select Paperless only. |
|
Service Totals |
To print the accumulated customer past due totals for each Service Code, check this box. Otherwise, please leave blank. |
Company Totals |
To print the accumulated customer past due totals for each Company, check this box. Otherwise, please leave blank. |
Finance Period Total |
To print the accumulated customer past due totals for each Finance Period, check this box. Otherwise, please leave blank. |
Totals Only |
To omit the associated detail and to print past due totals only, check this box. Otherwise, please leave blank. |
Merge Other Detail |
Note: This field is only available if extended aging information is set up. For more information, contact NDS Support. |
Compressed Detail |
To print a condensed version of the report with only 1 line of information per customer, click to check Compressed Detail. Otherwise, leave this box unchecked. |
Compressed Total |
To print a compressed total where customer amounts are accumulated into a single total, click to check Compressed Total. Otherwise, leave this box unchecked. |
Compressed Bal |
To print a compressed customer balance, click to check Compressed Balance. Otherwise, leave this box unchecked. |
Include zero Bal. |
To include customers with zero balances on the report, click to check this box. To omit customers with zero balances, please leave this box unchecked. |
Budget Accts Only |
To only report budget customers, click to check this box. Otherwise, to report all please leave this box blank. |
Show Invoice Details |
To include invoice details on the report, click to check this box. To omit invoice details, please leave this box blank. Notes:
|
Previous Customers |
To print previous customers associated with a specified location who have an outstanding balance, click to check Previous Customers. Otherwise, please leave the box unchecked. Notes:
|
To build a list of customers to report: Entry Options:
|
|
To build a list of locations to report: Entry Options:
|
|
Note: The location ID selection option is not available for this report. |
|
|
To begin printing, click Print,
or press [ENTER]. To print to the Print View window, click Print View. Or, to escape from the print routine, click Cancel, or press [ENTER]. |