Opening Vendor Master Maintenance, click More.
-
Basic Method:
1. Click Fund Accounting from the Menu Bar.
2. Click File Maintenance.
3. Click
Vendor Master.
-
Advanced Methods:
-
Click Vendor Master Maintenance
 on the Toolbar.
 -
Or, click the following sequence:
View from the Menu Bar; and Vendor Master FM. -
Or, use one of the following keyboard shortcuts:
[CTRL + v]
[ALT] [v] [v] (View Menu)
[ALT] [u] [f] [v] (Fund Accounting Menu)
Vendor Master Maintenance Window Example:

Creating a New Vendor, click More.
To create a new record choose one of these methods:
-
Enter the new Vendor Number and click Retrieve
 , or press
[ENTER].
Keyboard shortcut: [ALT + t] -
Or, enter the new Vendor Number and click File from the Menu Bar; next click New.
Keyboard shortcut: [ALT] [f] [n]
Tip: To
indicate that you are building a new vendor, New  displays near the Vendor Number. Default
entries display and the first field is highlighted
to let you know you can begin entering information.
|
Vendor Master Maintenance Prompts Tip: To see more information about a field, click the hyperlink for the field name. | |
|
Enter a unique Vendor Number. (6.0) Tip: To let Fund Accounting automatically assign a Vendor Number to a new vendor, leave the field blank, and then click Retrieve or press [ENTER]. | |
|
|
To update the new or changed information, click Save or press [ENTER]. Keyboard shortcut: [ALT + s] |
|
To avoid losing data, you must save new or changed records. | |
|
|
To view all of the existing vendors, click Search. From the Search list you can select the record to change or delete. Keyboard shortcut: [ALT + r] |
|
|
To display an existing vendor, enter the Vendor Number and click Retrieve, or press [ENTER]. Keyboard shortcut: [ALT + t] |
|
A temporary vendor typically is a vendor that you only use once. Options:
Tip: You can delete all temporary vendors at once using the Remove Temporary Vendors routine, which is a fiscal year end job. | |
|
Enter the General Ledger Account Number or the Appropriations Account Number that serves as the default account for this vendor during Invoice Entry and Purchase Order Entry. (unlimited characters) Tips:
1. Right-click to display the shortcut menu. 2. Click G/L Account # Search. | |
|
Enter the vendor's Tax Identification Number (TIN). (up to 12 characters) | |
|
To specify the Purchase Order Status default that displays when entering POs for this vendor, click one of the following options in the drop-down list. (predefined)
Tips:
| |
|
To specify if the vendor is eligible for 1099 Form reporting, click one of the following options in the drop-down list:
| |
|
To indicate if taxes are withheld for the vendor, click Yes or No in the drop-down list. (Yes/No) Tip: This field is informational only. To enter a tax withholding amount for a vendor, typically you enter a negative amount for 1099 Code 09 (federal) or Code 10 (state) during invoicing. the A/P Post Payments routine updates the Vendor Payment Amount YTD for the 1099 Code (or the Calendar Paid Amount YTD) with the negative amount. | |
|
|
To display 1099 Vendor Totals Maintenance, click Totals. Keyboard shortcut: [ALT + o] Tip: 1099 Vendor Totals Maintenance is applicable only if the Use 1099 File Option is selected during 1099 Codes Table Maintenance. |
|
Payment To Fields | |
|
Enter the vendor's remit to name. (up to 30 characters) Required | |
|
Enter the first line of address information, such as the street number and name. (up to 20 characters) | |
|
Enter any additional address information. (up to 20 characters) Tip: Leave this field blank if there is no additional address information. | |
|
Enter the city and two-letter state abbreviation. (up to 20 characters) Tip: For a complete listing of state abbreviations, refer to the United States Postal Service website, http://www.usps.com/ncsc/lookups/abbreviations.html. | |
|
Enter the postal code. (up to 10 characters) Tips:
| |
|
Enter the vendor's telephone number. [(xxx)xxx-xxxx] Tips:
| |
|
Enter a value if you want an alternative method for sorting this vendor. (up to 20 characters) Tip: You can use the Search Code as an alternative to the Vendor Name for sorting the Search results and for sorting some reports. For example, if the vendor name is "The ACME Corporation", you can omit "The" and just enter ACME in the Search Code. Or, if the Vendor Name is "John Smith", you can enter "Smith, John" in the Search Code. | |
|
Enter miscellaneous text as desired. (up to 30 characters) Example: You can use a miscellaneous field to store a fax number or contact person's name. | |
|
Enter miscellaneous text as desired. (up to 30 characters) | |
|
Balance Fields Note: The following fields are updated by Invision. Do not manually edit the values unless directed by NDS Technical Support. | |
|
Displays the current amount owed to the vendor. (-7.2 numeric) | |
|
Displays the current amount for open purchase orders with the vendor. (-7.2 numeric) | |
|
Displays the amount of payments posted to this vendor during the current calendar year. (-7.2 numeric) | |
|
Displays the amount expended to this vendor during the current fiscal year. (-7.2 numeric) | |
|
Displays the date that the last invoice was posted to this vendor. (mmddccyy - slashes and century optional) | |
|
Displays the amount expended to this vendor during the previous fiscal year. (-7.2 numeric) | |
|
Displays the total open purchase order amount for the previous fiscal year. (-7.2 numeric) Tip: This field is applicable only if your site is set up for the Dual Fiscal Year System. | |
|
Purchase From Fields Note: The Purchase From fields display only if the Vendor Purchase From File Option is specified as Y(es) when setting up Company Control Options. These fields print on the Purchase Orders in place of the Payment To fields. You can use them in the case of a parent/child situation where the corporate headquarters is the Payment To vendor, and the subsidiary is the Purchase From vendor. | |
|
Vendor Name |
Enter the Purchase From vendor's remit to name. (up to 30 characters) Tip: Leave this field blank to default to the Payment To value. |
|
|
To delete a Purchase From vendor, click Delete. Keyboard shortcut: [ALT + d] |
|
Address Line 1 |
Enter the first line of address information, such as the street number and name. (up to 20 characters) Tip: Leave this field blank to default to the Payment To field. |
|
Address Line 2 |
Enter any additional address information. (up to 20 characters) Tip: Leave this field blank to default to the Payment To field. |
|
Address Line 3 |
Enter the city and two-letter state abbreviation. (up to 20 characters) Tips:
|
|
Zip Code |
Enter the postal code. (up to 10 characters) Tips:
|
|
Phone Number |
Enter the Purchase From vendor's telephone number. [(xxx)xxx-xxxx] Tips:
|
|
Search Code |
Enter a value if you want an alternative method for sorting this Purchase From vendor. (up to 20 characters) Tips:
|
Editing an Existing Vendor, click More.
 CAUTION: To
avoid losing data, you must save new or changed records.
1. To
display the record to be changed, enter the Vendor
Number and click Retrieve  , or press [ENTER].
Keyboard shortcut: [ALT
+ t]
Tip: If
you do not know the Vendor Number, you can click Search  to see a list of vendors.
2. To position the pointer to the information that you want to change, press [TAB] or click the field using the mouse.
3. Enter the data changes.
4. To
complete the edit process, click Save  , or press [ENTER].
Keyboard shortcut: [ALT
+ s]
Deleting an Existing Vendor, click More.
Tips:
-
Deleting the vendor will delete the vendor master record, the associated Purchase From vendor, and the associated Vendor 1099 Totals.
-
If you attempt to delete a vendor with open balances, a warning is displayed, where you must confirm if you want to proceed with the deletion.
1. To
display the record to be deleted, enter the Vendor
Number and click Retrieve  , or press [ENTER].
Keyboard shortcut: [ALT
+ t]
Tip: If
you do not know the Vendor Number, you can click Search  to see a list of vendors.
2. Click
File from the Menu
Bar, and next click Delete.
Keyboard shortcut: [ALT]
[f] [d]
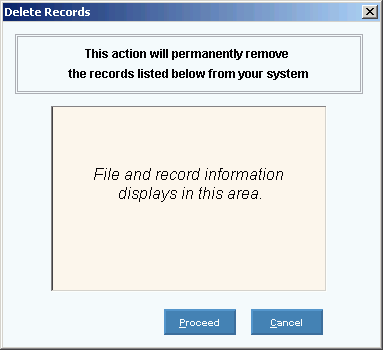
3. At the Delete Records prompt, click Proceed to delete the record, or click Cancel to escape from the delete routine.
Example:

Note: After
you click Proceed, you will see
the following message on the Status Bar.
Deleting an Existing Purchase From Vendor, click More.
1. To
display the Purchase From vendor to be deleted, enter the Vendor
Number and click Retrieve  , or press [ENTER].
Keyboard shortcut: [ALT
+ t]
Tip: If
you do not know the Vendor Number, you can click Search  to see a list of vendors.
2. Click
Delete  in
the Purchase From panel.
Keyboard shortcut: [ALT
+ d]
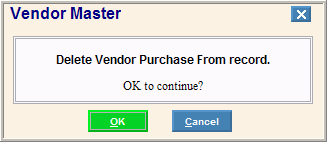
3. At the delete prompt, click OK to delete the record, or click Cancel to escape from the delete routine.
Example:

Note: After
you click OK, you will see the
following message on the Status Bar.

