Scheduling - Check In Status Window Change Status Area
Use the Check In Status Window Change Status Area in Scheduling to change the status of an appointment. For example, to check in a patient, select the appointment in the list and then enter the Check In time, which automatically updates the status. The table following the window example describes the Change Status Area for the Check In Status Window.
Directions:
To display the Change Status Area in the Check In Status Window:
Click the following sequence: View Menu from the Menu Bar; Check In Status.
Or, use the keyboard shortcut: [ALT] [v] [c]
Notes:
To limit which appointments appear in the Appointment List, change the settings in the Parameters Area.
To select an appointment when you want to change its status, click the appointment line so it is highlighted.
To change the status, enter the time for the appropriate status.
You do not have to open Scheduling to display the Check In Status Window.
When you check in a patient for their appointment, the appointment is highlighted in green to alert you.
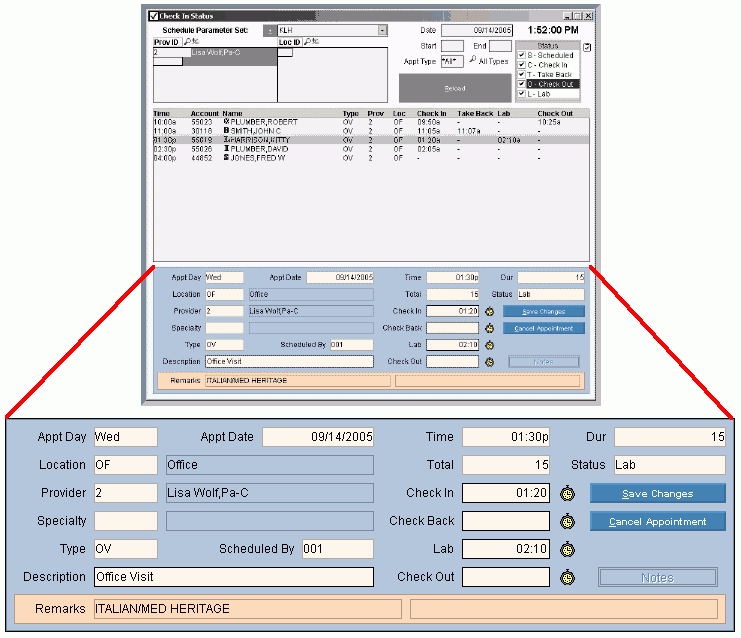
Scheduling - Appointment Status Window Change Status Area Example:
|
Scheduling - Appointment Status Window Change Status Area Prompts Tip: To see more information about a field, click the hyperlink for the field name. |
|
|
Appointment Detail |
For the highlighted appointment the values for the following fields display:
|
|
Remarks |
Displays the Patient Remarks. |
|
Status Time To change the patient's appointment status, enter the time in one of the status time fields. Note: To update the Appointment Status, you must click Save Changes. Tip: To quickly enter the current time, Click the Clock |
|
|
Enter the time the patient checked in. (hh:mm military time)
Note: After you check in the patient, the appointment is highlighted in green. |
|
|
Enter the time the patient has been seen by a provider assistant, and is now waiting for the provider. (hh:mm military time) Also called: Take Back |
|
|
Enter the time the patient went to the lab. (hh:mm military time) |
|
|
Enter the time the patient checked out. (hh:mm military time) |
|
|
|
To update the new or changed information, click Save Changes or press [ENTER]. Keyboard shortcut: [ALT + s] |
|
To avoid losing data, you must save changed records. |
|
|
|
To cancel the highlighted appointment if the patient is a "no show", click Cancel Appointment. Keyboard shortcut: [ALT + c] Note: For directions, see the Appointment Cancel Window. |
|
|
To display the Appointment Notes Area, click Notes. Tips:
|
![]()