Scheduling - Floating Appointment Detail Window Example (Reserved by Scheduled Appointment):
|
Scheduling - Floating Appointment Detail Window Prompts
Tip: To see more information about a field, click the hyperlink for the field name.
|
|
Column Header
|
To identify the column currently highlighted, these fields display:
|
|
Appointment Times Magnified List
|
To view detail for a specific time slot, click a time slot in the magnified list.
Notes:
-
The list of time slots displayed is based on the time slot currently highlighted in the schedule.
-
The highlighted time slot in the schedule displays in black.
-
To see earlier or later time slots, scroll up or down.
|
|
Unreserved Appointment Detail Window
Note: The fields below pertain to unreserved (unscheduled) appointment detail. To display the appointment detail click to highlight an appointment displayed in the time slot list either in the Floating Detail Appointment List or in the Appointment Book Area.
|
|
Unreserved Appointment Time Details
|
The following unscheduled appointment detail displays:
|
|

|
To schedule an appointment in the highlighted time slot, click Schedule New.
Tip: For directions to schedule an appointment, see the Scheduling - Appointment Scheduler Window.
|
|
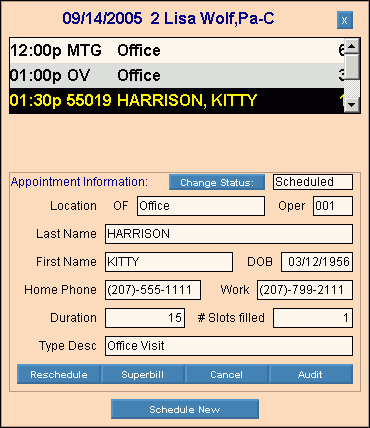
Reserved Appointment Detail Window
Note: The fields below pertain to reserved (scheduled) appointment detail. To display the appointment detail click to highlight an appointment displayed in the time slot list either in the Floating Detail Appointment List or in the Appointment Book Area.
|
|
Reserved Time Slot Detail
|
The following information displays for the highlighted appointment:
|
|

|
To change the of the appointment, click Change Status.
Status Choices:
-
Scheduled
-
Checked In
-
Take Back
-
Checked Out
Note: Status changes take affect immediately.
Tip: To change the status to Lab, use the Scheduling - Check In Status Window.
|
|

|
To reschedule the appointment, click Reschedule.
Tip: For directions to reschedule the appointment, see the Scheduling - Reschedule Appointment Window.
|
|

|
To print a (also called an encounter form) for the appointment, click Superbill.
Tip: For directions to print the superbill, see the Print Appointment Forms Instructions.
|
|

|
To cancel the highlighted appointment, click Cancel.
Tip: For directions to cancel the appointment, see the Scheduling - Appointment Cancel Window.
|
|

|
To view the Scheduling - Appointment Audit Trail of the reschedules for a specific appointment, click Audit.
Tip: To close the Audit Trail Inquiry window, click  . .
|
|
|
To schedule an appointment in the highlighted time slot, click Schedule New.
Tip: For directions to schedule an appointment, see the Scheduling - Appointment Scheduler Window.
|
|

|
To close the Floating Appointment Detail Window, click Close , or click Floating Detail  on the Scheduling Toolbar. on the Scheduling Toolbar.
|