Open Preferences.
Click the User Scheduling Preferences ![]() tab.
tab.
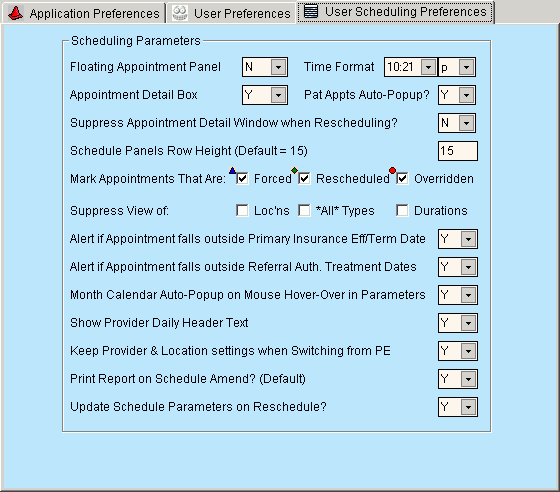
Preferences - User Scheduling Preferences Area
Use the User Scheduling Preferences Area to set parameters for Scheduling such as the Appointment Book appearance the action of the Floating Appointment Detail Window. The table following the window example describes the User Scheduling Preferences Area for Preferences.
Tip: For more information about working with data in fields, see Data Entry Guidelines.
Directions:
To display the User Scheduling Preferences Area:
Open Preferences.
Click the User Scheduling Preferences ![]() tab.
tab.
Preferences - User Scheduling Preferences Area Example:

|
Preferences - User Scheduling Preferences Area Prompts |
|
|
Floating Appointment Panel |
The Floating Appointment Detail Window (sometimes called a panel) helps you pinpoint where your cursor is located within the Scheduling Appointment Book Area. To specify if you want to automatically display the Floating Appointment Detail Window, select one of the following options in the drop-down list:
|
|
Time Format |
Specify if you want the appointment time displayed as 24 hour military time or with a.m. and p.m. Note: You must always enter time as 24 hour military time, regardless of how it is displayed. For example, enter 01:00 p.m. as 13:00. Entry Options:
|
|
Appointment Detail Box |
Specify whether to automatically display the Detail Panel in the Appointment Book when you open Scheduling. The Detail Panel can contain either the Provider Area, Appointment Detail Area, Recalls List Area, or Reschedule Appointments List Area. Entry Options:
|
|
Pat Appts Auto-Popup |
To specify if you want to automatically display the Patient Appointments Window, select one of the following options in the drop-down list:
|
|
Suppress Appointment Detail Window when Rescheduling |
To specify if you want to automatically display the Reschedule Appointment Window when you drag an appointment to a different Time Slot in the Appointment Book Area, click one of the following options in the drop-down list:
|
|
Schedule Panels Row Height |
To change the font size in the Scheduling Window display, enter a font size. (10 - 25) Tips:
|
|
Mark Appointments that are Forced |
Specify if you want the Forced Appointment Entry Options: |
|
Mark Appointments that are Rescheduled |
Specify if you want the Override Appointment Entry Options:
|
|
Mark Appointments that are Overridden |
Specify if you want the Reschedule Appointment Entry Options:
Tip: For more information, see the Reschedule Appointment Window. |
|
Suppress View of Loc'ns |
Specify if you want to display Location Names in the Appointment Book Time Slots. Entry Options:
|
|
Suppress View of *All* Types |
Specify if you want to display *ALL* in the Appointment Book Time Slots when all Appointment Types are allowed. Entry Options:
|
|
Suppress View of Durations |
Specify if you want to display the Time Slot Duration in the Appointment Book. Entry Options:
|
|
Alert if Appointment falls outside of primary Insurance Eff/Term Date |
Specify if you want to see a warning when scheduling a patient appointment on a date that falls outside the range defined by the primary insurance's effective and termination dates. Entry Options:
|
|
Alert if Appointment falls outside of Referral Auth Treatment Dates |
Specify if you want to see a warning when scheduling a patient appointment for a date that falls outside the range defined by the referral authorization's Treatment Start Date and Treatment End Date. Entry Options:
|
|
Month Calendar Auto Popup on Hover on Mouse Hover-Over in Parameters |
Specify if you want the Scheduling - Calendar Pop-Up to display when you hover over the days of the week bar in the Scheduling Parameters Panel. Entry Options:
|
|
Show Provider Daily Header Text |
Specify if you want the provider's column header in the Appointment Book to display a line with the icon for the Provider Status and a note, if applicable. Entry Options:
|
|
Keep Provider and Location Settings When Switching from PE |
Specify if you want to reload the default provider and location parameters when switching between INSight components, such as from Scheduling to Patient Entry and back to Scheduling again. Entry Options:
|
|
Print Report on Schedule Amend? |
Set the default value for the Print Amend Report option at the Scheduling - Amend Layout Appointment Type and Location window. Entry Options:
Tip: You can override the default value. |
|
Update Schedule Parameters on Reschedule? |
Specify if you want to update the parameters in the Scheduling Parameters Panel according to the Reschedule. Entry Options:
|
|
|
To save the parameters and close the Preferences window, click OK or press [ENTER]. Keyboard shortcut: [ALT + o] |
|
To avoid losing data, you must save the changed parameters by clicking OK or Apply. |
|
|
|
To cancel the changes to the parameters, click Cancel. Keyboard shortcut: [ALT + c] |
|
|
To update the parameters and leave the Preferences window open, click Apply. Keyboard shortcut: [ALT + a] |