Opening Employee Fringe Maintenance, click More.
-
Click Payroll from the Menu Bar, and next click Employee File Maintenance; then click Employee Fringes.
-
Or, use the keyboard shortcut: [ALT] [p] [e] [f].
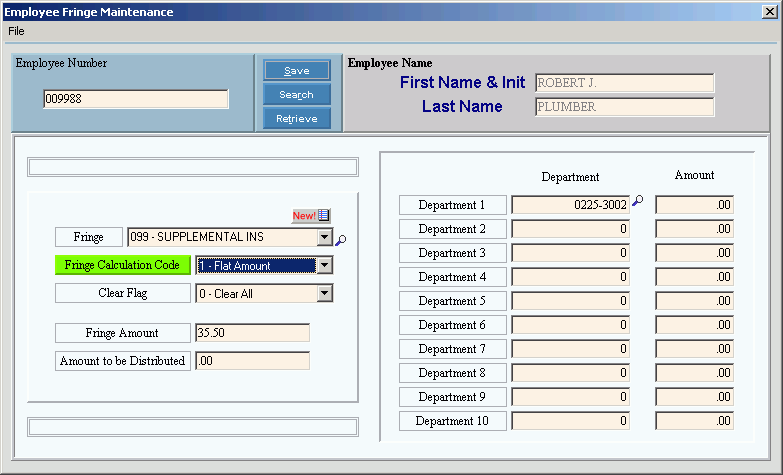
Employee Fringe Maintenance Window Example:

Assigning a new Employee Fringe, click More.
To assign a new fringe to an employee, which adds it to the drop-down list of Fringe Numbers for the employee, follow these directions:
-
Enter an existing Employee Number and click Retrieve
 , or press [ENTER].
Keyboard shortcut: [ALT + t] -
Assign the new Fringe Number using one of the following methods:
-
Enter the existing Fringe Number and press [ENTER].
Tip: If you do not know the Fringe Number, click Search to see a list of existing Fringes.
Keyboard shortcut: [CTRL + f] -
Or, click File from the Menu Bar, and next click New. Then enter the existing Fringe Number and tab to the next field.
Keyboard shortcut: [ALT] [f] [n]
Note: All assigned Fringe Numbers must already exist. To create a new Fringe Number, use Fringe Master Maintenance.
Tip: To indicate that you are assigning a new Fringe to the employee, New ![]() displays near the Fringe Number. Default entries display and the first field is highlighted to let you know you can begin entering information.
displays near the Fringe Number. Default entries display and the first field is highlighted to let you know you can begin entering information.
|
Employee Fringe Maintenance Prompts Tip: To see more information about a field, click the hyperlink for the field name. |
|
|
Enter an existing Employee Number. (up to 7 digits) Required |
|
|
|
To update the new or changed information, click Save, or press [ENTER]. Keyboard shortcut: [ALT + s] |
|
To avoid losing data, you must save new or changed Fringes. |
|
|
|
To view all of the existing employees, click Search. From the Search list you can select an employee to change. Keyboard shortcut: [ALT + r] |
|
|
To display an existing Employee, enter the Employee Number and click Retrieve, or press [ENTER] if the button is in focus. Keyboard shortcut: [ALT + t] |
|
Displays the employee's first name and middle initial. (up to 15 characters) |
|
|
Displays the employee's last name. (up to 15 characters) |
|
|
To assign a new fringe benefit to the employee, enter the Fringe Number and press [TAB]. (3.0 numeric) To edit the information for a fringe already assigned to the employee, click the Fringe Number in the drop-down list. Tips:
|
|
|
Click the Fringe Calculation Code in the drop-down list. Options:
Tip: The code defaults from the Standard Fringe Calculation Code specified during Fringe Master Maintenance. You can override the value, here. |
|
|
To determine how the fringe is cleared during the Fringe Distribution Post, click one of the following options in the drop-down list:
|
|
|
Enter the dollar amount or the calculation factor for the fringe benefit. (5.2 numeric) Tips:
|
|
|
Enter the total dollar amount to be distributed among departments. (5.2 numeric) Tip: If Automatic Fringe Distribution is active leave this field blank, and the Payroll Post will update the value. |
|
|
Fringe Distribution: In the manual distribution mode, use the following fields to distribute the Fringe Amount to as many as ten different departments. In the automatic distribution mode, leave these fields blank because the Payroll Post updates the values. |
|
|
Enter the Department Number for the distributed fringe amount. (up to 20 characters) Important: If there are any invalid departments listed (99999999), you will not be able to run the Fringe Distribution Post. Tips:
|
|
|
Enter the portion of the Fringe Amount (in dollars and cents) to be distributed to this department. (5.2 numeric) |
|
Editing an existing Employee Fringe, click More.
![]() CAUTION: To avoid losing data, you must save new or changed fringes.
CAUTION: To avoid losing data, you must save new or changed fringes.
-
To display the employee to be changed, enter the Employee Number and click Retrieve
 , or press [ENTER].
Keyboard shortcut: [ALT + t]
Tip: If you do not know the Employee Number, you can click Search to see a list of employees.
-
Click the Fringe Number in the drop-down list.
-
To position the pointer to the information that you want to change, press [TAB] or click the field using the mouse.
-
Enter the data changes.
-
To complete the edit process, click Save
 , or press [ENTER].
Keyboard shortcut: [ALT + s]
Removing an assigned Fringe from an employee, click More.
-
To display the employee with the fringe to be deleted, enter the Employee Number and click Retrieve
 , or press [ENTER].
Keyboard shortcut: [ALT + t]
Tip: If you do not know the Employee Number, you can click Search to see a list of employees.
-
Click the Fringe Number to be deleted in the drop-down list.
-
Click File from the Menu Bar, and next click Delete.
Keyboard shortcut: [ALT] [f] [d] -
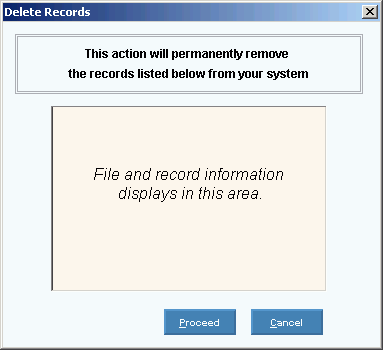
At the Delete Records prompt, click Proceed to delete the record, or click Cancel to escape from the delete routine.
Example:

Note: After you click Proceed, you will see the following message on the Status Bar.
