Electronic Billing Procedure
Below is information outlining the steps for electronically sending billing claims to the insurance carrier using the INSight communications programs, which are found on the Billing Functions Menu.
Notes:
The electronic billing steps can be performed before or after HCFAs and statements are run.
Please keep in mind that the examples may refer to WEB MD or MaineCare, but it's a similar process for ALL CARRIERS whether it's WEB MD, Railroad Medicare, or MaineCare. For special details for a specific insurance carrier, please refer to your training notes.
You may find it handy to launch the Communications Menu Panel to quickly and easily select the electronic billing routines.
Here is an overview of the electronic billing steps.
1. WORKFILE - do not build a special workfile. Use the same billing workfile used for your paper claims.
2. Run the SETUP - creates an electronic billing setup file by looking at the current billing workfile and pulling in claims that qualify to go electronically.
3. Print the JOURNAL - prints all claims that are in current setup file.
4. Run the TRANSFER - transfers the claims information in the Setup file to an ANSI 837 format file.
5. Run the SEND - zips and moves the electronic billing file to the location where it can be sent electronically.
6. Upload Claims to Carrier - Use Filezilla or go to the carrier's portal to transmit the electronic billing file to the carrier.
7. Download Receive Reports from the Carrier - Use Filezilla or go to the carrier's portal to download the receive reports from the insurance carrier.
7. Run the RECEIVE LOG - Moves the Receive Logs from the download location to INSight. These reports show what the carrier acknowledges receiving during the electronic billing transmission session and whether the claims in the file were accepted or rejected. If the claims were rejected a reason is given. All rejected claims must be repaired and then re-submitted.
8. View
the REVIEW Log - provides an audit trail that allows you to look
at processing information for each step of the e-billing session. Here
you can print the receive reports that you picked up during the download
receive reports step and reconcile them with the e-billing journal.
Notes:
During this step review and print all reports and verify that the e-billing file was accepted. You will also reconcile the e-billing journal with the receive reports for a complete audit trail.
NDS recommends maintaining a printed copy of the reports for a complete audit trail and as proof of timely filing.
The first step in electronic billing is to use the same workfile that was built for your paper claims. You do not build a special workfile.
The Setup looks at the information in the current Billing workfile and creates an electronic billing file containing the claims that qualify to be processed electronically for the selected insurance carrier.
a. To select the Setup click the following sequence:
1. Click Communications from the Billing Functions menu.
2. Click Menu Panel.
3. Select the carrier to whom you will be sending.
4. Click Setup.
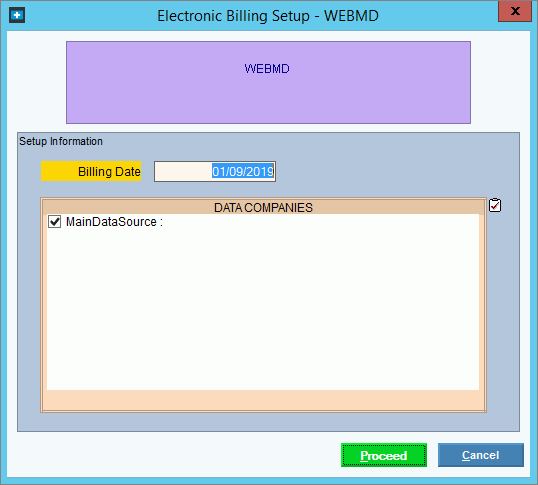
b. This is an example of the Setup window:
c. Verify and enter the following information:
Carrier Code Displays the selected insurance carrier name.
Billing Date defaults to the system date. Accept, or edit to be the date that matches the Workfile Build Date.
Data Companies refers to which volumes you wish to run the Setup for. Most practices will only have one company to process (COMP1VOL, e.g.). If you have more than one company to process, INSight will prompt through all companies you have set to go electronically. Click to select the companies you want to process at this time.
When entries are complete, press [ENTER] or click Proceed.
d. The following screen displays:
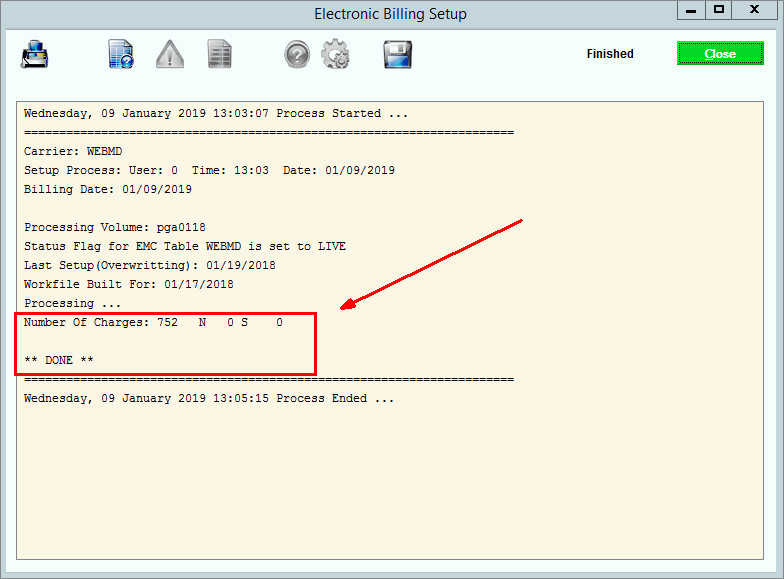
Note: Some information to note at this window before you continue:
Make sure the Billing Date is the date you used in the Setup screen.
Make sure you are set to LIVE or TEST – depending on your current situation.
Make sure your WorkFile Built for Date is correct.
When the Setup is complete, you'll get a message reflecting the number of charges processed. Make sure you have a number of claims processed.
Make sure Done displays!
![]() Important: If the
message NOTICE Setup Incomplete
displays in the Process window, stop and carefully review all messages
that display. You will need to correct all errors in order for
the claims to be processed electronically. Do not continue to
the next step until you have resolved the errors. For a complete
list of errors and resolutions, see Electronic
Billing Setup Common Error Messages. To see some of the
more common errors with the steps for correcting, click More
and see Troubleshooting.
Important: If the
message NOTICE Setup Incomplete
displays in the Process window, stop and carefully review all messages
that display. You will need to correct all errors in order for
the claims to be processed electronically. Do not continue to
the next step until you have resolved the errors. For a complete
list of errors and resolutions, see Electronic
Billing Setup Common Error Messages. To see some of the
more common errors with the steps for correcting, click More
and see Troubleshooting.
DO NOT CONTINUE until the problem is resolved.
If all items above are present and valid, go onto next step.
The journal prints all claims that are in current setup file for the specified insurance carrier.
Note: If the Setup did not finish, the journal prints all claims up until the claim that caused the setup to fail. If Setup did not begin, claims from the previous setup file will print.
a. To select the Print Journal, click the following sequence:
1. Click Communications from the Billing Functions menu.
2. Click Menu Panel.
3. Select the carrier.
4. Click Print Journal.
b. This is an example of the Print Journal window:
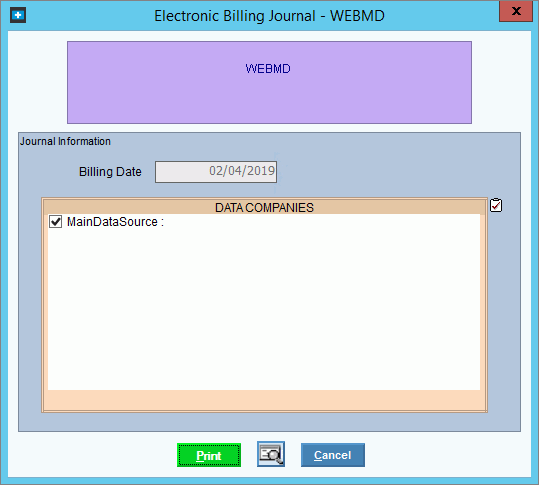
c. Verify or enter the following information:
Carrier Code Displays the selected insurance carrier name.
Billing Date Displays today's date as the date the journal is printed.
Data Companies Click to select the companies you want to process at this time.
When your entries are complete, click Print or press [ENTER].
Important:
Review
the journal and make sure the journal totals print. If the totals
are included, continue to the next step. For a report sample,
see Electronic
Billing Print Journal Sample.
If the Grand Totals line is not present, refer to the Troubleshooting
section.
Maintain a copy of the journal for a complete audit trail.
The Transfer routine transfers the claims information in the carrier's electronic billing Setup file to an ANSI 837 format file that is required for tranmission.
a. To select Transfer, click the following sequence:
1. Click Communications from the Billing Functions menu.
2. Click Menu Panel.
3. Select the carrier to whom you will be sending.
4. Click Transfer.
b. This is an example of the Transfer window:
![]()
c. Verify and enter the following information:
Transfer Claims Displays the selected insurance carrier name.
Data Companies Click to select the companies you want to process at this time.
When your entries are complete, click Proceed or press [ENTER].
d. The following screen displays:
![]()
Note: Some things to note during the Transfer window:
To confirm that the process completed, verify the carrier name, the processing date and processing volume that display in the Processing Status window. In addition, make sure that *** Done *** displays.
If the message Volume Skipped displays, stop and carefully review the messages as it often means that the transfer has already been completed. Most likely, you will need to reset the EMC Table Maintenance Status field (edit from 2 to 1) and then re-run the transfer.
If all items above are valid, continue to the next step.
The Send routine compresses and zips the e-billing file into the required format and then moves the zipped e-billing file to the location where it can be transmitted to the insurance carrier.
Important: When this step
is complete, your file will be saved to: c:\blast\webmd.dat
or xxxxxxxx (for MaineCare
x represents the practice's group NPI number).
This is the file that you will upload to insurance carrier. It's
important to note that this file is overwritten each time the Send is
run.
a. To select the Send, click the following sequence:
1. Click Communications from the Billing Functions menu.
2. Click Menu Panel.
3. Select the carrier to whom you will be sending.
4. Click Send.
b. This is an example of the Send window:

c. Verify the following information:
Carrier Name Displays the selected insurance carrier name.
Data Companies Click to select the companies you want to process at this time.
Click Proceed or press [ENTER].
d. When complete the Processing Status window displays:
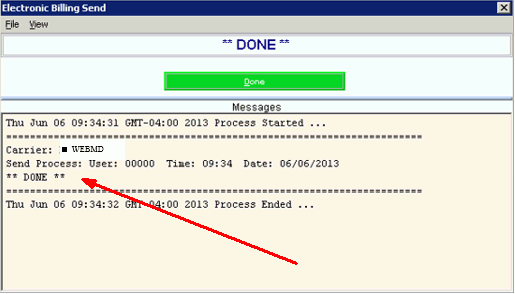
Note: When the Send is complete, click Done.
Note: Upload instructions vary for each carrier. Please find the appropriate instructions on MyNDS, NDS' customer portal.
Note: Download instructions vary for each carrier. Please find the appropriate instructions on MyNDS, NDS' customer portal.
The Receive Log routine moves the electronic billing transmission logs also called Receive logs from the download location to INSight. The Receive Logs are confirmation files that show what the carrier acknowledges receiving during the e-billing transmission. The Receive Logs provide an audit trail that you sent the electronic billing file to the carrier. When the Receive Log routine is completed, you will use the Review Log routine to actually view the contents of the receive logs.
Notes:
Each insurance carrier's receive logs have a slightly different format, but in general each carrier provides the following information:
Acknowledgement Report or 997 Report - Reports whether the insurance carrier's electronic billing file as a whole is accepted or rejected. The Acknowledgement Report interprets the 997 Report in a simple, easy to read format and tells whether the file has been accepted or rejected as a whole.
Receive Log or Error Summary Report - Reports each claim in the electronic billing file and whether the claim is accepted or rejected and the reason why it was rejected.
Little p Report - Reports information pertaining to your Medicare session and reports the number of claims they received. This report only pertains to Medicare.
a. To select the Receive Log, click the following sequence:
1. Click Communications from the Billing Functions menu.
2. Click Menu Panel.
3. Select the carrier to whom you will be sending.
4. Click Receive Logs.
b. This is an example of the Receive Logs
window:
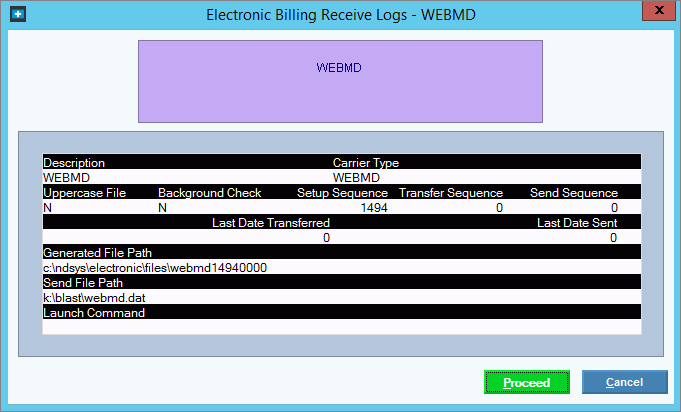
c. To begin, simply press [Enter] or click Proceed.
The next step in the electronic billing process is to view the Review Log. The Review Log routine is an audit tool that allows you to look at processing information for each step of the e-billing session. Here you can view the Receive Logs from the insurance carrier, which are confirmation files showing what the carrier acknowledges receiving during the electronic billing transmission session.
In addition, the Review Logs allow you to look back in the e-billing history and find the answers to your questions.
Important: It's important to review both the Receive Logs from the insurance carrier and the e-billing journal and maintain them as part of the audit trail for the electronic billing session with the carrier.
a. To select the Review Log, click the following sequence:
1. Click Communications from the Billing Functions menu.
2. Click Menu Panel.
3. Select the carrier to whom you will be sending.
4. Click Review Logs.
b. This is an example of the Review Logs
window:
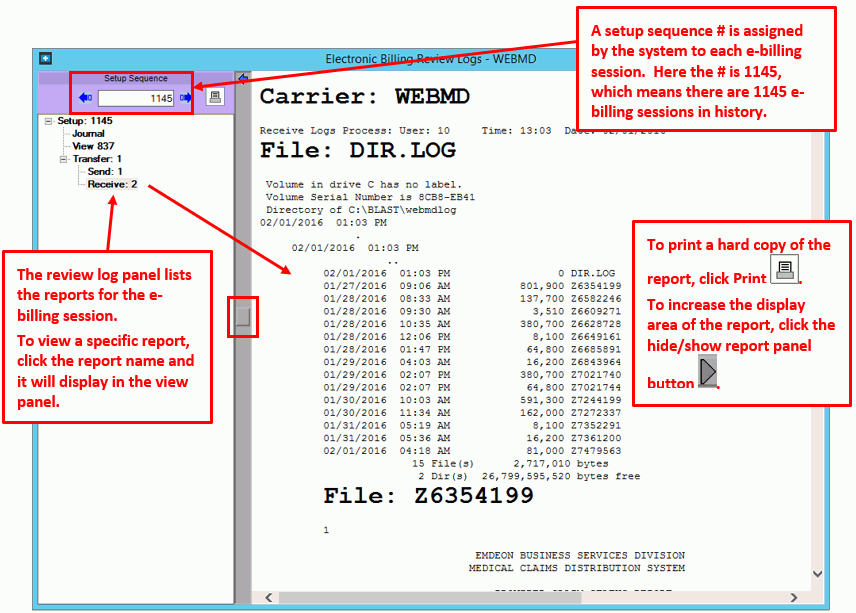
c. Follow these steps to view the reports:
Setup Sequence Displays the most recent Setup Sequence. Click Forward or Backward to display another Sequence.
Setup Sequence Reports - To view a report in the View panel, click the appropriate report name in the list.
To print a copy, click print.
d. To reconcile the e-billing session:
1. Record the Transaction Set # that is at the top of the e-billing journal.
2. View the Receive Log for the same date and look for the ST Control #.
3. The e-billing journal Transaction Set # and the receive log St Control # must match. If there is a question of timely filing, you will need to provide the carrier these numbers and copies of the reports as proof.
4. The Receive Log summary amounts and the e-billing journal totals should also match as further proof that the e-billing session was processed properly. The dollar amount of each claim and the total dollar amount of all claims and the total number of claims must match.
If your e-billing journal and receive log totals do not match:
1. The first thing to check is your
Setup file, which you can view in the Review Log routine. If the
Setup does not tell you the number of claims, something is wrong. Most
likely there is something wrong with a particular account. This
screen will tell you the account number that needs adjusting and why.
Remember, this screen will always say *DONE
at the end whether there was an error or not.
Note: If the Setup report seems confusing or you are not sure
what needs to be done, print the Setup screen and fax it to NDS Support
at 207-781-3726 or email it to support@ndsys.com.
2. If the Setup screens looks OK, then
look at your Transfer file session information by viewing it during the
Review Log routine.
It should list a number of records retrieved (this number will not correspond
to any other number such as number of claims or number of accounts, it
is system driven), and will state Ready
to Send, if Transfer completed properly.
3. The most common error is:
***WARNING-THIS FILE
CONTAINS NO CLAIMS TO SEND-WARNING***
This is a very common error that can
occur during the Setup. It can mean that there are no claims to
send.
4. Another possible reason why claims are not being sent, depends on how your insurance Ids are set up in File Maintenance. All insurances must have a Payor ID, Claim Receiver type, and an EMC table ID assigned to them. In addition, they must be set to go electronically. Please refer to the HIPAA File Maintenance Runbook for instructions.
5. There are numerous reasons why your e-billing file did not go through electronically. There can be communication issues, PC issues, carrier issues, or system issues, etc. Often, NDS can decipher why claims were not sent by looking at your Review session. When in doubt, call NDS Support at 1-800-649-7754. Make sure you have your receive log and e-billing journal handy as you will need to refer to ttem.